KAJI - Developer Guide
By: Team CS2113T-F11-3 Since: August 2020
Table of Contents
-
Introduction
1.1. Overview
1.2. Purpose
1.3. Scope
-
Setting Up
2.1. Prerequisites
2.2. Setting Up the Project in your Computer
2.3. Verifying the Setup
-
Design (Architecture)
3.1. Ui Component
3.2. Logic Component
3.3. Model Component
3.4. Storage Component
3.5. Common Component
-
Implementation
4.1. Admin Features
4.1.1. Add Module Feature
4.1.2. List Modules Feature
4.1.3. Edit Module Name Feature
4.1.4. Remove Module Feature
4.1.5. Access Module Level Feature
4.2. Module Features
4.2.1. Add Chapter Feature
4.2.2. List Chapters Feature
4.2.3. Edit Chapter Name Feature
4.2.4. Remove Chapter Feature
4.2.5. Access Chapter Level Feature
4.2.6. Return to Admin Level Feature
4.3. Chapter Features
4.3.1. Add Flashcard Feature
4.3.2. List Flashcards Feature
4.3.3. Edit Flashcard Content Feature
4.3.4. Remove Flashcard Feature
4.3.5. Return to Module Level Feature
4.3.6. Check Overall Performance for a Chapter Feature
4.4. Revise with Scheduling Feature
4.4.1. Revise Feature
4.4.2. Scheduling The Chapters Feature
4.5. Viewing and Customising the Schedule Feature
4.5.1. View Due Chapters Feature
4.5.2. Preview Upcoming Dues Feature
4.5.3. Exclusion Feature
4.5.4. Reschedule Chapter Feature
4.5.5. View Revision History Feature
-
Appendices
5.1. Appendix A: Product Scope
5.1.1. Target User Profile
5.1.2. Value Proposition
5.2. Appendix B: User Stories
5.3. Appendix C: Use Cases
5.4. Appendix D: Non-Functional Requirements
5.5. Appendix E: Glossary
5.6. Appendix F: Instructions for Manual Testing
5.6.1. Launch and Shutdown
5.6.2. Showing a list of commands
5.6.3. Adding a module/chapter/flashcard
5.6.4. Listing modules/chapters/flashcards
5.6.5. Editing a module/chapter/flashcard
5.6.6. Removing a module/chapter/flashcard
5.6.7. Accessing the next level
5.6.8. Going back to the previous level
5.6.9. Rescheduling a chapter
5.6.10. Starting a revision session
5.6.11. Checking percentage of rating for the cards in a chapter
5.6.12. Listing all chapters that are due on current date
5.6.13. Previewing list of chapters due in a week
5.6.14. Viewing history of revision completed in a day
5.6.15. Excluding a module/chapter
5.6.16. Including a module/chapter
1. Introduction
1.1. Overview
KAJI is a schedule manager that implements Spaced Repetition for students, optimised for use via a Command Line Interface (CLI).
1.2. Purpose
This document describes the architecture and system design for the application, KAJI.
1.3. Scope
This documentation describes the software architecture and software design decisions for the implementation of KAJI. The intended audience of this document is the developers, designers, and software testers of Kaji.
Back to Top ^
2. Setting Up
2.1. Prerequisites
- JDK 11
- IntelliJ IDEA
2.2. Setting up the Project in your Computer
- Fork this repository, and clone the fork into your computer.
- Open IntelliJ (if you are not in the welcome screen, click
File→Close Projectto close the existing project dialog first). - Set up the correct JDK version for Gradle.
- Click
Configure→Project Defaults→Project Structure. - Click
New…and set it to the directory of the JDK.
- Click
- Click
Import Project(orOpen or Importin newer version of Intellij). - Locate the
build.gradlefile (not the root folder as you would do in a normal importing) and select it. ClickOK. If asked, choose toOpen as Project(notOpen as File). - Click
OKto accept the default settings.
2.3. Verifying the Setup
- In an IntelliJ terminal, run
gradlew build. - Navigate to the folder
build>libsby executingcd build/libs/and then run:java -jar kaji.jar.- To use KAJI, type a valid command into the terminal and press the enter key to run the command.
e.g. Typinghelpand pressing the enter key will show the list of commands available. - Some example commands you can try to get familiar with KAJI:
-
help: Lists the commands that KAJI supports. -
add CS2113T: Adds a module CS2113T. -
list: Shows a list of modules available. -
exit: Exits KAJI.
-
- To use KAJI, type a valid command into the terminal and press the enter key to run the command.
Back to Top ^
3. Design (Architecture)
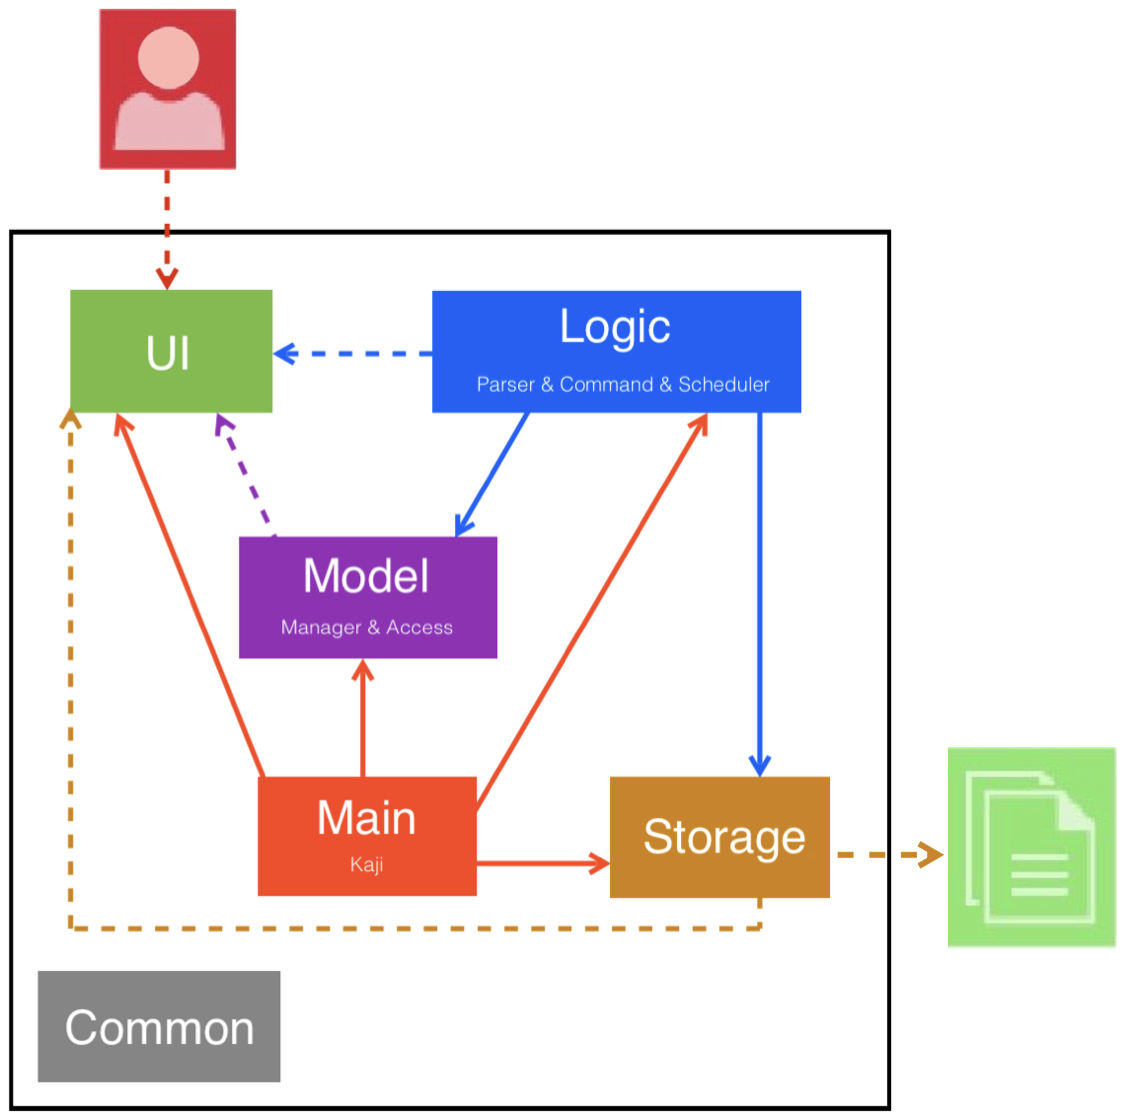
Figure 1. Architecture diagram of KAJI
The Architecture Diagram given above explains the high-level design of the App. Given below is a quick overview of each component.
The main class is Kaji.java. It is responsible for:
- Initializing the components in the correct sequence, and connects them up with each other at app launch.
- Shutting down the components and invoking cleanup methods where necessary at exit.
The rest of the App consists of 8 components:
-
UI: The UI of the App. -
Logic: The command executor. -
Model: Holds the data of the App in memory. -
Storage: Reads data from, and writes data to, the hard disk.
The sections below give more details of each component.
3.1. Ui Component
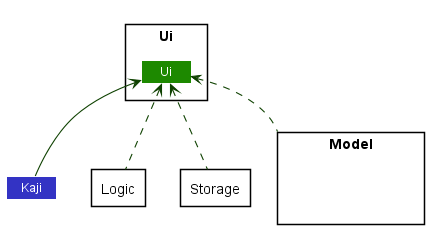
Figure 2. Class diagram of Ui component
The Ui component consists of a main class — Ui.java. While KAJI has Ui as its class variable so that it can instantiate a Ui object at each run of the program, the Model, Logic and Storage components have a dependency on the Ui component due to the need to take in user input and show the results of execution.
The Ui component is responsible for:
- Taking in user input.
- Printing result of execution for the different commands.
- Printing error messages when certain exceptions occur.
3.2. Logic Component
The Logic component consists of the Parser, Command and Scheduler classes as shown in the class diagram below:
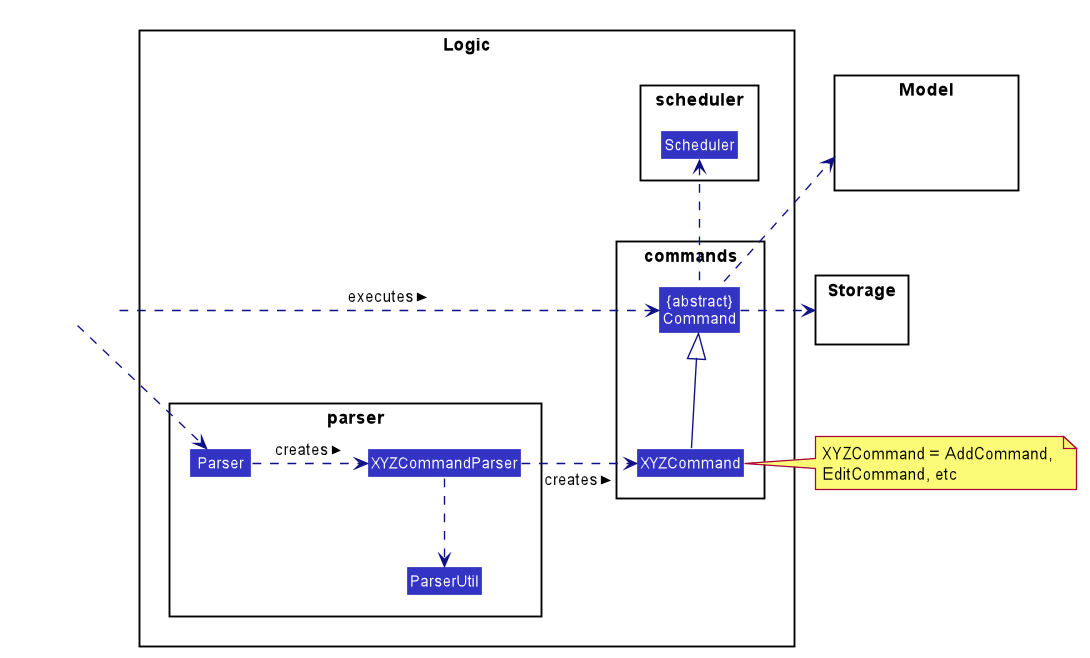
Figure 3. Class diagram of Logic component
-
KAJIuses theParserclass to parse the user command. - This results in a
Commandobject which is executed byKAJI. - The command execution can affect the
ModelandStorage(e.g. adding a module). - The
Scheduleris used in some command execution to schedule the due date of a chapter. - The result of the command execution is passed to the
Ui.
Given below is the Sequence Diagram for interactions within the Logic component for the parse("edit 1 CS2113T") API call:
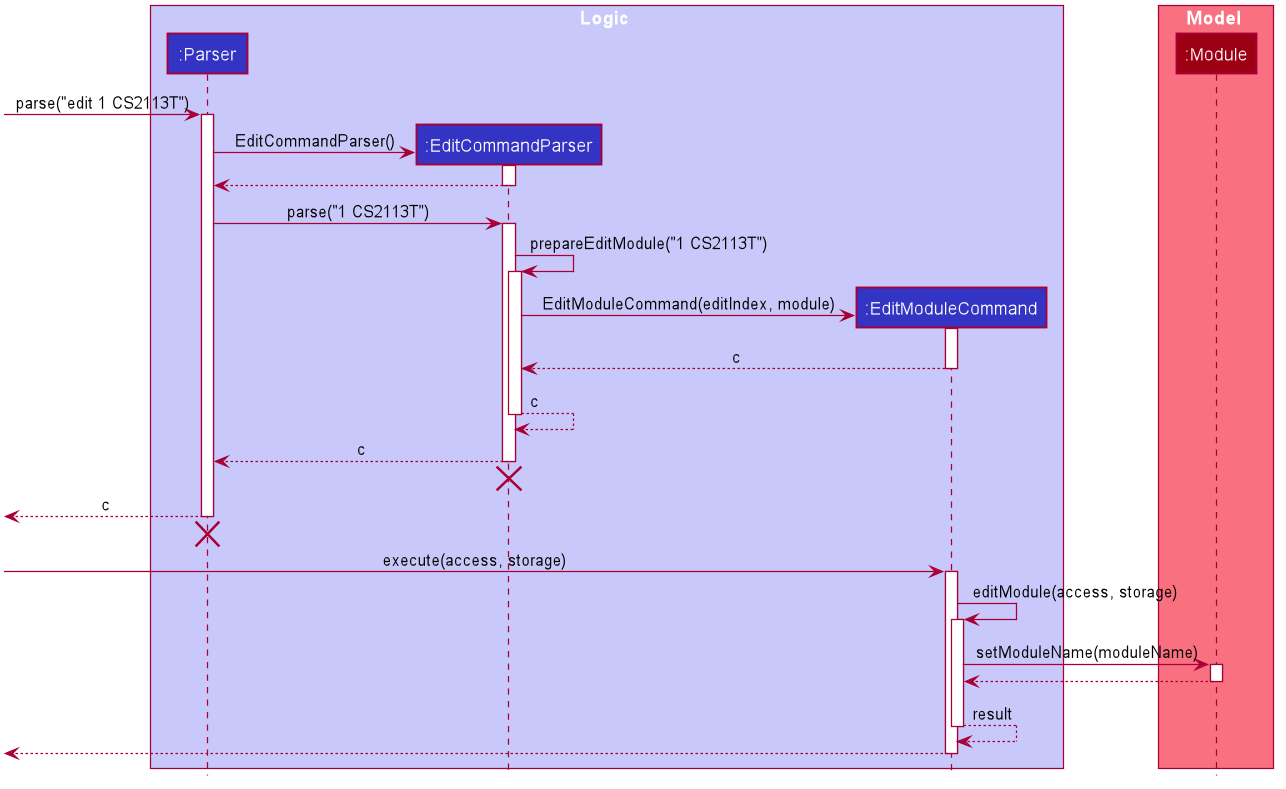
Figure 4. Sequence diagram of Logic component
Note: The lifeline for
ParserandEditCommandParsershould end at the destroy marker (X) but due to a limitation of PlantUML, the lifeline reaches the end of diagram.
3.3. Model Component
The Model component consists of the Access, History, DueChapter, ModuleList, ChapterList and CardList classes as shown in the class diagram below:
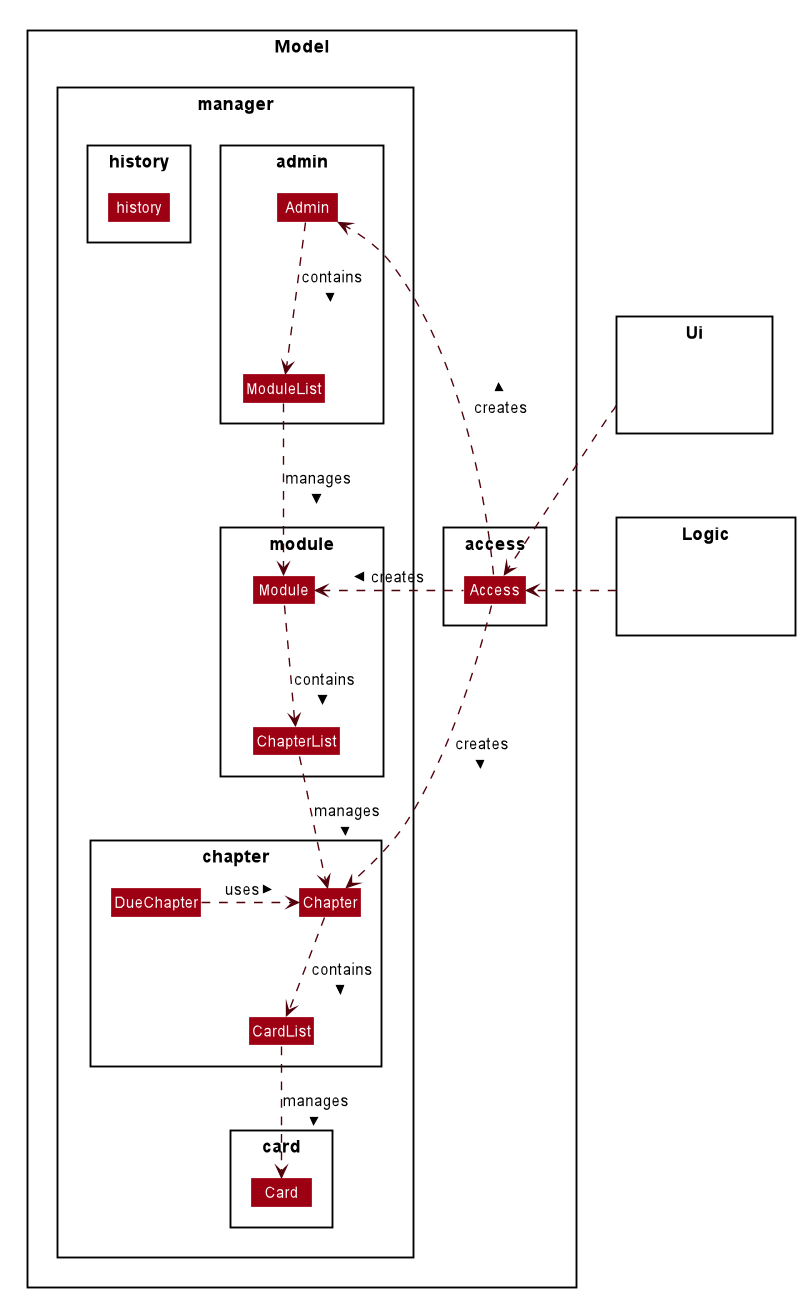
Figure 5. Class diagram of Model component
The Model component
- stores a
Accessobject that holds temporary data for user’s access level and contents of level being accessed. - stores a
Historyobject that saves revision history of a day. - stores a
DueChapterobject that manages due chapter data. - provides an
Adminclass that can be created and accessed byAccessobject. TheAdminclass contains aModuleListobject to manage data for modules. - provides a
Moduleclass that can be created and accessed byAccessobject. TheModuleclass contains aChapterListobject to manage data for chapters. - provides a
Chapterclass that can be created and accessed byAccessobject. TheChapterclass contains aCardListobject to manage data for cards. - provides a
Cardobject that can be created and accessed byCardList. ACardobject represents a flashcard with question, answer and mastery level of revision.
3.4. Storage Component
The Storage component consists of the Storage, StorageWrite, StorageParser and StorageLoad classes.
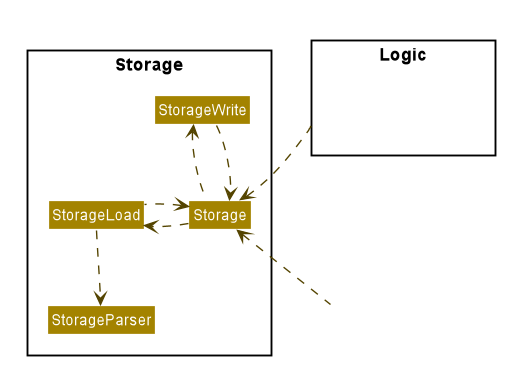
Figure 6. Class diagram of Storage component
The Storage component
- can save the User’s database of
Modules,Chapters andCards as directories, text files and text within the data directory respectively. - can parse the contents of the database stored in the data directory back into the software to load the User’s database back into KAJI as
Modules,Chapters andCards - can save the due dates for a
Chapterinto a text file within the dues directory located in theModuledirectory that contains it. - can parse the due dates into LocalDate objects from the dues directory so that KAJI can utilise them.
- can save the exclusions from the scheduling feature into a text file “exclusions.txt” within the “admin” directory.
- can parse the exclusions into an ArrayList
so that KAJI can determine which chapters are excluded.
3.5. Common Component
The Common component consists of KajiLog and Messages as shown in the class diagram below:
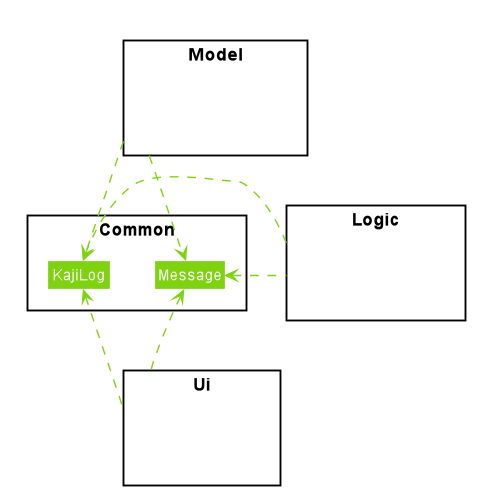
Figure 7. Class diagram of Common component
The Common component
- stores user visible messages.
- generates a log for KAJI.
Back to Top ^
4. Implementation
This section will describe the significant details of how the features in KAJI are being implemented.
4.1. Admin Features
This section will elaborate the available features to users at Admin Level.
At Admin Level, users are able to:
- Add module
- List modules
- Edit module name
- Delete module
- Access module
4.1.1. Add Module Feature
Implementation
The add modules feature allows the user to create new modules at Admin level.
AddModuleCommand facilitates the proposed add module feature. It extends AddCommand with an AddCommand#prepareResult() method. This method formates message about the result of the action to user in Ui.
Shown as the class diagram below, because of the inheritance of AddCommand, Command and AddModuleCommand, Kaji is able to execute the operation AddModuleCommand#excute().
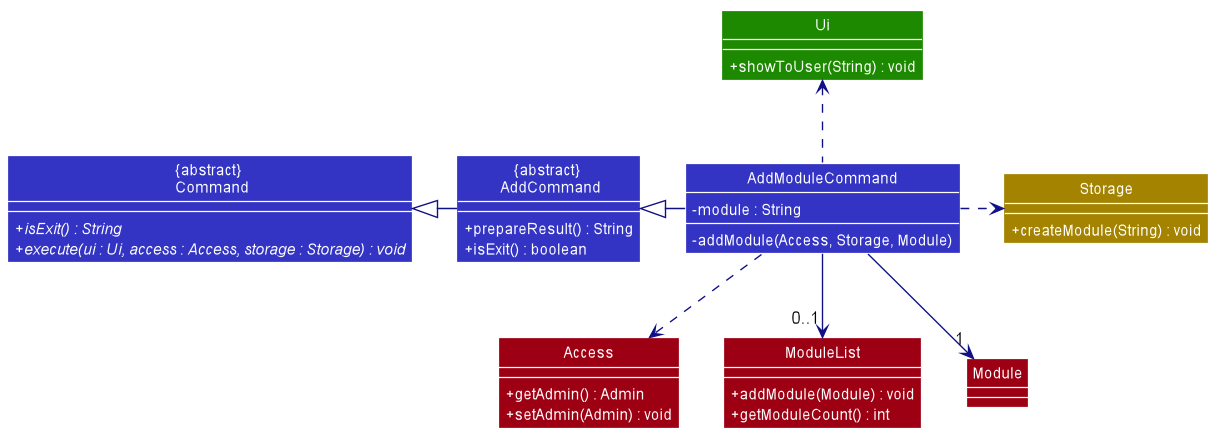
Figure 8. Class diagram of add module command
Given below is an example usage scenario at Admin level and how the add module feature behaves at each step:
-
Step 1: The user is currently at admin level and wants to add a new module CS2113 and enters
add CS2113command. -
Step 2: The
addcommand createsAddModuleCommandwhich will then be executed. -
Step 3: The
AddModuleCommandobject creates a newModuleobject with theModule#moduleNameof CS2113. -
Step 4: The new
CS2113 : Moduleobject will be passed into theAddModuleCommand#addModule()withAccessandStorage. -
Step 5: The
AddModuleCommand#addModule()gets the currentAdminobject viaAccess#getAdmin()method, then it adds the newCS2113: Moduleobject into theAdmin#ModuleList. -
Step 6: The new
Adminobject with theCS2113: Moduleobject is updated toAccessvia the methodAccess#setAdmin(Admin). -
Step 7: The new
Moduleis updated in the folder by executing theStorage#createModule(). A ‘CS2113’ folder is created under the ‘data/admin’ folder. -
Step 8: The
AddModuleCommand#addModule()method returns a result message to theAddModuleCommand#execute()method which usesUi#showToUser()to print the success message.
The following diagram shows how the add module command feature works:
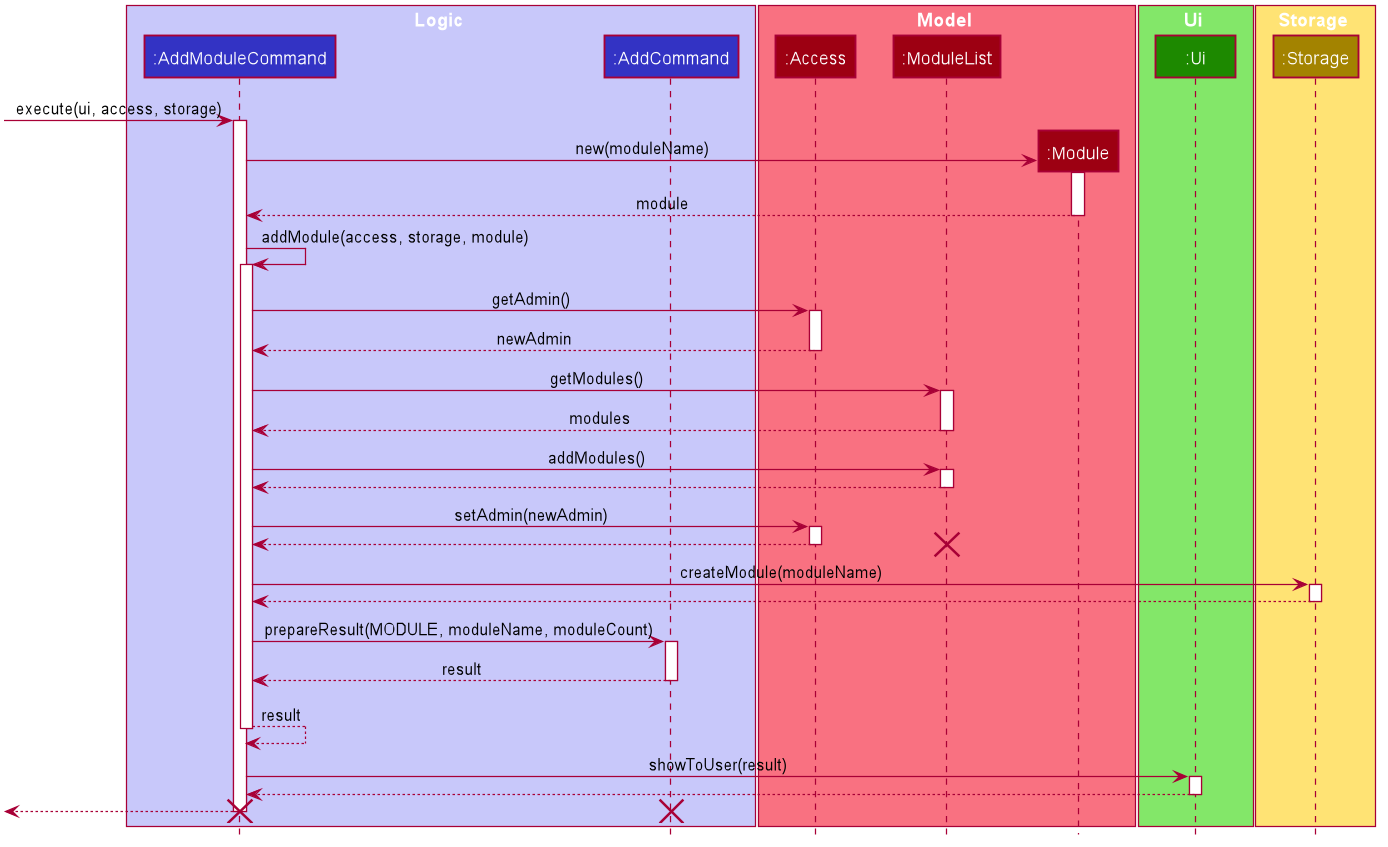
Figure 9. Sequence diagram of add module command
4.1.2. List Modules Feature
Implementation
The list modules feature allows the user to list all modules in admin level
The list modules mechanism is facilitated by ListModulesCommand. It extends from the abstract class ListCommand.
In addition, it implements the following operations:
-
ListModulesCommand#execute()— oversees entire execution for listing modules. -
ListModulesCommand#listModules()— gets and lists all modules in admin level.
The following diagram shows the class diagram of the list modules feature:
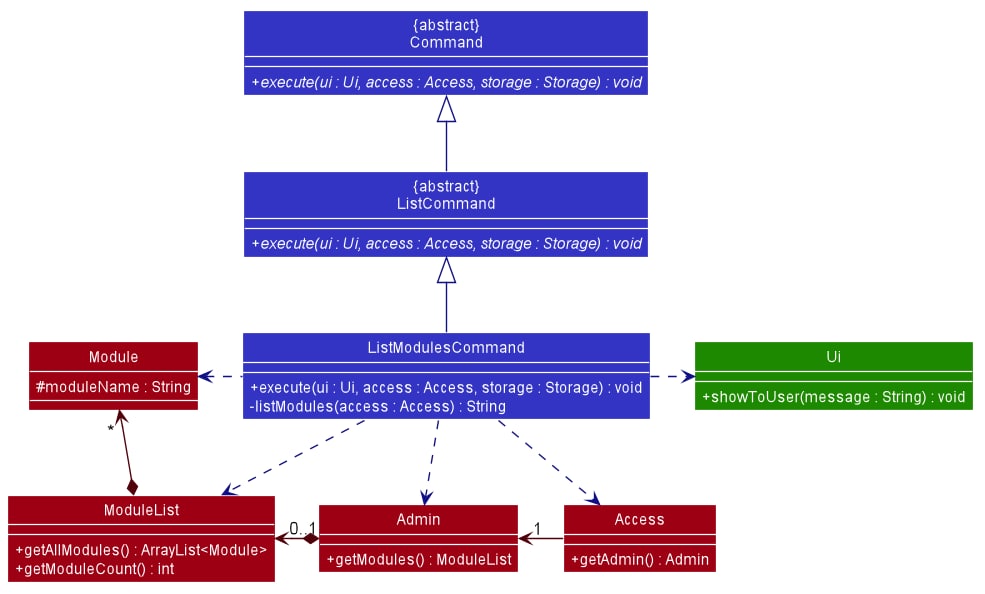
Figure 10. Class diagram of list modules feature
For instance, the user wants to list all modules available in admin, a detailed description of what happens is shown below:
-
Step 1: The user is currently in
adminlevel. -
Step 2: The user enters
listcommand to list all modules inadminlevel.
The following sequence diagram shows how the list modules feature works:
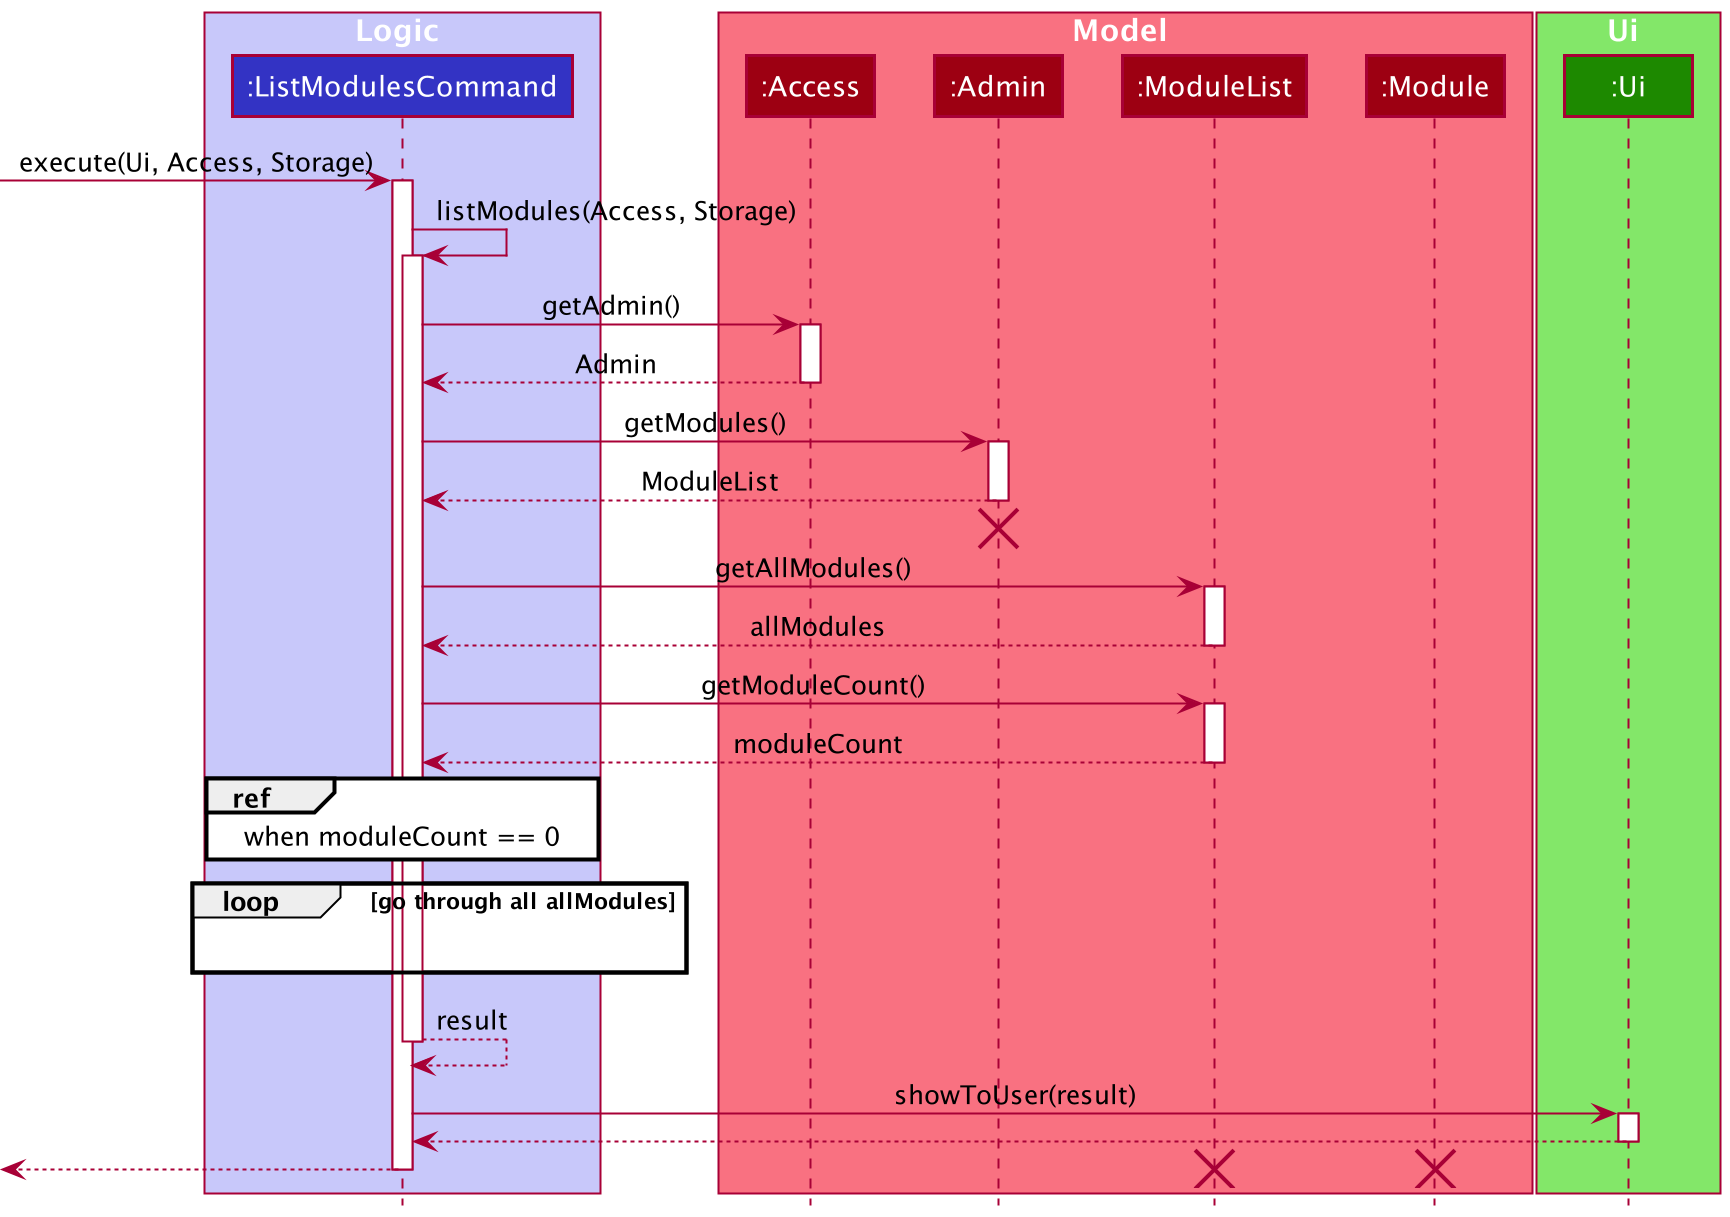
Figure 11. Sequence diagram of list modules
4.1.3. Edit Module Name Feature
Implementation
The edit module name feature allows the user to edit the name of any existing module.
The user can edit the name of an existing module with the edit command, which follows the following format: edit MODULE_INDEX MODULE_NAME.
The edit module name feature is facilitated by ModuleList and Module. The list of user’s modules are stored internally as ModuleList.
In addition, it implements the following operations:
-
ModuleList#getModule()- Gets a module based on the specified index from the list of modules. -
Module#setModuleName()— Sets the name of the module.
The following diagram shows the class diagram of the edit module name feature:
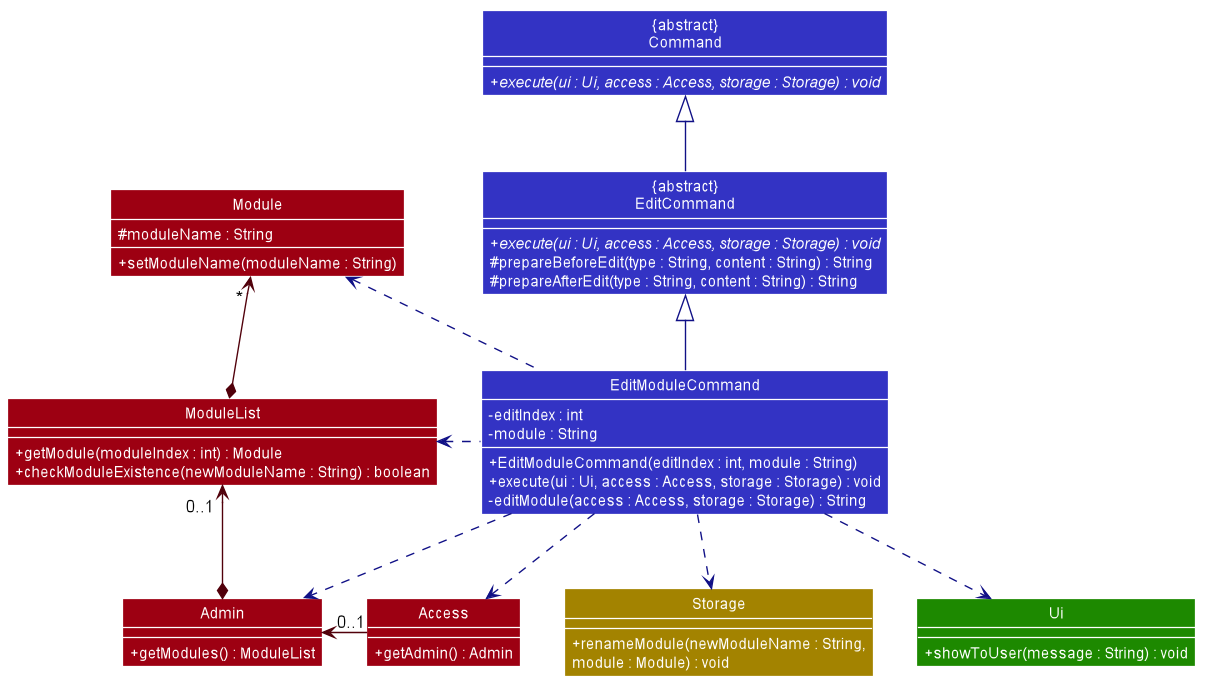
Figure 12. Class diagram of edit module name feature
For instance, the user wants to edit the module CS2113, a detailed description of what happens is shown below:
-
Step 1: The user is currently in
adminlevel. -
Step 2: The user enters
edit 1 CS2113Tcommand to edit the first module in the list of modules — which in this case isCS2113. -
Step 3: The user input is parsed by
Parser, which results in a newEditModuleCommandobject. -
Step 4:
EditModuleCommandis executed and calls the methodEditModuleCommand#editModule(). -
Step 5:
EditModuleCommand#editModule()gets the module based on the index provided by the methodModuleList#getModule(). -
Step 6: The module name is edited to
CS2113Tby the methodModule#setModuleName(). -
Step 7: The result message from
EditModuleCommand#editModule()is returned toEditModuleCommand#execute()and shown to the user by callingUi#showToUser().
The following sequence diagram shows how the edit module name feature works:
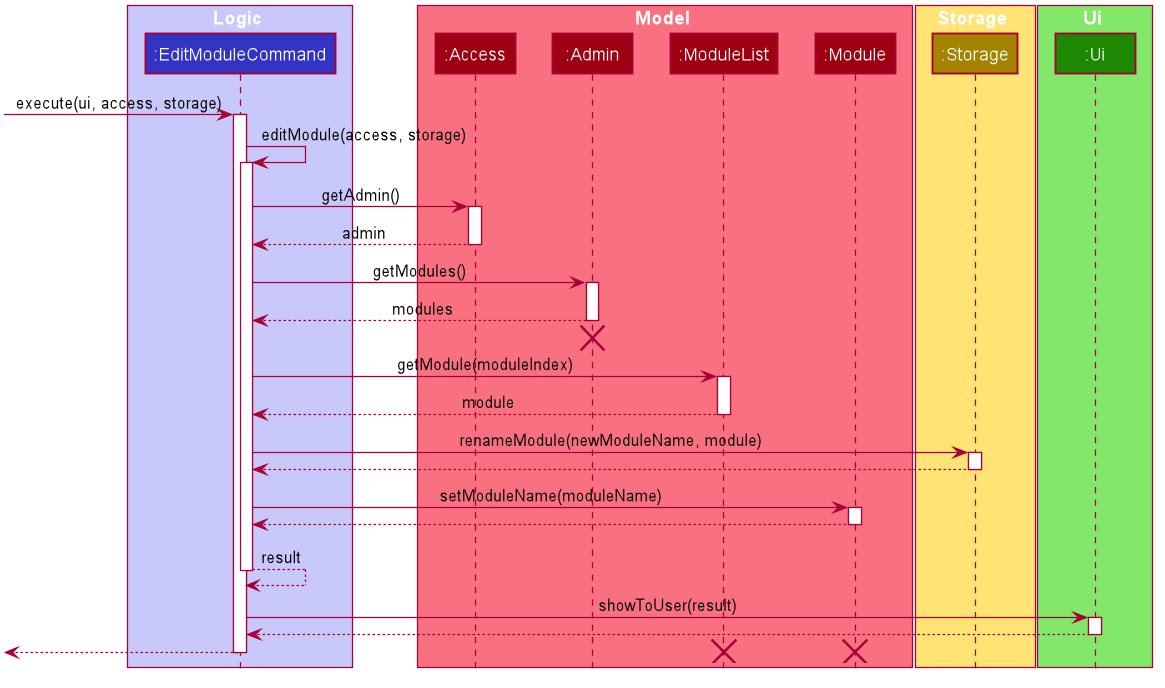
Figure 13. Sequence diagram of edit module name feature
Adminshould end at the destroy marker (X) but due to a limitation of PlantUML, the lifeline reaches the end of diagram.
4.1.4. Remove Module Feature
Implementation
The remove module feature allows the user to remove a module by specifying the index of the module in the list.
The remove module mechanism is facilitated by RemoveModuleCommand. It extends from the abstract class RemoveCommand.
In addition, it implements the following operations:
-
RemoveModuleCommand#execute()— oversees entire execution for removing a module. -
RemoveModuleCommand#removeModule()— removes module from list of modules including the chapters and flashcards under it. -
RemoveCommand#prepareResult()— prepares the resulting message of the execution.
The following diagram shows the class diagram of the remove module feature:
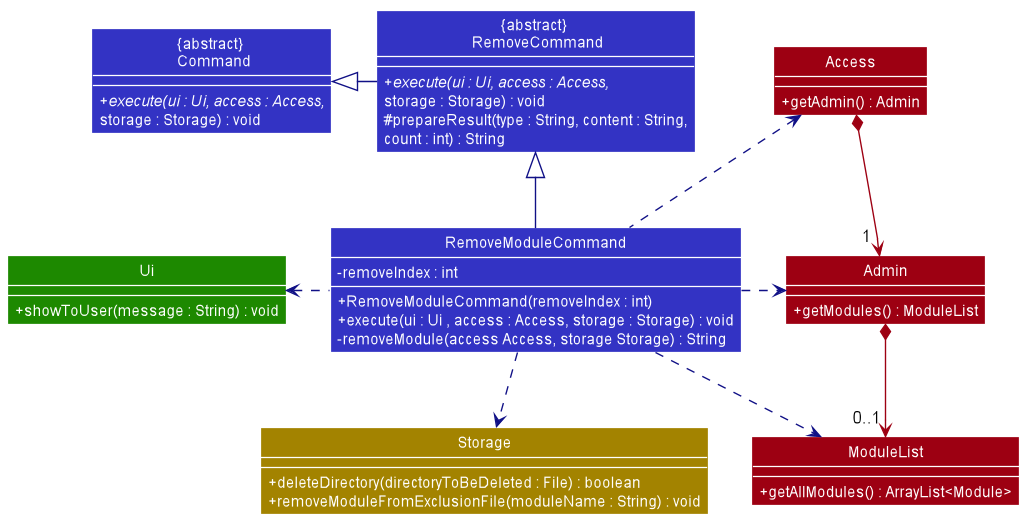
Figure 14. Class diagram of remove module
For instance, the user wants to start a remove the module CS2113T, a detailed description of what happens is shown below:
-
Step 1: The user is currently in
adminlevel. -
Step 2: The user enters
remove 1command to delete the first module in the list of modules — which in this case isCS2113T. Theremovecommand createsRemoveModuleCommandwhich will then be executed. -
Step 3:
RemoveModuleCommand#executegets themodulebased on the index provided and passes it toStorage#deleteDirectoryto delete the module folder as well as the chapters and flashcards under it.
The following sequence diagram shows how the remove module feature works:
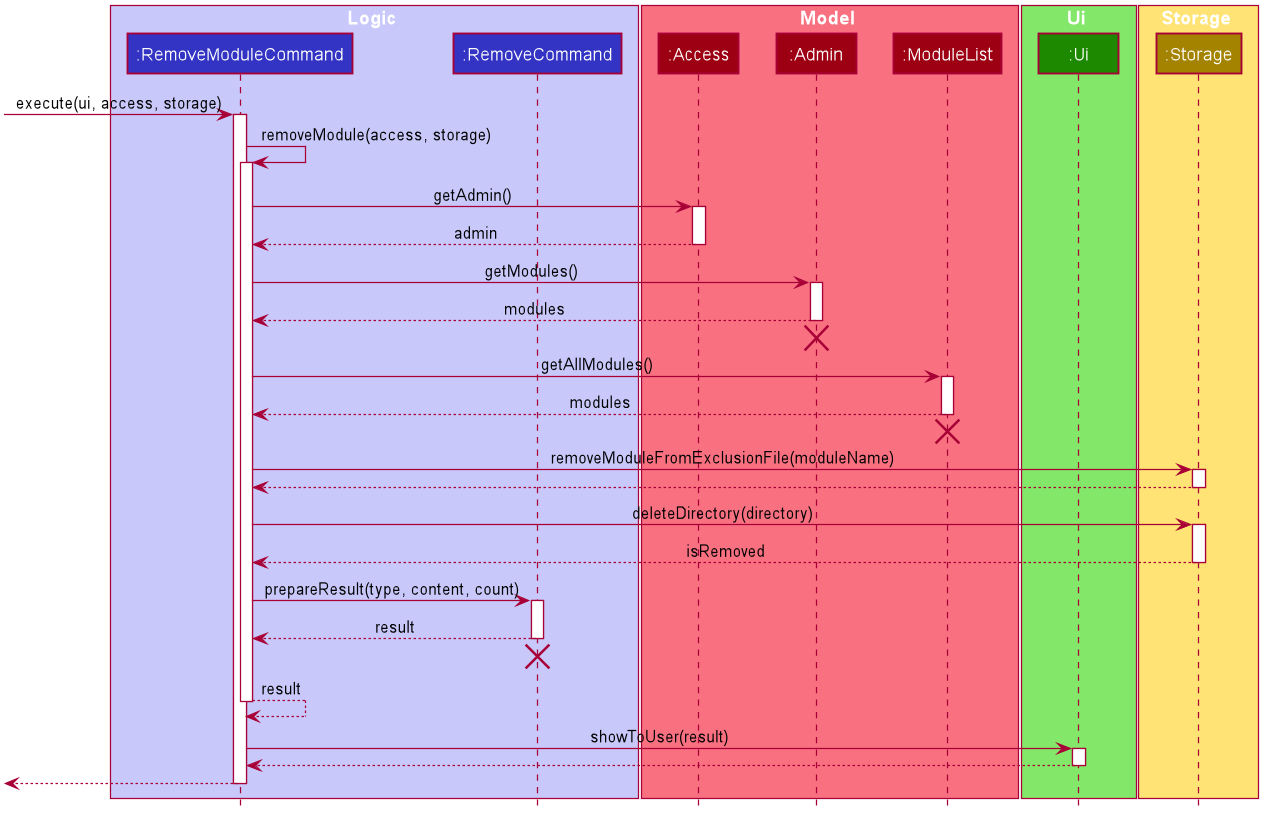
Figure 15. Sequence diagram of remove module
4.1.5. Access Module Level Feature
Implementation
The go modules feature allows the user to access the existing module from Admin level.
GoModuleCommand class facilitates the proposed access module level feature. It extends GoCommand class.
It implements the following operations:
-
GoModuleCommand#execute()– Inherits from the abstractGoCommand. It is a override to callsGoModuleCommand#goModule()and print message to user. -
GoModuleCommand#goModule()– Accesses a new module level from admin level based on the index entered by user. If the index is out of bounds, KAJI returns an error message to user. Otherwise, this operation returns a successful message to theGoModuleCommand#executeoperation.
Shown as the class diagram below, with the inheritance of GoCommand and Command, Kaji is able to execute the operation GoModuleCommand#execute() directly.
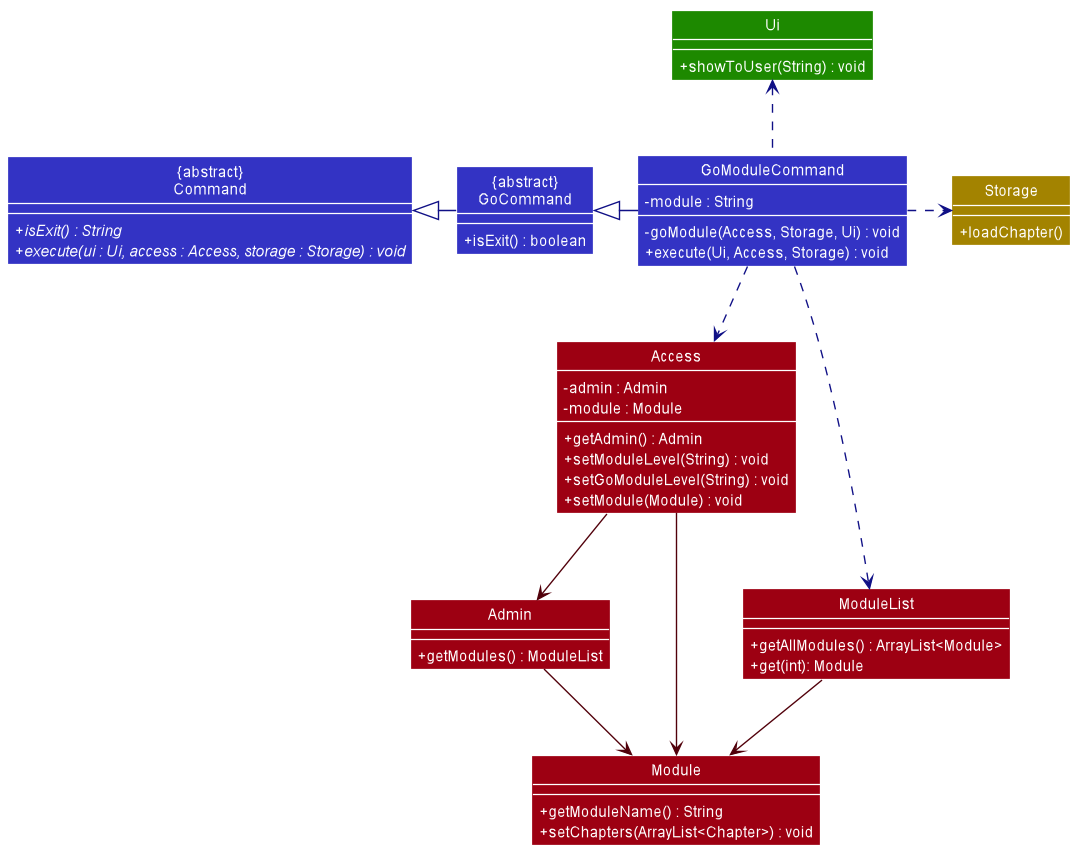
Figure 16. Class diagram of go module command
Given below is an example usage scenario at Admin level and how the access module level feature behaves at each step:
-
Step 1: The user is currently at admin level and wants to access a module level named ‘CS2113’.
-
Step 2: The user enters
go 1command because module named ‘CS2113’ is first item on displayed list. This example is based on the assumption that the module ‘CS2113’ already has been added. -
Step 3: The
gocommand createsGoModuleCommandwhich will then be executed. -
Step 4:
GoModuleCommand#goModule()gets the module via the methodModuleList#get(int)based on the index parsed byGoCommandParser. -
Step 5: User’s current access level is set to
modulelevel and a new temporaryCS2113module object is created via the methodAccess#setModule(Module). -
Step 6:
GoModuleCommand#execute()prints the successful message to the user viaUi#showToUser()method.
The following diagram shows how the add chapter command feature works:
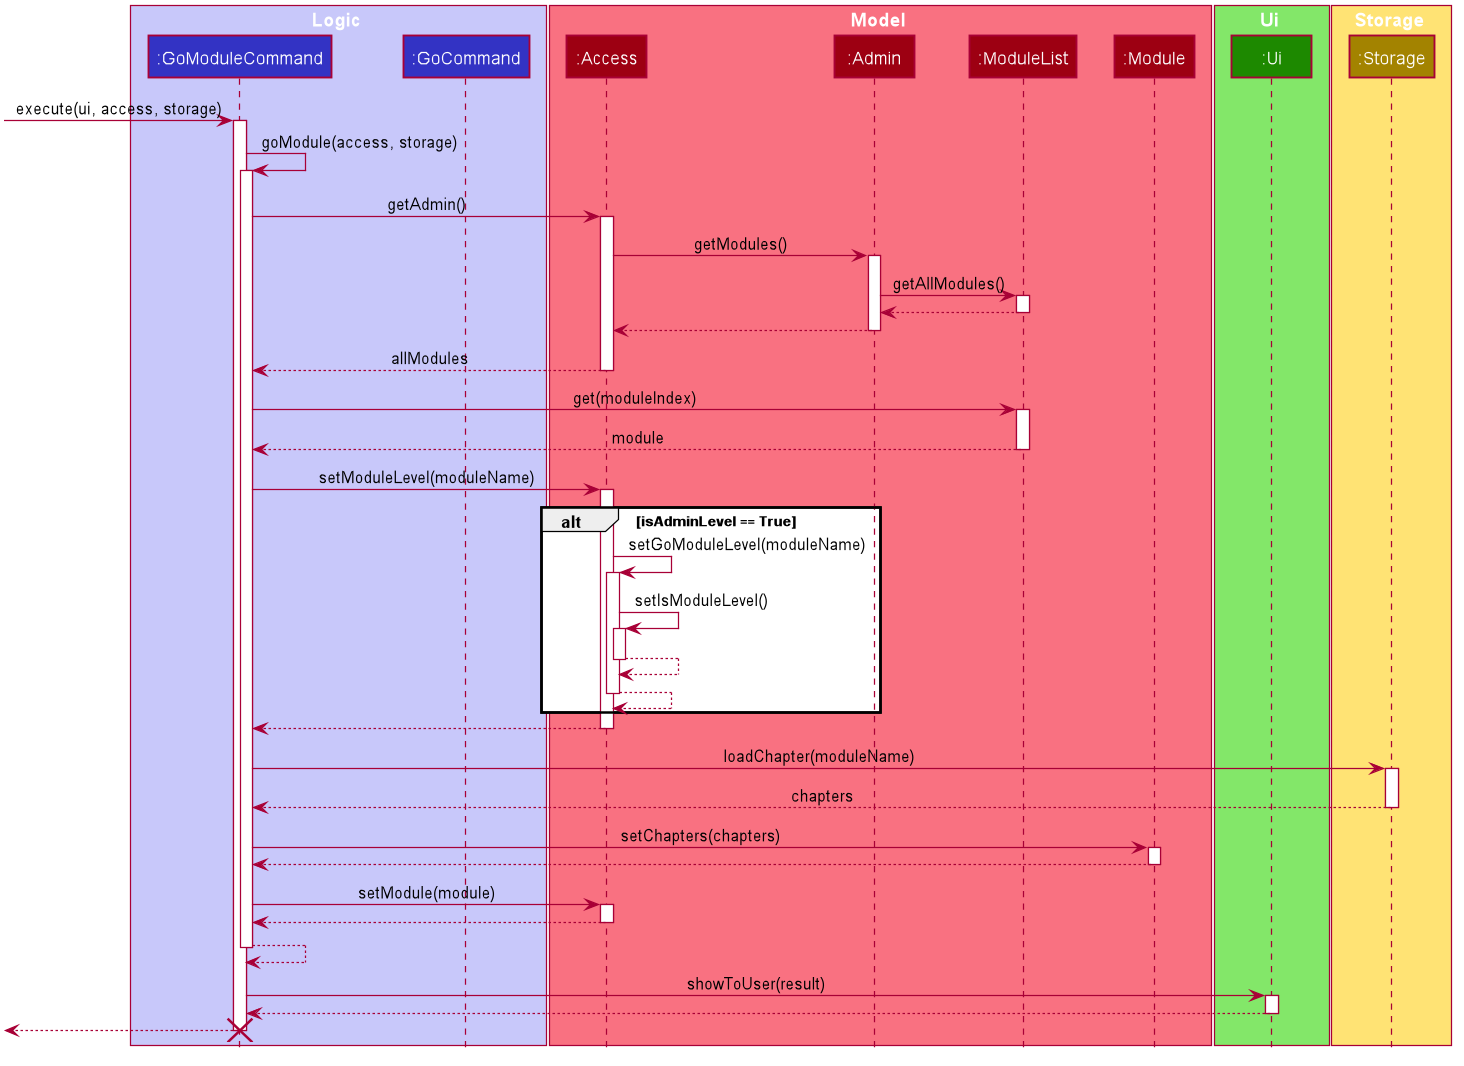
Figure 17. Sequence diagram of add chapter command
Back to Top ^
4.2. Module Features
This section will elaborate the available features to users at Module Level.
At Module Level, users are able to:
- Add chapter
- List chapters
- Edit chapter name
- Delete chapter
- Access chapter
- Return to Admin Level
4.2.1. Add Chapter Feature
Implementation
The add chapter feature allows the user to create new chapters at Module level.
AddChapterCommand facilitates the proposed add chapter feature. It extends AddCommand with an AddCommand#prepareResult() method. This method formats message about the result of the action to user in Ui.
Shown as the class diagram below, because of the inheritance of AddCommand, Command and AddChapterCommand, Kaji is able to execute the operation AddChapterCommand#excute().
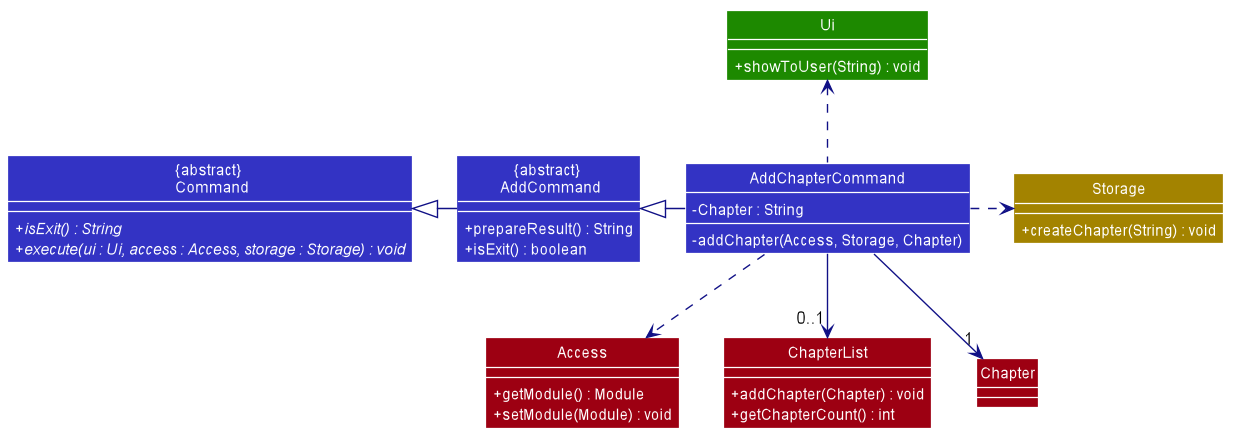
Figure 18. Class diagram of add chapter command
Given below is an example usage scenario at Module level and how the add chapter feature behaves at each step:
-
Step 1: The user is currently at module level and wants to add a new chapter chapter1 and enters
add chapter1command. -
Step 2: The
addcommand createsAddChapterCommandwhich will then be executed. -
Step 3: The
AddChapterCommandobject creates a newChapterobject with theChapter#chapterNameof chapter1. -
Step 4: The new
chapter1 : Chapterobject will be passed into theAddChapterCommand#addChapter()withAccessandStorage. -
Step 5: The
AddChapterCommand#addChapter()gets the currentModuleobject viaAccess#getModule()method, then it adds the newchapter1: Chapterobject into theModule#ChapterList. -
Step 6: The new
Moduleobject with thechapter1: Chapterobject is updated toAccessvia the methodAccess#setModule(Module). -
Step 7: The new
Chapteris updated in the folder by executing theStorage#createChapter(). A ‘chapter1’ folder is being created under the ‘data/module’ folder. -
Step 8: The
AddChapterCommand#addChapter()method returns a result message to theAddChapterCommand#execute()method which usesUi#showToUser()to print the success message.
The following diagram shows how the add chapter command feature works:
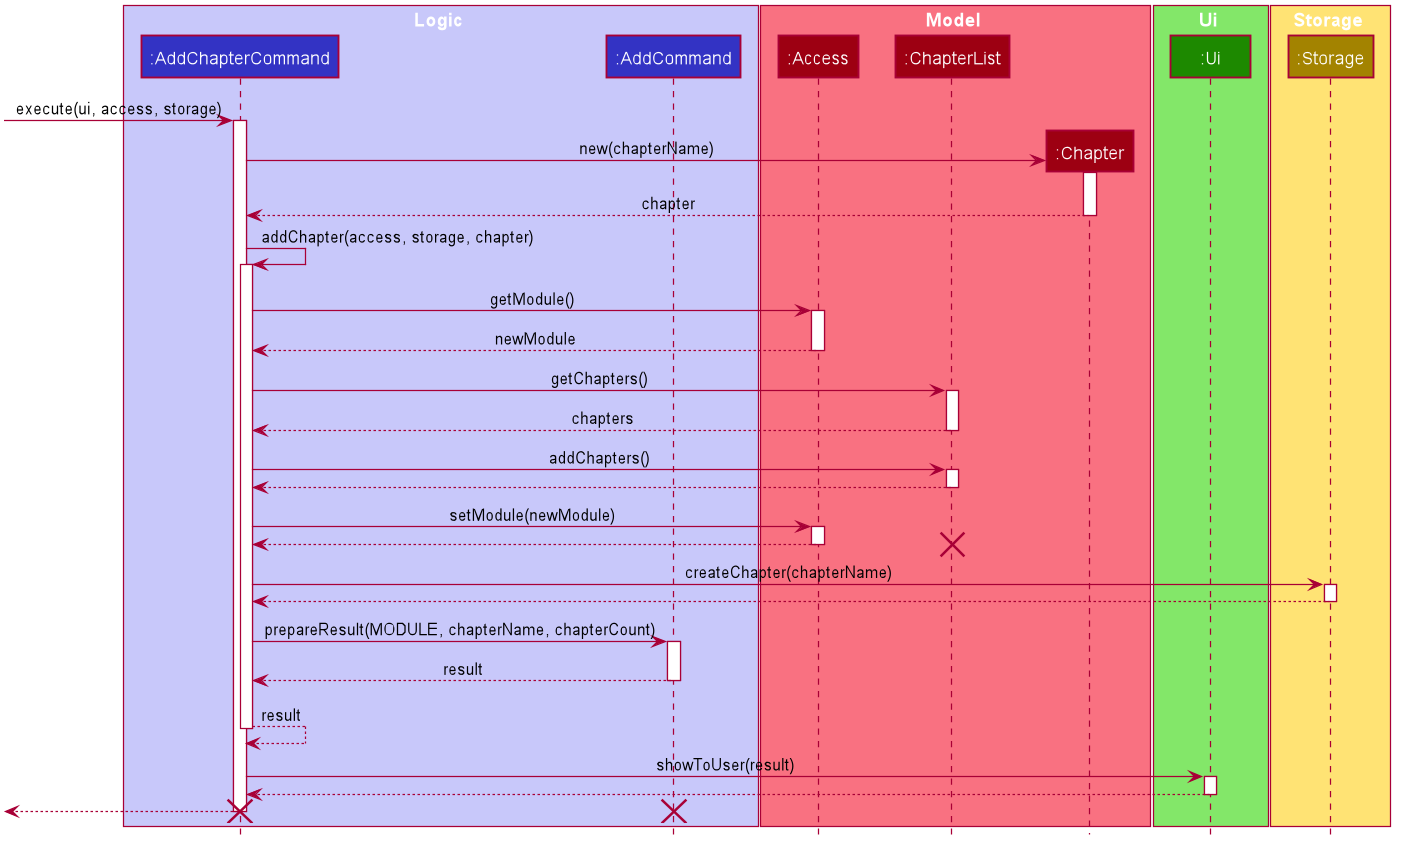
Figure 19. Sequence diagram of add chapter command
4.2.2. List Chapters Feature
Implementation
The list chapters feature allows the user to list all chapters in module level
The list chapters mechanism is facilitated by ListChaptersCommand. It extends from the abstract class ListCommand.
In addition, it implements the following operations:
-
ListChaptersCommand#execute()— oversees entire execution for listing chapters. -
ListChaptersCommand#listChapters()— gets and lists all chapters in module level.
The following diagram shows the class diagram of the list chapters feature:
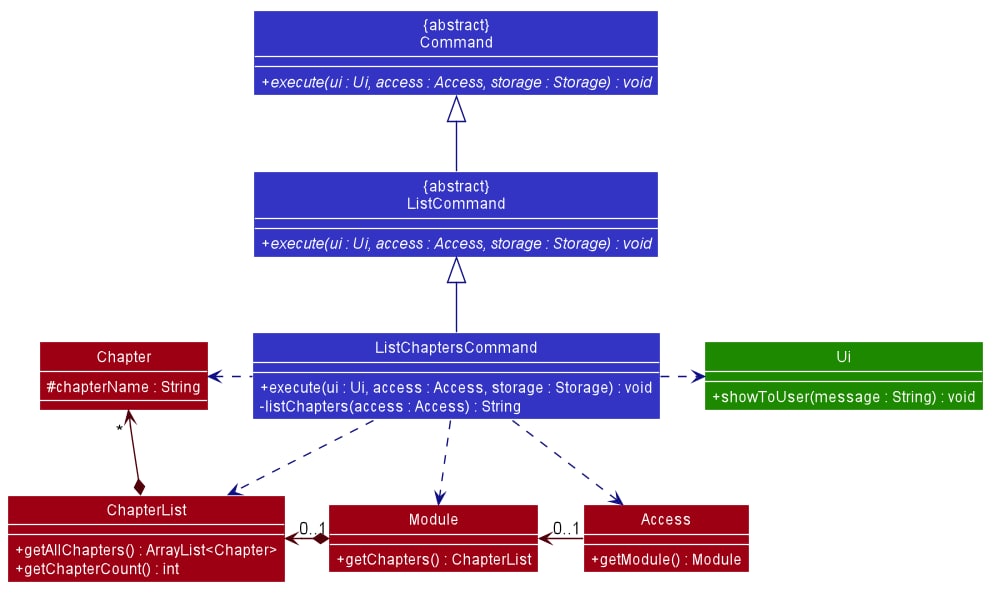
Figure 20. Class diagram of list chapters feature
For instance, the user wants to list all chapters available in CS2113T (module name), a detailed description of what happens is shown below:
-
Step 1: The user is currently in
CS2113Tlevel. -
Step 2: The user enters
listcommand to list all chapters inCS2113Tlevel.
The following sequence diagram shows how the list chapters feature works:
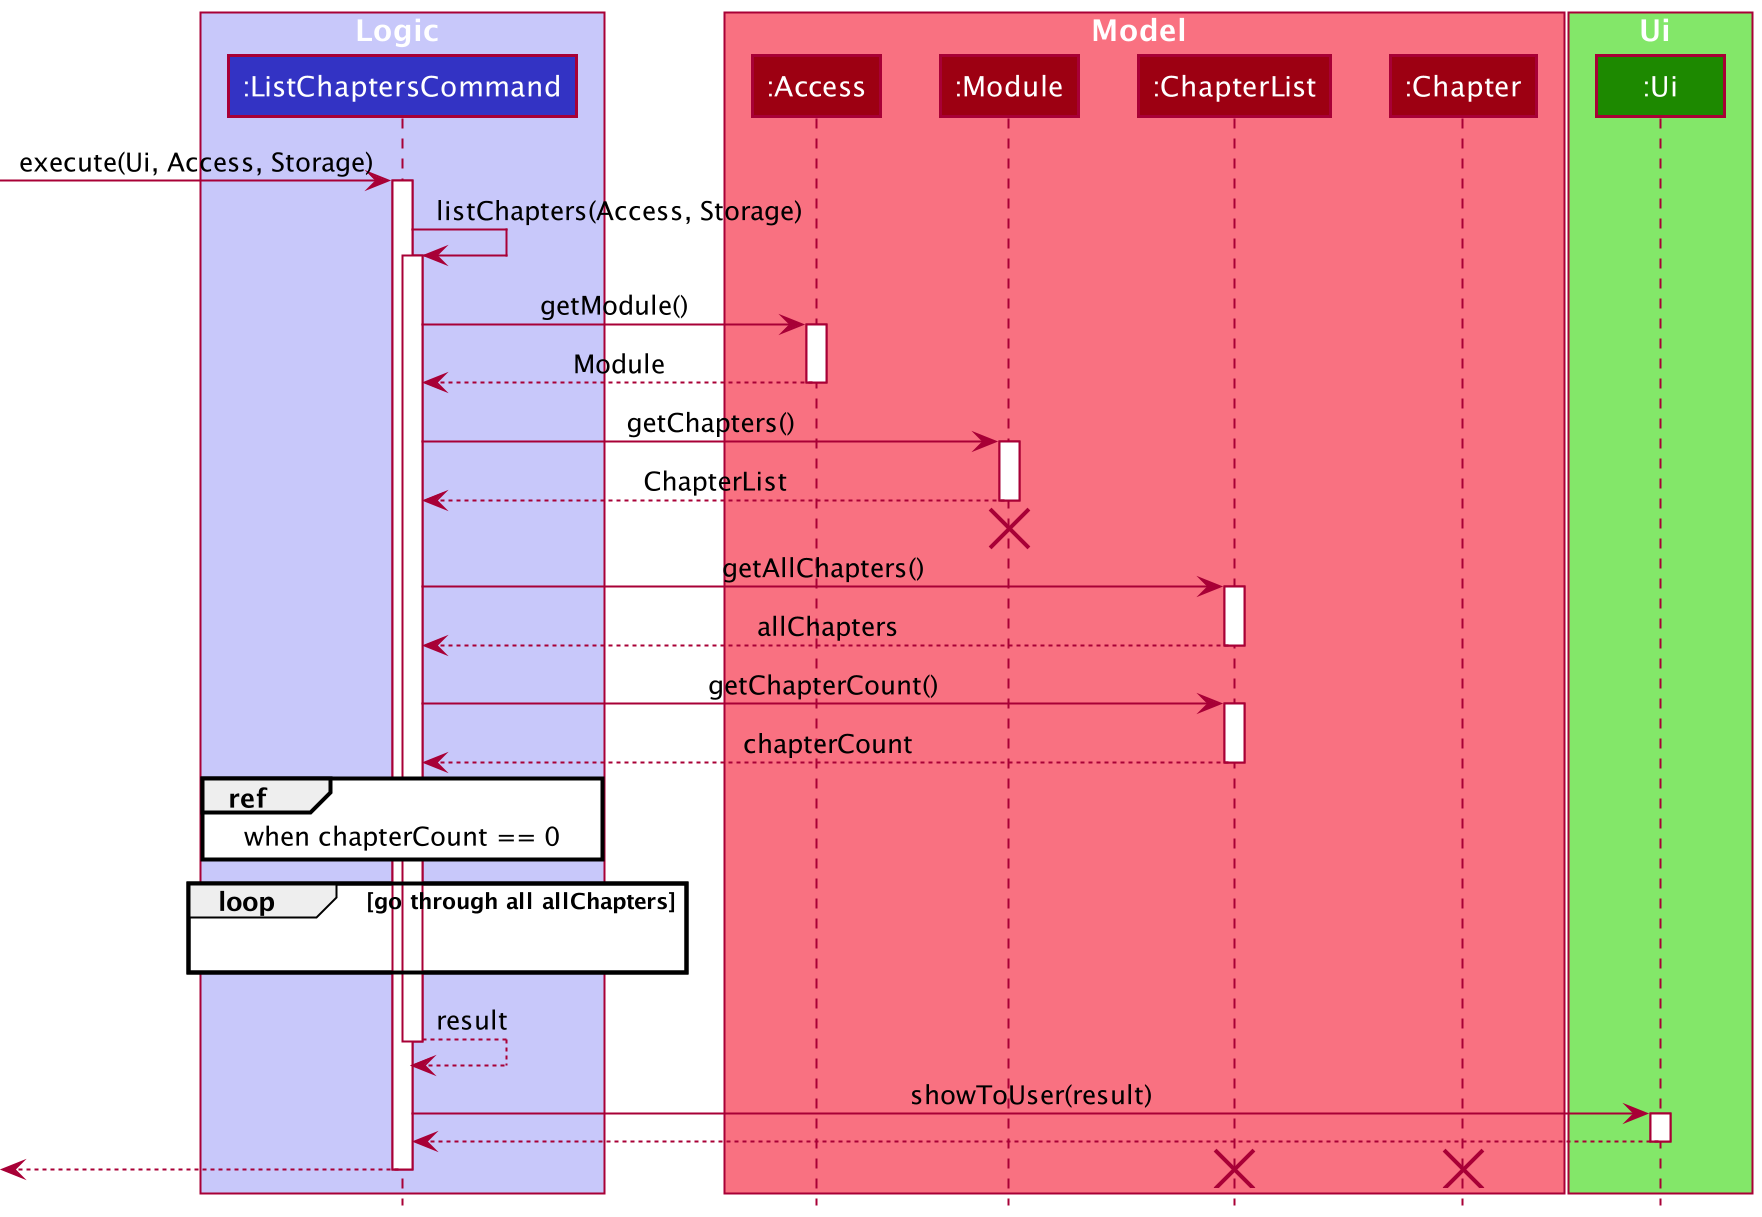
Figure 21. Sequence diagram of list chapters
4.2.3. Edit Chapter Name Feature
Implementation
The edit chapter name feature allows the user to edit the name of any existing chapter.
The user can edit the name of an existing chapter with the edit command, which follows the following format: edit CHAPTER_INDEX CHAPTER_NAME.
The edit module name feature is facilitated by ChapterList and Chapter. The list of user’s chapters are stored internally as ChapterList.
In addition, it implements the following operations:
-
ChapterList#getChapter()- Gets a chapter based on the specified index from the list of chapters. -
Chapter#setChapterName()— Sets the name of the chapter.
The following diagram shows the class diagram of the edit chapter name feature:
Figure 22. Class diagram of edit chapter name feature
For instance, the user wants to edit the chapter chap 1 from the module CS2113T, a detailed description of what happens is shown below:
-
Step 1: The user is currently in
CS2113Tat the module level. -
Step 2: The user enters
edit 1 Chapter 1command to edit the first chapter in the list of chapters — which in this case ischap 1. -
Step 3: The user input is parsed by
Parser, which results in a newEditChapterCommandobject. -
Step 4:
EditChapterCommandis executed and calls the methodEditChapterCommand#editChapter(). -
Step 5:
EditChapterCommand#editModule()gets the chapter based on the index provided by the methodChapterList#getChapter(). -
Step 6: The chapter name is edited to
Chapter 1by the methodChapter#setChapterName(). -
Step 7: The result message from
EditChapterCommand#editChapter()is returned toEditChapterCommand#execute()and shown to the user by callingUi#showToUser().
The following sequence diagram shows how the edit chapter name feature works:
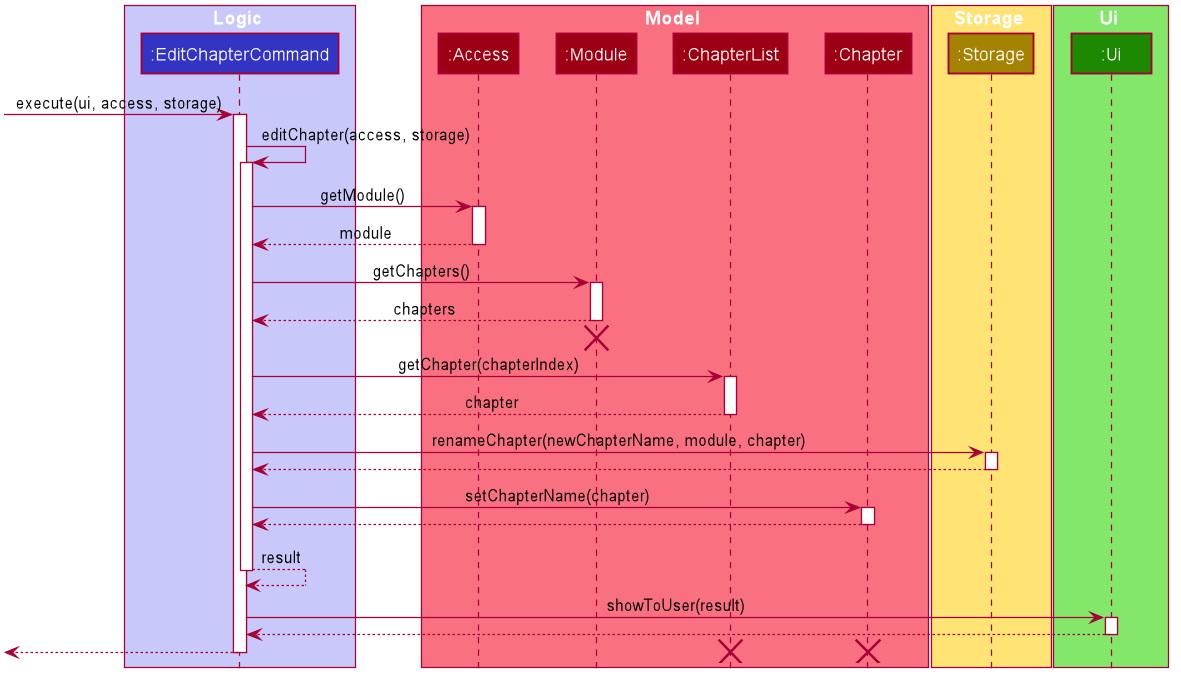
Figure 23. Sequence diagram of edit chapter name feature
Moduleshould end at the destroy marker (X) but due to a limitation of PlantUML, the lifeline reaches the end of diagram.
4.2.4. Remove Chapter Feature
Implementation
The remove chapter feature allows the user to remove a chapter by specifying the index of the chapter in the list.
The remove chapter mechanism is facilitated by RemoveChapterCommand. It extends from the abstract class RemoveCommand.
In addition, it implements the following operations:
-
RemoveChapterCommand#execute()— oversees entire execution for removing a chapter. -
RemoveChapterCommand#removeModule()— removes chapter from list of chapters in a module including the flashcards under it. -
RemoveCommand#prepareResult()— prepares the resulting message of the execution.
The following diagram shows the class diagram of the remove chapter feature:
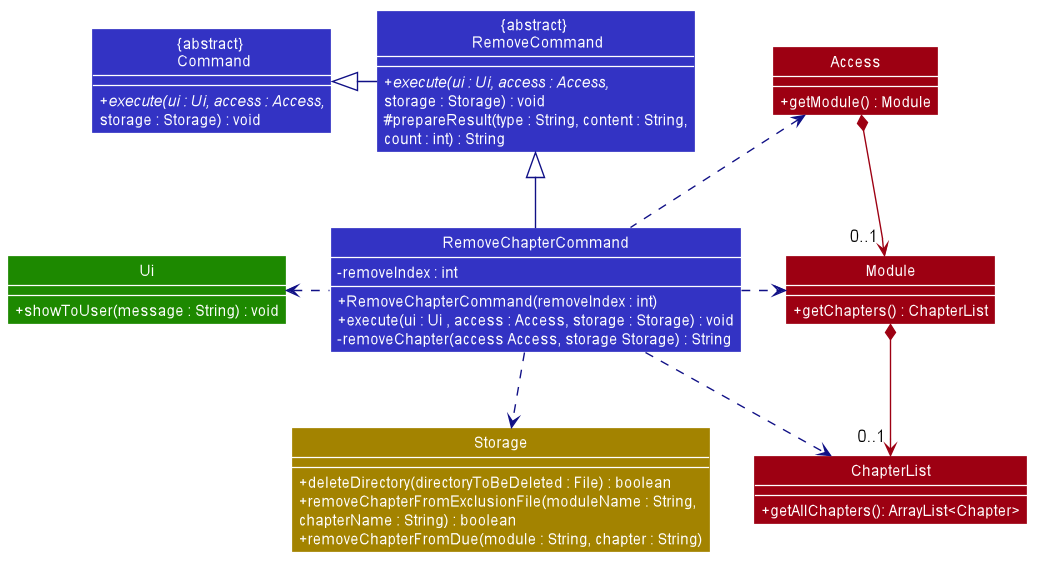
Figure 24. Class diagram of remove chapter
For instance, the user wants to start a remove the chapter Chapter 1 from the module CS2113T, a detailed description of what happens is shown below:
-
Step 1: The user is currently in
CS2113Tat the module level. -
Step 2: The user enters
remove 1command to delete the first chapter in the list of chapters — which in this case isChapter 1. Theremovecommand createsRemoveChapterCommandwhich will then be executed. -
Step 3:
RemoveChapterCommand#executegets thechapterbased on the index provided and passes it toStorage#deleteDirectoryto delete the chapter file as well as the flashcards under it.
The following sequence diagram shows how the remove chapter feature works:
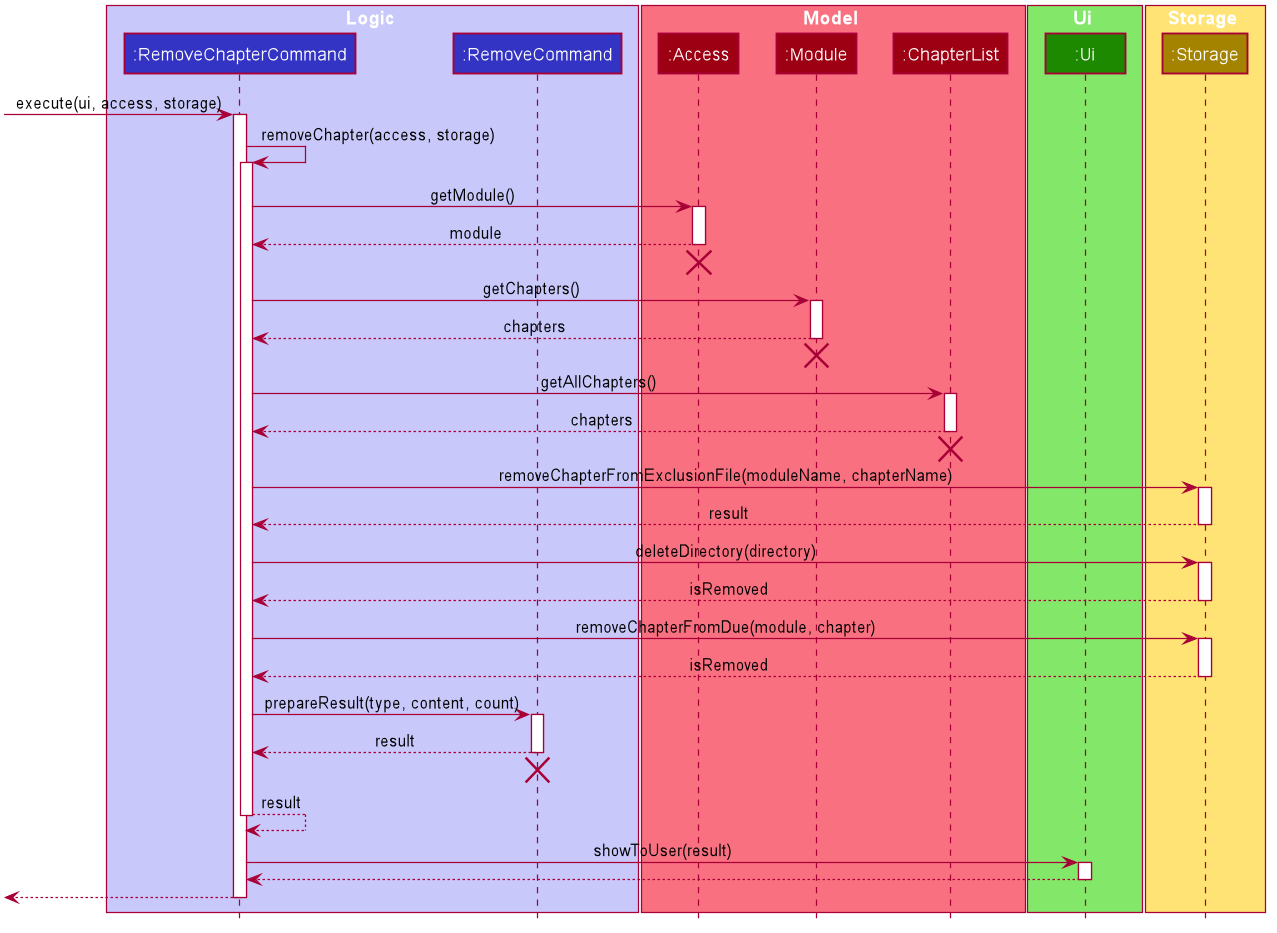
Figure 25. Sequence diagram of remove chapter
4.2.5. Access Chapter Level Feature
Implementation
If a user wishes to go to the Chapter Level from the Module Level by accessing a Chapter within the Module he is currently in, he can do so with the Access Chapter Level Feature.
To execute this feature, the following class was created:
-
GoChapterCommand- extends the abstract classGoCommand, brings the User down to the Chapter level if the target Chapter exists.
To support the Access Chapter Level Feature, GoChapterCommand implements the following operations:
-
GoChapterCommand#goChapter()- Parses through the Module that the User is currently on to search for the specified Chapter. If the Chapter is found but not empty, there will be no output message, while if the found Chapter is empty, a message prompting the user to add Cards to the Chapter will be returned. -
GoChapterCommand#execute()- CallsGoChapterCommand#goChapter()and prints the output message returned if there is one.
The following diagram shows the class diagram of the Access Chapter feature:
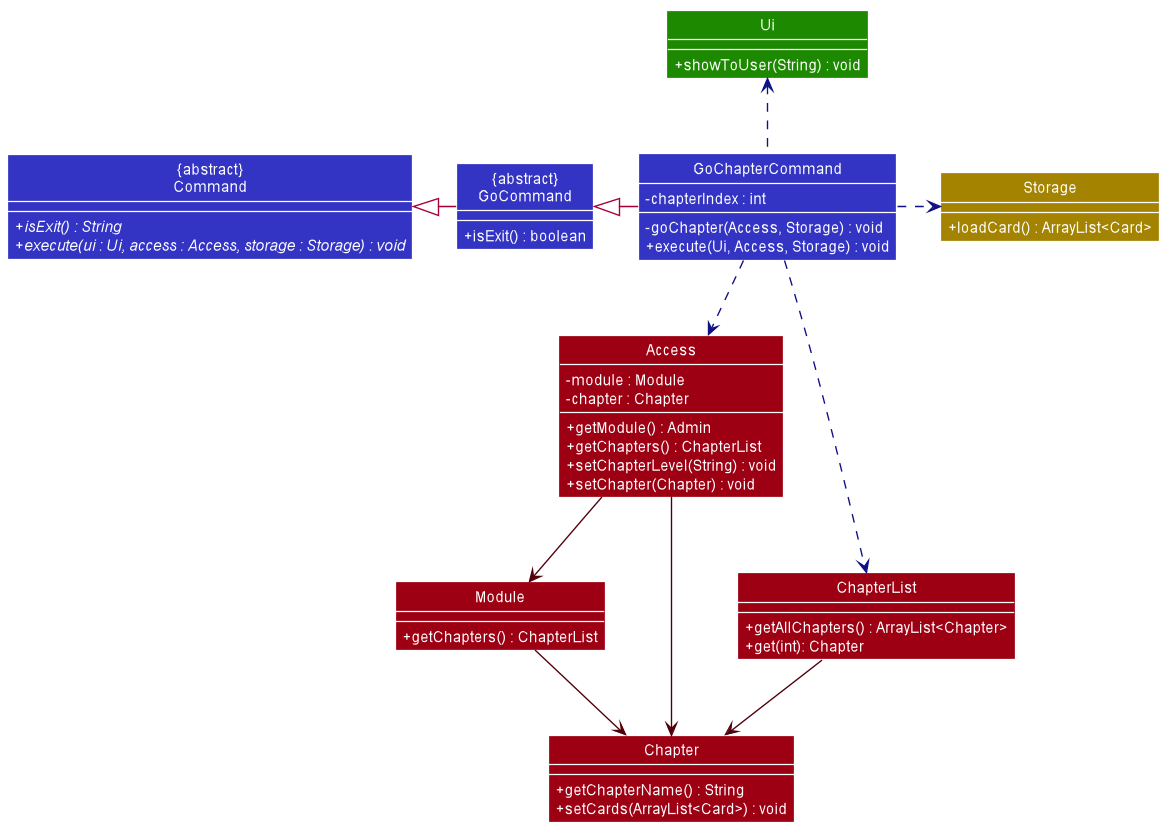
Figure 26. Class diagram of access chapter
Example
For instance, the user is currently in the Module CS2113T and would like to go to the Chapter ‘Chapter 1’ on the Chapter level. A detailed description of what happens is shown below:
Step 1: The user enters go 1 as CS2113T is the first Module in list.
Step 2: The user input is parsed by Parser, and Parser creates a GoCommandParser object, which in turn
creates a GoChapterCommand object, with 1 as the command argument.
Step 3: GoChapterCommand is executed, and GoChapterCommand#goChapter() is called.
Step 4: GoChapterCommand#goChapter() calls Access#getModule(), Access#getChapters() and ChapterList#getAllChapters() to obtain an ArrayList of Chapters.
Step 5: Using the command argument as the chapterIndex, and all the Cards within the Chapter are loaded with Storage#loadCard() into an ArrayList of Cards.
Step 6: Lastly, to finish the transition into the Chapter level, Access#setChapterLevel(), Chapter#setCards() and Access#setChapter are called.
The following sequence Diagrams illustrates how the Access Chapter Level Feature is executed:
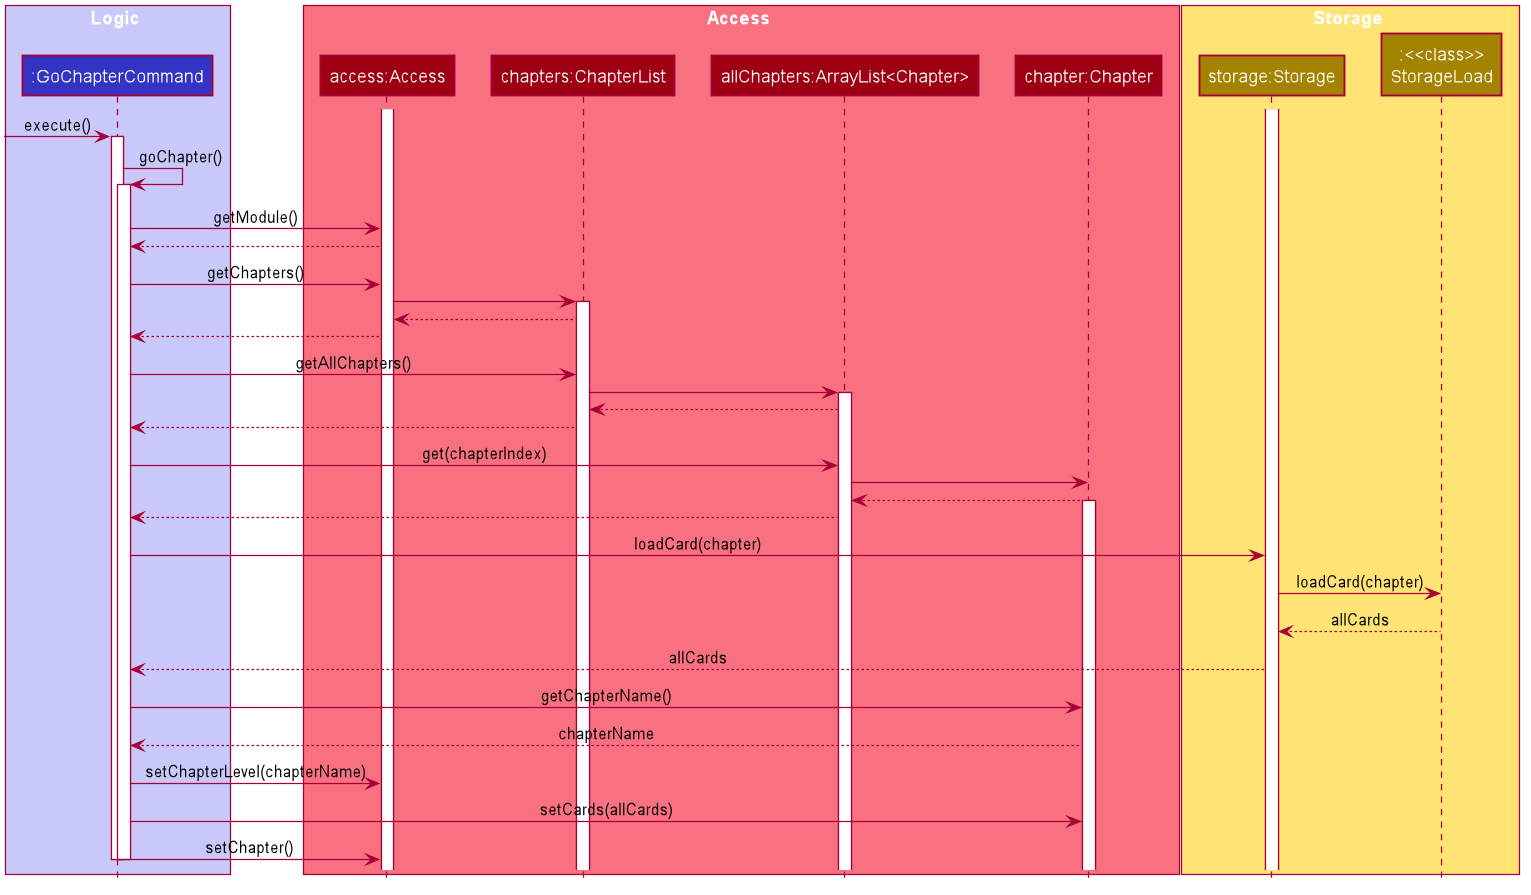
Figure 27. Sequence diagram of access chapter level feature
4.2.6. Return to Admin Level Feature
Implementation
If a user has completed the tasks he has on the Module Level and wish to edit Modules from the Admin level, he can do so with the return to Admin Level Feature.
To execute this feature, the following class was created:
-
BackAdminCommand- Extends the abstract classBackCommand, returns the User to the Admin Level
To support the Return to Admin Level Feature, BackAdminCommand implements the following operation:
-
BackAdminCommand#execute()- CallsAccess#setModuleLevel()to set theAccessObject’slevelattribute’s value toadminLevelif its current value is themoduleLevel
The following diagram shows the class diagram of the Return to Admin Level feature:
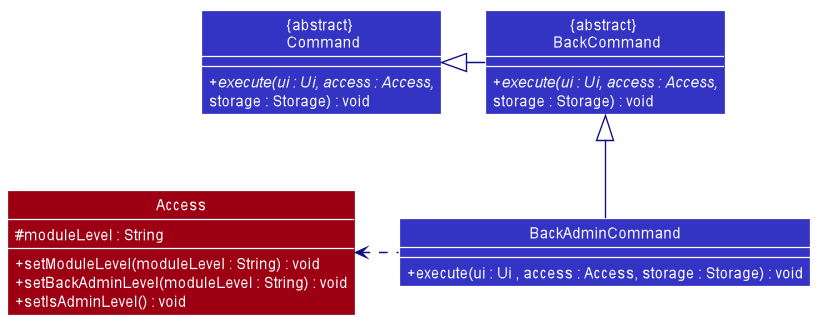
Figure 28. Class diagram of access chapter
Example
For instance, the user is currently in the Module CS2113T and would like to return to the Admin Level. A detailed description of what happens is shown below:
Step 1: The user enters back.
Step 2: The user input is parsed by Parser, and Parser creates a BackCommandParser object, which in turn
creates a BackAdminCommand object
Step 3: BackAdminCommand is executed, and Access#setModuleLevel() is called.
Step 4: Access#setModuleLevel() verifies that the user is not on the Admin level at the moment, and calls Access#setBackAdminLevel(), which sets the user back into the Admin Level.
The following sequence Diagrams illustrates how the Return to Admin Level Feature is executed:
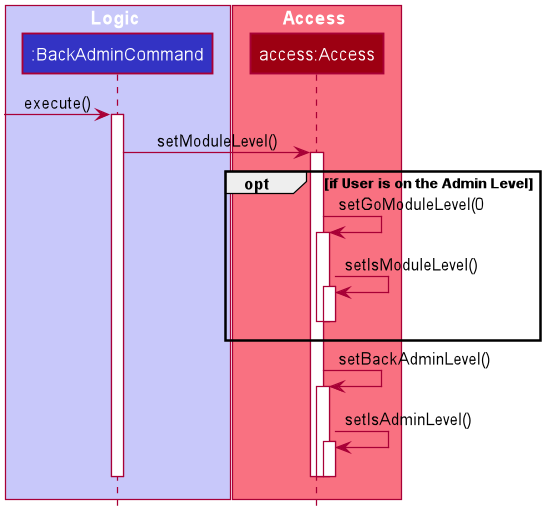
Figure 29. Sequence diagram of return to admin level feature
Back to Top ^
4.3. Chapter Features
This section will elaborate the available features to users at Chapter Level.
At Chapter Level, users are able to:
- Add flashcard
- List flashcards
- Edit question and answer of a flashcard
- Delete flashcard
- Return to Module Level
- Check overall revision performance
4.3.1. Add Flashcard Feature
Implementation
The add flashcard feature allows the user to add a flashcard to a chapter.
The user can add a flashcard with the add command, which follows the following format: add q:QUESTION | a: ANSWER.
The add flashcard feature is facilitated by CardList. The list of user’s flashcards are stored internally as CardList.
In addition, it implements the following operation:
-
CardList#addCard()- Adds a flashcard to the list of flashcards.
The following diagram shows the class diagram of the add flashcard feature:
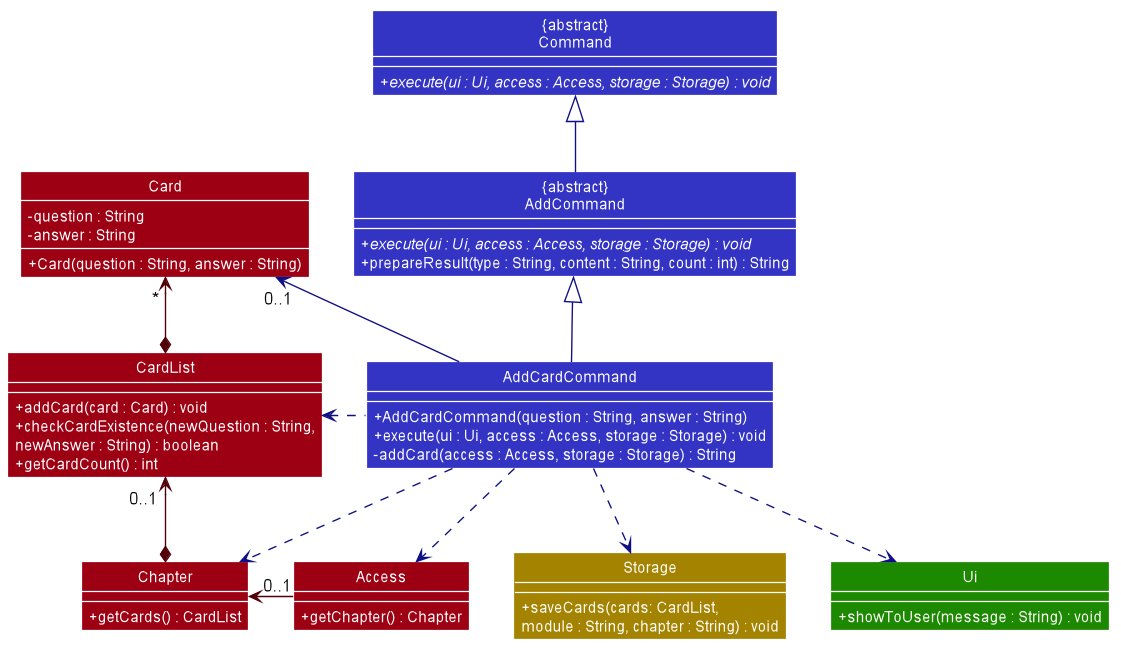
Figure 30. Class diagram of add flashcard feature
For instance, the user wants to add a flashcard [Q] 1+1 | [A] 2 to the chapter Chapter 1 for module CS2113T, a detailed description of what happens is shown below:
-
Step 1: The user is currently in
Chapter 1at the chapter level of the moduleCS2113T. -
Step 2: The user enters
add q:1+1 | a:2command to add a flashcard to the list of flashcards. -
Step 3: The user input is parsed by
Parser, which results in a newAddCardCommandobject. -
Step 4: A
Cardobject is created withinAddCardCommand. -
Step 5:
AddCardCommandis executed and calls the methodAddCardCommand#addCard(). -
Step 6:
AddCardCommand#addCard()adds a flashcard to the list of flashcards by calling the methodCardList#addCard(). -
Step 7: The result message from
AddCardCommand#addCard()is returned toAddCardCommand#execute()and shown to the user by callingUi#showToUser().
The following sequence diagram shows how the add flashcard feature works:
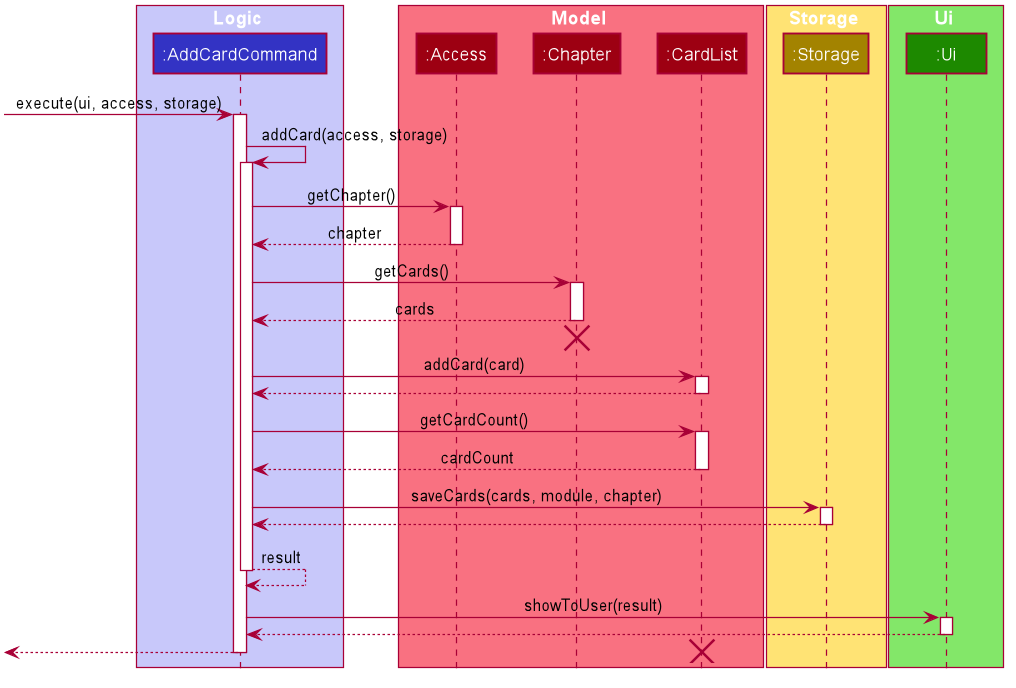
Figure 31. Sequence diagram of add flashcard feature
Chaptershould end at the destroy marker (X) but due to a limitation of PlantUML, the lifeline reaches the end of diagram.
4.3.2. List Flashcards Feature
Implementation
The list flashcards feature allows the user to list all flashcards in chapter level
The list flashcards mechanism is facilitated by ListCardsCommand. It extends from the abstract class ListCommand.
In addition, it implements the following operations:
-
ListCardsCommand#execute()— oversees entire execution for listing flashcards. -
ListCardsCommand#listCards()— gets and lists all flashcards in chapter level.
The following diagram shows the class diagram of the list flashcards feature:
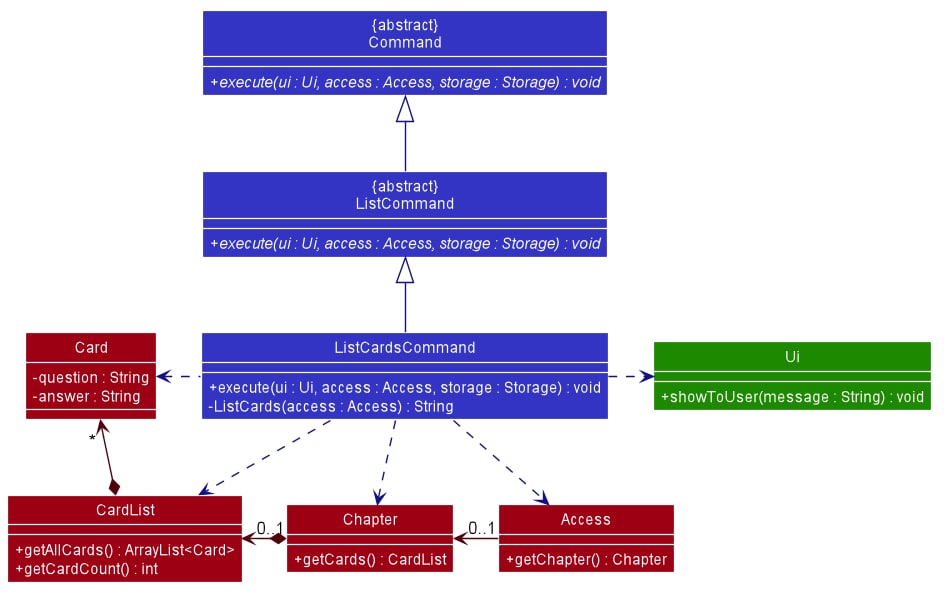
Figure 32. Class diagram of list flashcards feature
For instance, the user wants to list all flashcards available in Chapter 1 (chapter name), a detailed description of what happens is shown below:
-
Step 1: The user is currently in
Chapter 1level. -
Step 2: The user enters
listcommand to list all flashcards inChapter 1level.
The following sequence diagram shows how the list flashcards feature works:
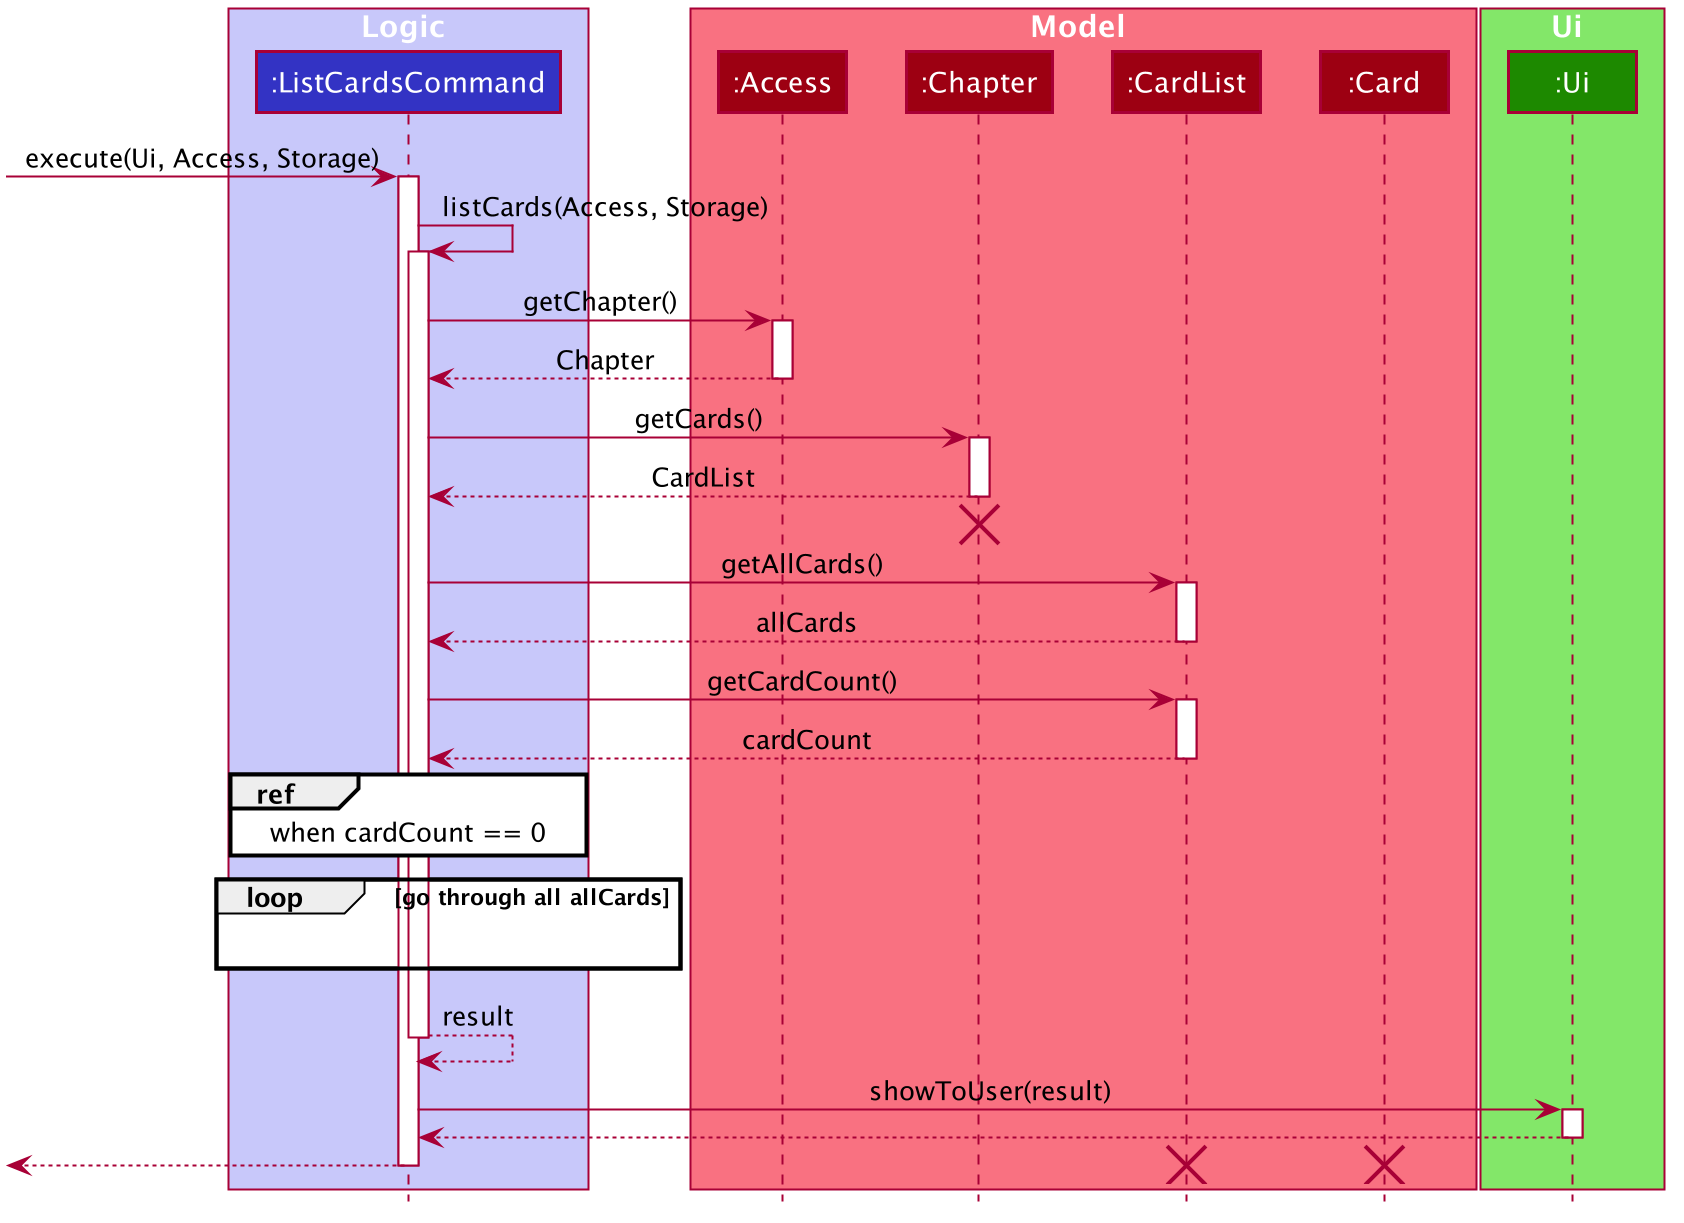
Figure 33. Sequence diagram of list cards
4.3.3. Edit Flashcard Content Feature
Implementation
The edit flashcard content feature allows the user to edit the content of any existing flashcard.
The user can edit the content of an existing flashcard with the edit command, which follows the following format: edit FLASHCARD_INDEX q:QUESTION | a: ANSWER.
The edit flashcard content feature is facilitated by CardList and Card. The list of user’s flashcards are stored internally as CardList.
In addition, it implements the following operations:
-
CardList#getCard()- Gets a flashcard based on the specified index from the list of flashcards. -
Card#setQuestion()— Sets the question of a flashcard. -
Card#setAnswer()— Sets the answer of a flashcard.
The following diagram shows the class diagram of the edit flashcard content feature:
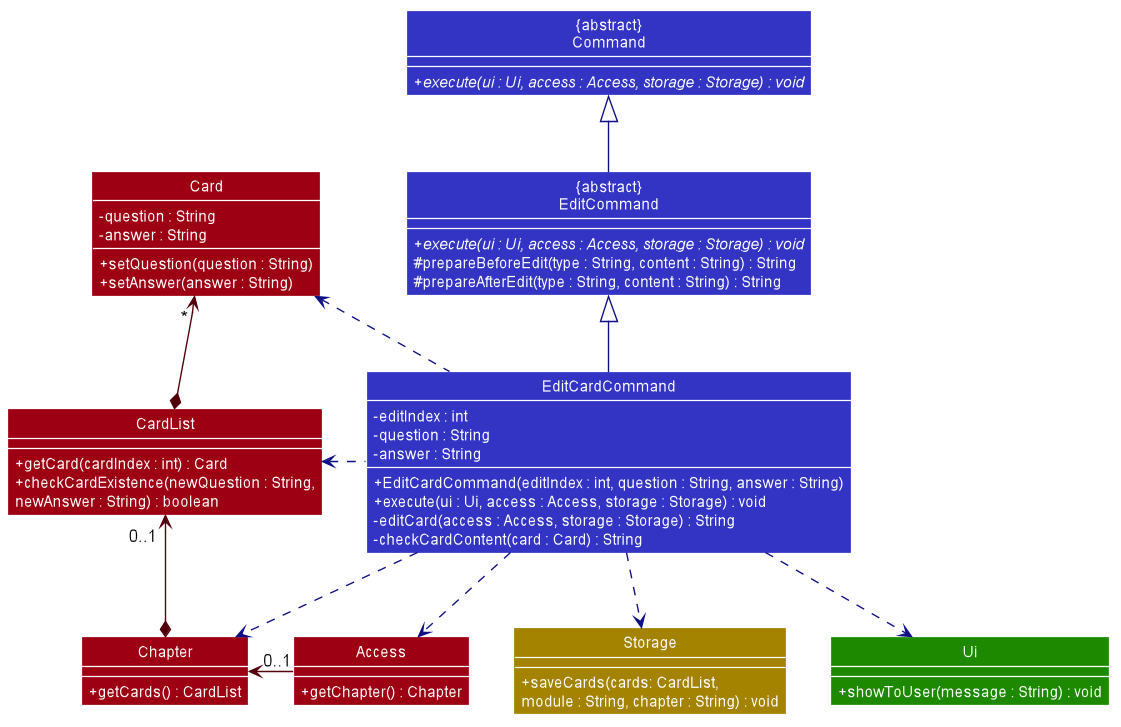
Figure 34. Class diagram of edit flashcard content feature
For instance, the user wants to edit the flashcard [Q] 2*1 | [A] 2 from the chapter Chapter 1 for module CS2113T, a detailed description of what happens is shown below:
-
Step 1: The user is currently in
Chapter 1at the chapter level of the moduleCS2113T. -
Step 2: The user enters
edit 1 q:1+1 | a:command to edit the first flashcard in the list of flashcards — which in this case is[Q] 2*1 | [A] 2. -
Step 3: The user input is parsed by
Parser, which results in a newEditCardCommandobject. -
Step 4:
EditCardCommandis executed and calls the methodEditCardCommand#editCard(). -
Step 5:
EditCardCommand#editCard()gets the chapter based on the index provided by the methodCardList#getCard(). -
Step 6: As there is no content to edit the answer, the method
Card#getAnswer()is called to get the answer of the existing flashcard - which in this case is2. -
Step 7: The question is edited to
1+1by the methodCard#setQuestion(). -
Step 8: The answer is edited to
2by the methodCard#setAnswer(). -
Step 9: The result message from
EditCardCommand#editCard()is returned toEditCardCommand#execute()and shown to the user by callingUi#showToUser().
The following sequence diagram shows how the edit flashcard content feature works:
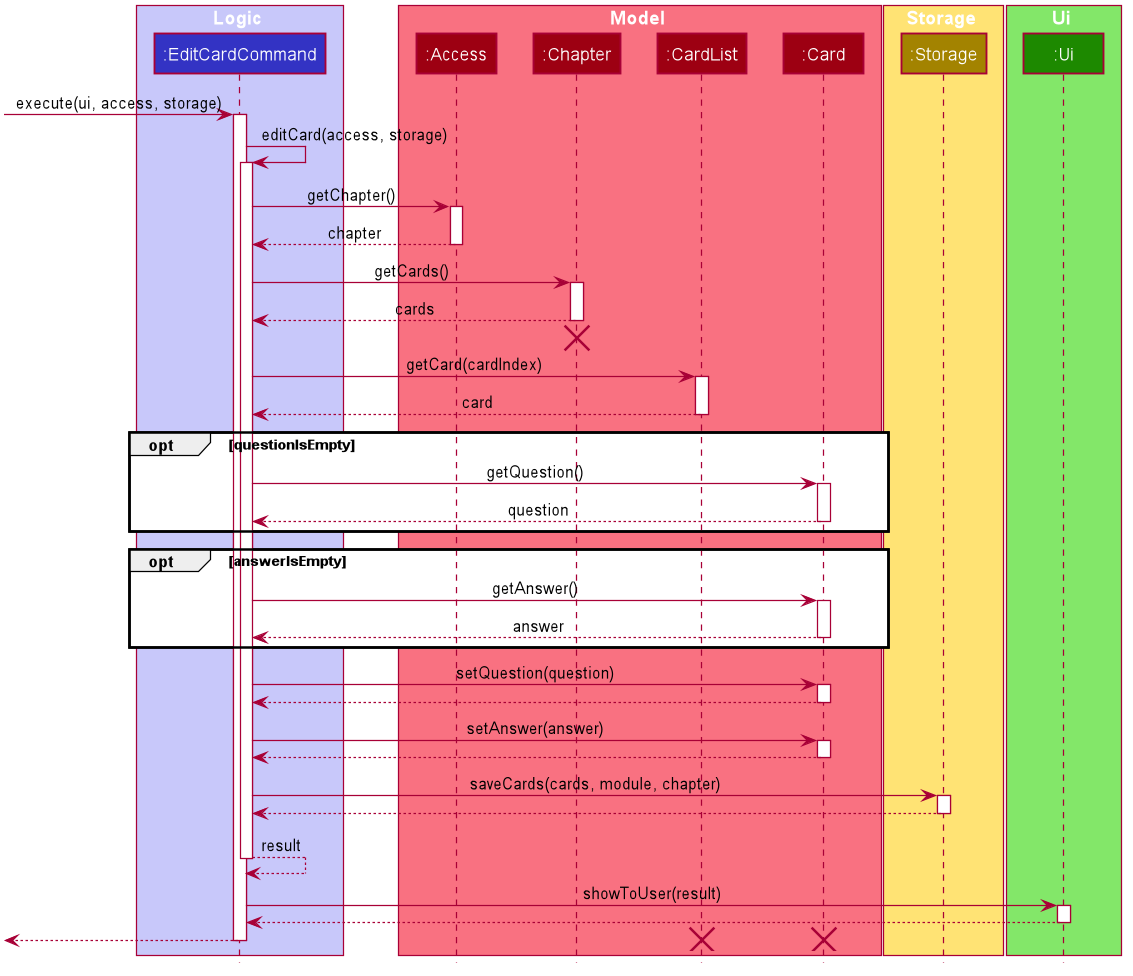
Figure 35. Sequence diagram of edit flashcard content feature
Chaptershould end at the destroy marker (X) but due to a limitation of PlantUML, the lifeline reaches the end of diagram.
4.3.4. Remove Flashcard Feature
Implementation
The remove flashcard feature allows the user to remove a flashcard by specifying the index of the flashcard in the list.
The remove flashcard mechanism is facilitated by RemoveFlashcardCommand. It extends from the abstract class RemoveCommand.
In addition, it implements the following operations:
-
RemoveFlashcardCommand#execute()— oversees entire execution for removing a flashcard. -
RemoveFLashcardCommand#removeModule()— removes flashcard from list of flashcards in a chapter. -
RemoveCommand#prepareResult()— prepares the resulting message of the execution.
The following diagram shows the class diagram of the remove flashcard feature:
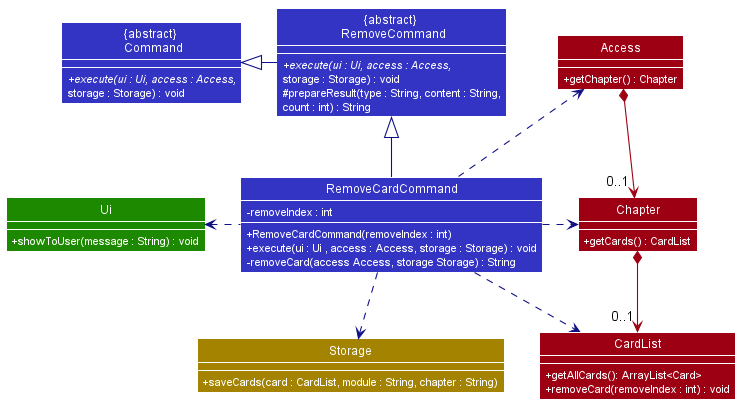
Figure 36. Class diagram of remove flashcard
For instance, the user wants to start a remove the flashcard [Q] 1+1 | [A] 2 from the chapter Chapter 1, a detailed description of what happens is shown below:
-
Step 1: The user is currently in
Chapter 1at the chapter level of the moduleCS2113T. -
Step 2: The user enters
remove 1command to delete the first flashcard in the list of flashcards — which in this case is[Q] 1+1 | [A] 2. Theremovecommand createsRemoveCardCommandwhich will then be executed. -
Step 3:
RemoveCardCommand#executegets theflashcardbased on the index provided and removes it from theCardList -
Step 4: The updated
CardListis passed toStorage#saveCards()to update the contents of the chapter with the removed card.
The following sequence diagram shows how the remove flashcard feature works:
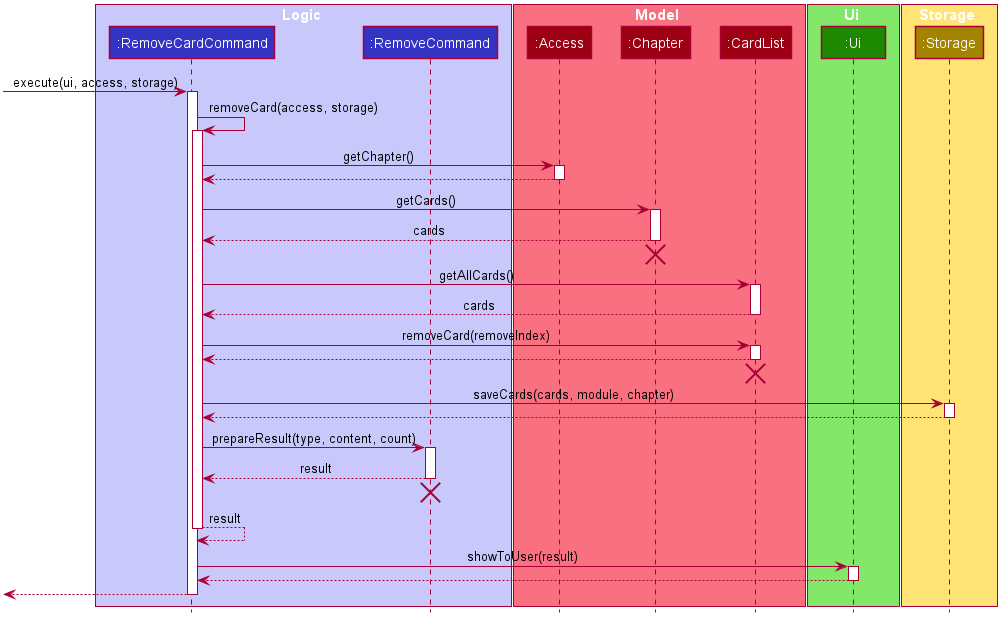
Figure 37. Sequence diagram of remove flashcard
4.3.5. Return to Module Level Feature
Implementation
The return to module level feature allows the user to return to the module level from the chapter level.
The return to module level mechanism is facilitated by BackModuleCommand. It extends from the abstract class BackCommand.
In addition, it implements the following operation:
-
BackModuleCommand#execute— lowers access level of the user.
The following diagram shows the class diagram of the return to module feature:
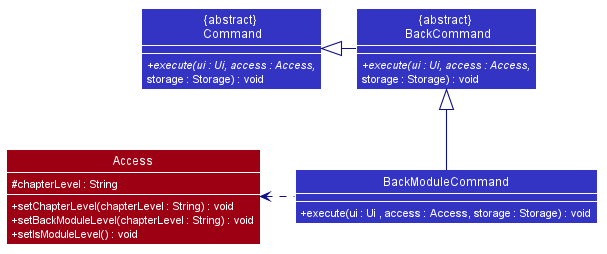
Figure 38. Class diagram of return to module
For instance, the user wants to return to the module level from the chapter he is currently at in the module CS2113T, a detailed description of what happens is shown below:
-
Step 1: The user is currently in
Chapter 1at the chapter level in the moduleCS2113T. -
Step 2: The user enters
backcommand to return toCS2113T. Thebackcommand createsBackModuleCommandwhich will then be executed. -
Step 3:
BackModuleCommand#executepasses an empty string toAccess#setChapterLevel()to check the chapter level and callsAccess#setIsModuleLevelto set the user back to module level.
The following sequence diagram shows how the return to module feature works:
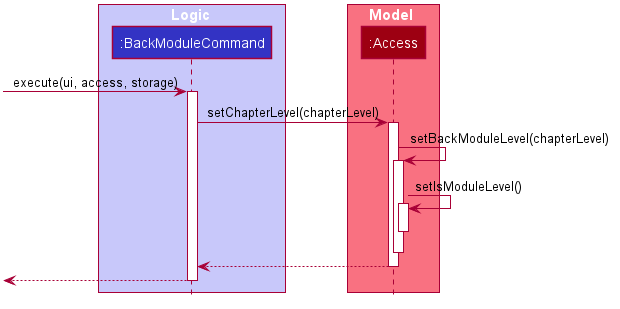
Figure 39. Sequence diagram of return to module
4.3.6. Check Overall Performance for a Chapter Feature
Implementation
The show rate feature allows the user to check their overall performance of revision with the chapter they are currently accessing.
ShowRateCommand facilitates the proposed check overall performance feature. It extends an abstract Command class with the abstract Command#execute() and Command#isExit().
It implements the following operations:
-
ShowRateCommand#execute()– Inherits from the abstractCommand. It is an override to callsShowRateCommand#computePercentage()and print message that specific to performance checking feature. -
ShowRateCommand#computePercentage()– Computes the overall performance by mastery levels and updates theShowRateCommand#easyPercentage,ShowRateCommand#mediumPercentage,ShowRateCommand#hardPercentageandShowRateCommand#cannotAnswerPercentage, then it returns number of cards in theChapter. -
ShowRateCommand#isExit()– Inherits from the abstractCommand. It is an override to returnfalse.
Shown as the class diagram below, with the inheritance of Command, Kaji is able to execute the operation ShowRateCommand#execute() directly.
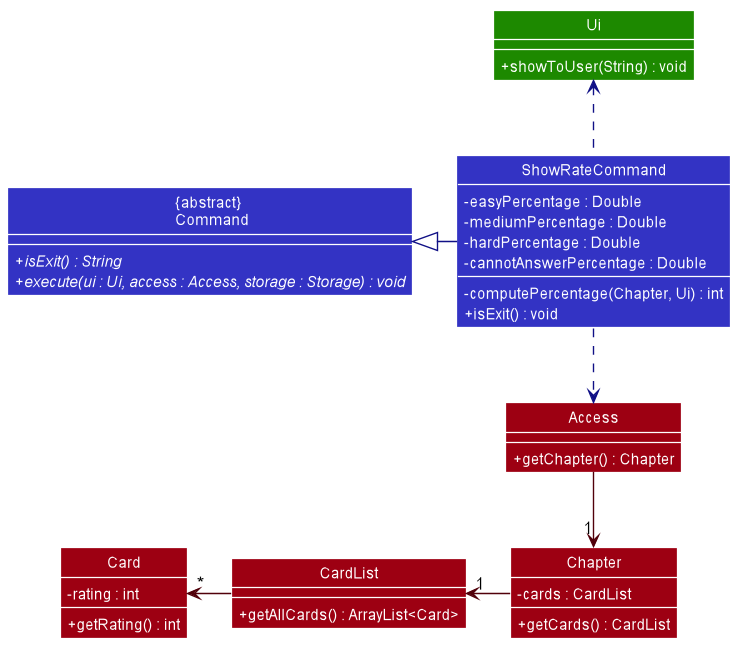
Figure 40. Class diagram of show overall performance command
Given below is an example usage scenario at Chapter level and how the show overall performance feature behaves at each step:
-
Step 1: The user is currently at chapter level.
-
Step 2: The user enters
showratecommand to check the overall revision performance of the current chapter. Theshowratecommand createsShowRateCommandwhich will then be executed. -
Step 3: The
ShowRateCommandobject gets the reference of current chapter level via theAccess#getChapter()and stores the reference as aChapterobject. -
Step 4: The
Chapterobject will be passed into the operationShowRateCommand#computePercentage(). -
Step 5: The
ShowRateCommand#computePercentage()gets all theCardobjects in the currentChapterobject via the methodsChapter#getCards()andCardList#getAllCards()respectively. -
Step 6: If there is no
Cardobject in the currentChapter, theShowRateCommand#computePercentage()operation returns int0after checking theArrayList<Card>size. If there areCardobjects, a ‘for’ loop is used to check theCard#ratingof everyCardobjects and compute the overall performance. -
Step 7:
ShowRateCommand#computePercentage()updates the variablesShowRateCommand#easyPercentage,ShowRateCommand#mediumPercentage,ShowRateCommand#hardPercentageandShowRateCommand#cannotAnswerPercentageat the end and returns the number of cards in the chapter -
Step 8:
GoModuleCommand#execute()prints the performance message to the user viaUi#showToUserif theShowRateCommand#computePercentage()is greater than int0.
The following diagram shows how the show overall performance feature works:
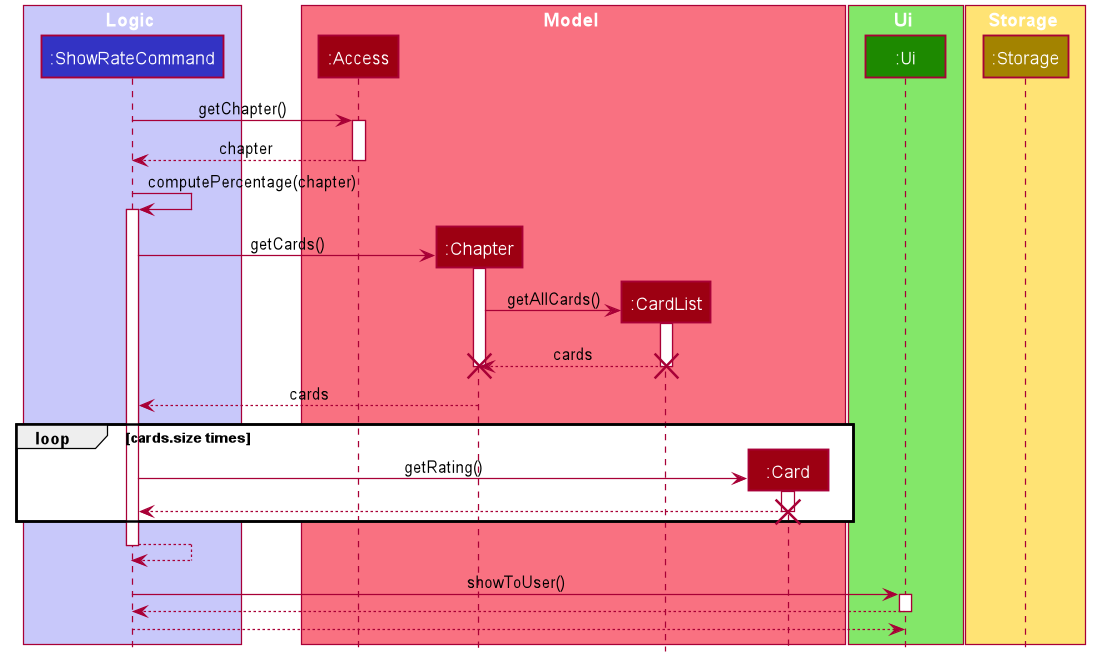
Figure 41. Sequence diagram of show overall performance command
Back to Top ^
4.4. Revise with Scheduling Feature
The revise feature allows the user to start a revision on a chapter and can only be done when the user is in the module level.
4.4.1. Revise Feature
Implementation
The revise mechanism is facilitated by ReviseCommand. It extends from the abstract class Command.
In addition, it implements the following operations:
-
ReviseCommand#execute()— oversees the entire revise process and calls the respective methods when necessary. -
ReviseCommand#getChapter()— getschapterbased on the index the user provided. -
ReviseCommand#getCards()— gets a list ofcardinchapter. -
ReviseCommand#promptNotDue()— prompts user if he still wants to revise achapterthat is not due. -
ReviseCommand#reviseCard()— makes use ofuito show the contents of each card to the user and gets rating input for the particular card. -
ReviseCommand#rateCard()— gets user input on difficulty of a flashcard. -
ReviseCommand#repeatRevision()— repeats revision for cards which user could not answer.
The following diagram shows the class diagram of the revise feature:
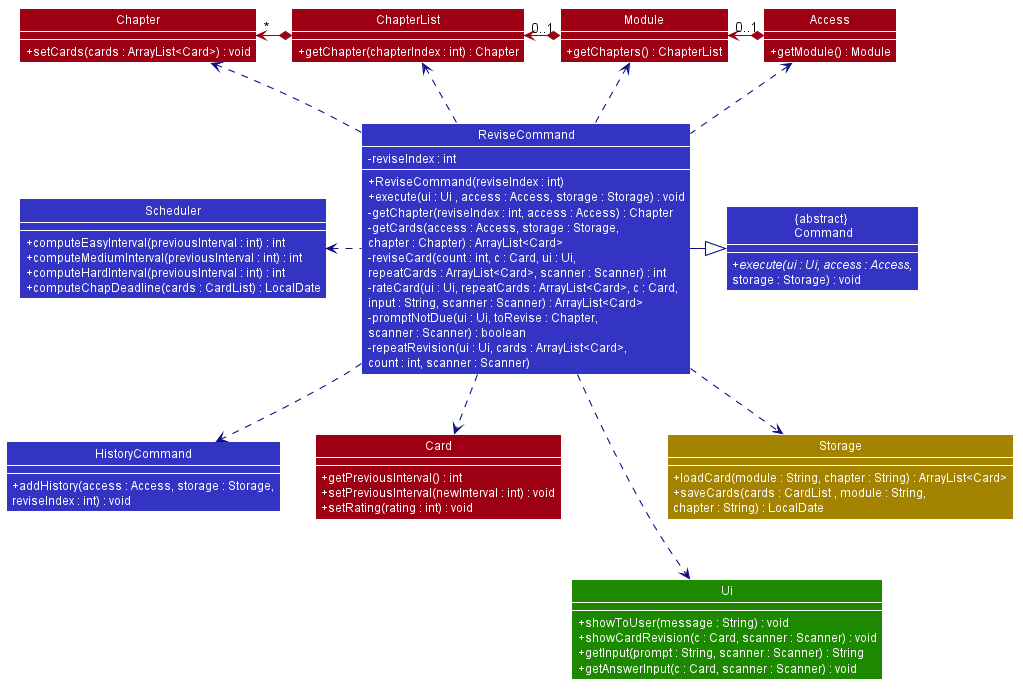
Figure 42. Class diagram of revise
For instance, the user wants to start a revision for Chapter 1 in the module CS2113T, a detailed description of what happens is shown below:
-
Step 1: The user is currently in
CS2113Tat the module level. -
Step 2: The user enters
revise 1command to revise the first chapter in the module — which in this case isChapter 1. Therevisecommand createsReviseCommandwhich will then be executed. -
Step 3:
ReviseCommand#executegetsChapter1based on the index provided as well as a list ofcardunder the particular chapter by callingReviseCommand#getChapterandReviseCommand#getCardsrespectively. -
Step 4: If the
chapteris not due for revision yet,ReviseCommand#promptNotDue()will prompt the user if he still wants to revise achapterthat is not due. If the user entersY, the Revise feature will continue execution, else it will return to the main class Kaji, and wait for the next command. -
Step 5:
ReviseCommand#executeloops through each flashcard and shows the user its contents by callingReviseCommand#reviseCard()and inside it,ReviseCommand#rateCard()is called and makes use ofUi#getUserInput()to get user to rate the difficulty of each flashcard. -
Step 6: A success message of completing the revision will be shown to the user through
Ui#showToUser(). -
Step 7:
Scheduler#computeChapterDeadline()then calculates the new deadline for thechapterand passes the result toChapter#setueBy()to set the new deadline for thechapter. -
Step 6:
ReviseCommand#repeatRevisionthen repeats the revision session on cards which the user could not answer if any. -
Step 7: Lastly,
ReviseCommand#execute()callsHistoryCommand#addHistory()to keep a record of the chapter revised so that the user can review what revision has been completed.
The following sequence diagram shows how the revise feature works:
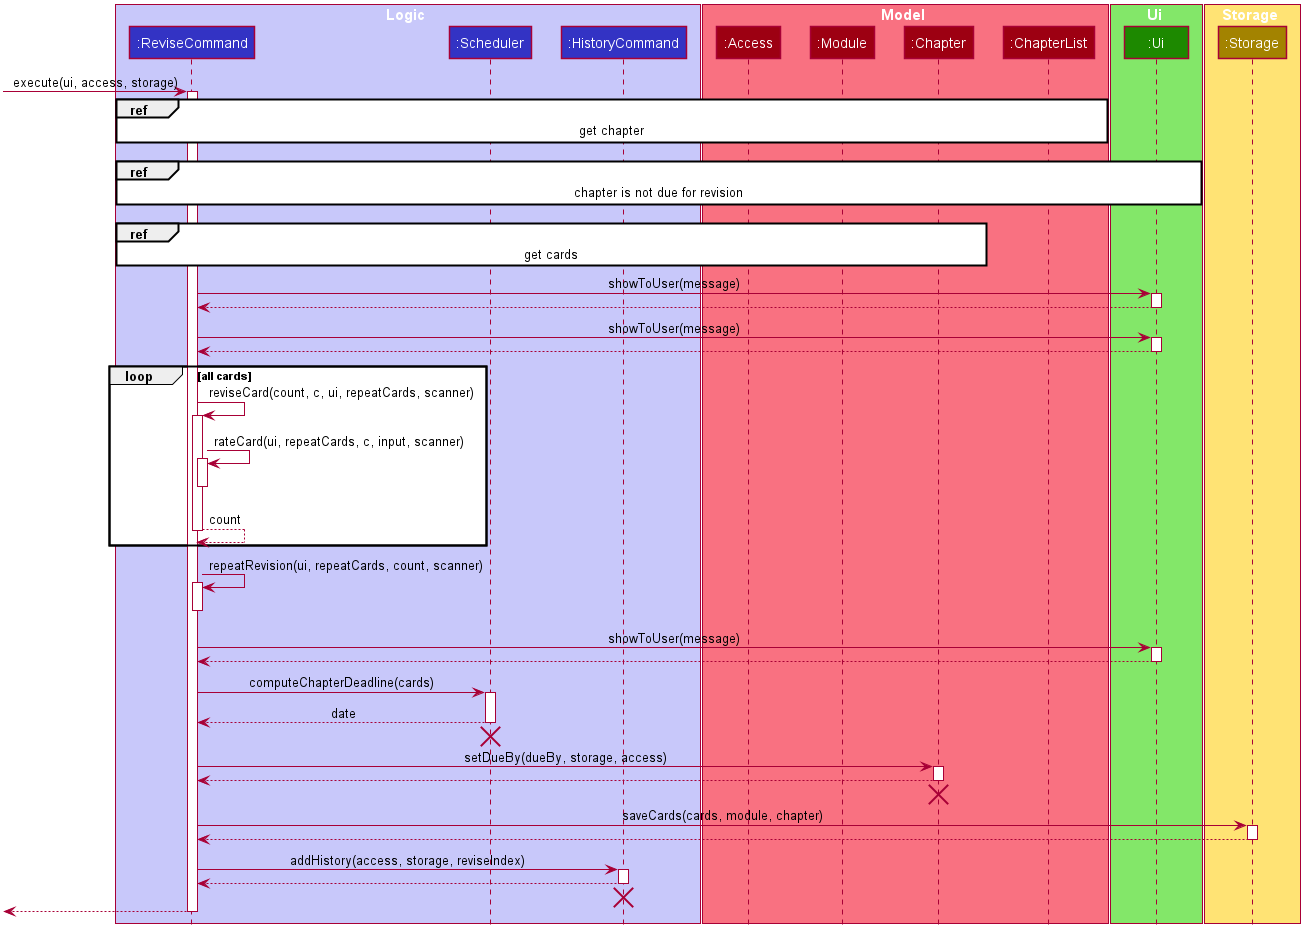
Figure 43. Sequence diagram of revise
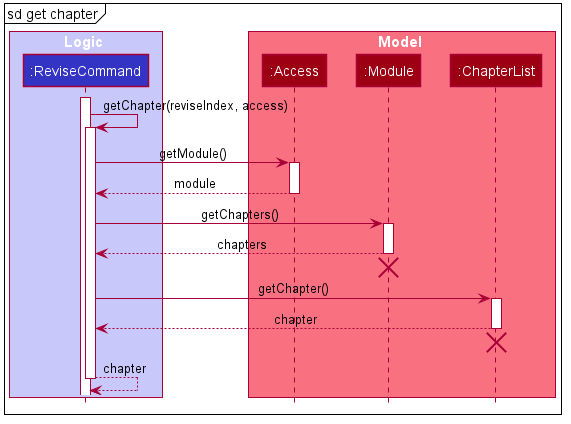
Figure 44. Sequence diagram of get chapter for revision
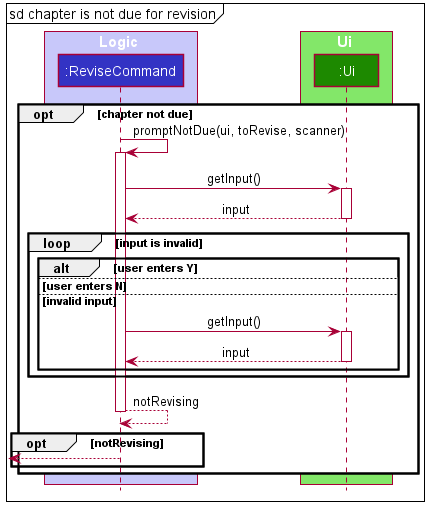
Figure 45. Sequence diagram of revise for chapter that is not due
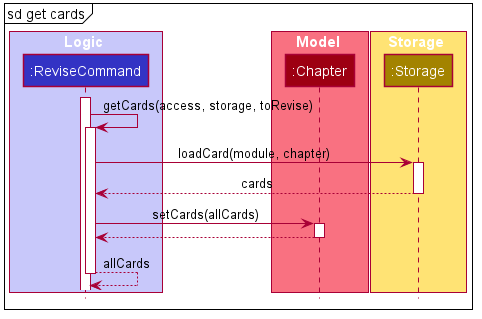
Figure 46. Sequence diagram of get cards for revision
4.4.2. Scheduling The Chapters Feature
Implementation
In KAJI, each Chapter stores a CardList of Cards, each with their own int attribute previousInterval. Each Chapter also has a LocalDate attribute named dueBy that determines when the Chapter is due for revision.
At the end of a revision session, the Scheduler class implements Spaced Repetition by computing the deckInterval, the mean (rounded off to the nearest integer) of the previousIntervals of every Card within the Chapter, and updates the dueBy attribute of the Chapter to deckInterval days after the day of revision.
To support this feature, Scheduler implements the following operations:
-
Scheduler#computeEasyInterval()- returns the product of theCard’spreviousIntervaland the Easy Multiplier(4.4) rounded to the nearest integer -
Scheduler#computeMediumInterval()- returns the product of theCard’spreviousIntervaland the Medium Multiplier(2.2) rounded to the nearest integer -
Scheduler#computeHardInterval()- returns the product of theCard’spreviousIntervaland the Hard Multiplier(1.1) rounded to the nearest integer -
Scheduler#computeChapterInterval()- returns the mean of thepreviousIntervalof eachCardwithin theChapterrounded off to the nearest integer -
Scheduler#computeChapterDeadline()- returns aLocalDateobject containing the newdueBy, which is interval(returned fromScheduler#computeChapterInterval()) days away from the current day
Scheduler#computeEasyInterval(), Scheduler#computeMediumInterval() and Scheduler#computeHardInterval() are exposed in the ReviseCommand class as ReviseCommand#rateCard() while Scheduler#computeDeckDeadline() is exposed as ReviseCommand#execute().
Back to Top ^
4.5. Viewing and Customising the Schedule Feature
KAJI schedules the user’s database automatically for them based on their revision sessions, chapter by chapter, using Spaced Repetition. Users should be able to view their schedule for the current day to know which tasks they need to complete on the day itself and to view their schedule for the upcoming week so that they can plan ahead. However, to effectively use the scheduling feature, users should also be able to customise their scheduling system to include or exclude chapters from their schedule with ease.
To utilise this feature, the following commands and their corresponding features are introduced:
-
due- Viewing their schedule for the current day (View Due) -
preview- Viewing their schedule for the upcoming week (Preview Upcoming Due) -
exclude- Removing Chapters from the Scheduler (Exclusion) -
include- Including Chapters back into the Scheduler (Exclusion)
4.5.1. View Due Chapters Feature
Implementation
Each Chapter has a deadline assigned to it from the point of creation, which forms the core of the Scheduling process. The View Due Chapters Feature builds on that by allowing users to view every chapter in the database that is due on the current day with a single command.
To support this feature, the following command was added to KAJI:
-
due- A command that displays everyChapterin the database that is due on a given day. A corresponding ClassListDueCommandwas also created to carry out the functions related to the command.
This feature takes the Exclusions of the database into account and will not display Chapters from the Exclusion List when the user calls them even if their deadlines are due.
As this Feature can be activated at any point, the following class is created to identify Chapters easily.
-
DueChapter- object contain two variables,String parentModuleto identify theChapter’s parentModule, andChapter chapterto hold a reference to the actualChapter
To support the View Due feature, ListDueCommand implements the following operations:
-
ListDueCommand#loadAllDueChapters()- CallsStorage#loadAllDueChapters()to load everyChapterin the database as aDueChapterand stores them into aArrayList<DueChapter> allDueChapters -
ListDueCommand#setDueDueChapters()- Checks eachDueChapterinArrayList<DueChapter> allDueChaptersto verify if the underlyingChapteris due by the current day by callingScheduler#isDeadlineDue()on theChapter’s deadline’, and adds the dueDueChaptersintoArrayList<DueChapter> dueDueChapters -
ListDueCommand#execute()- CallsListDueCommand#loadAllDueChapters(),ListDueCommand#setDueDueChapters()and prints theDueChapters that are due
On top of that, Storage implements the following operations:
-
Storage#checkChapterDeadline()- Reads the deadline for eachChapter, prompts if they are corrupted, and adds aDueChapterformed with theChapterintoArrayList<DueChapter> allDueChapters -
Storage#checkAllChaptersForDue()- Obtains the name of everyChapterfrom the list of Modules passed to it and callsStorage#checkChapterDeadline()for each of them -
Storage#loadAllDueChapters()- Obtains the names of everyModulein the user database and callsStorage#checkAllChaptersForDue()
Figure 47. Class diagram of ListDue
Example
For instance, the user wants to check what Chapters are due at the moment. A detailed description of what happens is shown below:
Step 1: The user enters due.
Step 2: The user input is parsed by Parser, and Parser creates a ListDueCommand object.
Step 3: ListDueCommand is executed and calls the method ListDueCommand#loadAllDueChapters(), which will call Storage#loadAllDueChapters(), which will then call StorageLoad#loadAllChaptersAsDueChapters(). The name of every Chapter, their deadlines, and the name of the Module that they belong to, will be stored as a DueChapter and be returned to ListDueCommand.
Step 4: ListDueCommand will then call ListDueCommand#setDueDueChapters() to parse each DueChapter for those
that are already due by the current date, and add them to its dueDueChapters attribute.
Step 5: ListDueCommand will then call Ui#printDueByTodayMessage() to print the prompt, and then call Ui#printDueChapters(), to print out the contents of dueDueChapters
The following sequence Diagrams illustrates how the View Due Chapters Process is executed:
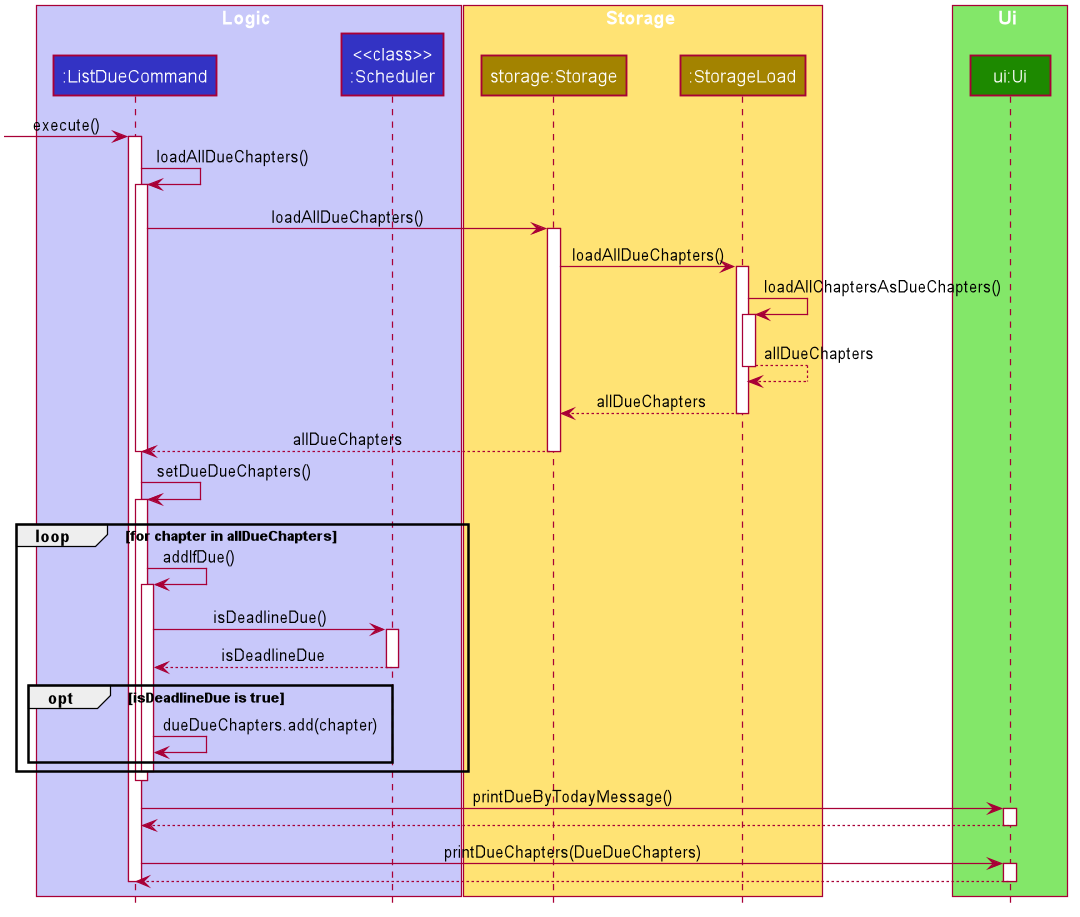
Figure 48. Sequence Diagram of the view due Feature
4.5.2. Preview Upcoming Dues Feature
Implementation
Similar to the View Due Chapters Feature, the Preview Upcoming Dues Feature builds on the Scheduling process by allowing users to view every chapter in the database that is due in the upcoming week with a single command.
To support this feature, the following command was added to KAJI:
-
preview- A command that displays everyChapterin the database that is due in the upcoming week. A corresponding ClassPreviewCommandwas also created to carry out the functions related to the command.
This feature also takes the Exclusions of the database into account and will not display Chapters from the Exclusion List when the user calls them even if they are due in the upcoming week.
As this Feature can be activated at any point, the following class is also (similar to View Due Chapters) used to identify Chapters easily.
-
DueChapter- object contain two variables,String parentModuleto identify theChapter’s parentModule, andChapter chapterto hold a reference to the actualChapter
To support the Preview Upcoming Dues feature, PreviewCommand implements the following operations:
-
PreviewCommand#loadAllDueChapters()- CallsStorage#loadAllDueChapters()to load everyChapterin the database as aDueChapterand stores them into aArrayList<DueChapter> allDueChapters -
PreviewCommand#setDueDueChapters()- Checks eachDueChapterinArrayList<DueChapter> allChaptersto verify if the underlyingChapteris due in an increment number of days from the current day by callingScheduler#isDeadlineDueIn()on theChapter’s deadline, and adds the dueDueChaptersintoArrayList<DueChapter> dueDueChapters -
PreviewCommand#execute()- CallsPreviewCommand#loadAllDueChapters(), before callingPreviewCommand#setDueDueChapters()for the current day, then one to six days after the current day, and prints theDueChapters for each day individually
On top of that, the following operations from Storage are used:
-
Storage#checkChapterDeadline()- Reads the deadline for eachChapter, prompts if they are corrupted, and adds aDueChapterformed with theChapterintoArrayList<DueChapter> allDueChapters -
Storage#checkAllChaptersForDue()- Obtains the name of everyChapterfrom the list of Modules passed to it and callsStorage#checkChapterDeadline()for each of them -
Storage#loadAllDueChapters()- Obtains the names of everyModulein the user database and callsStorage#checkAllChaptersForDue()
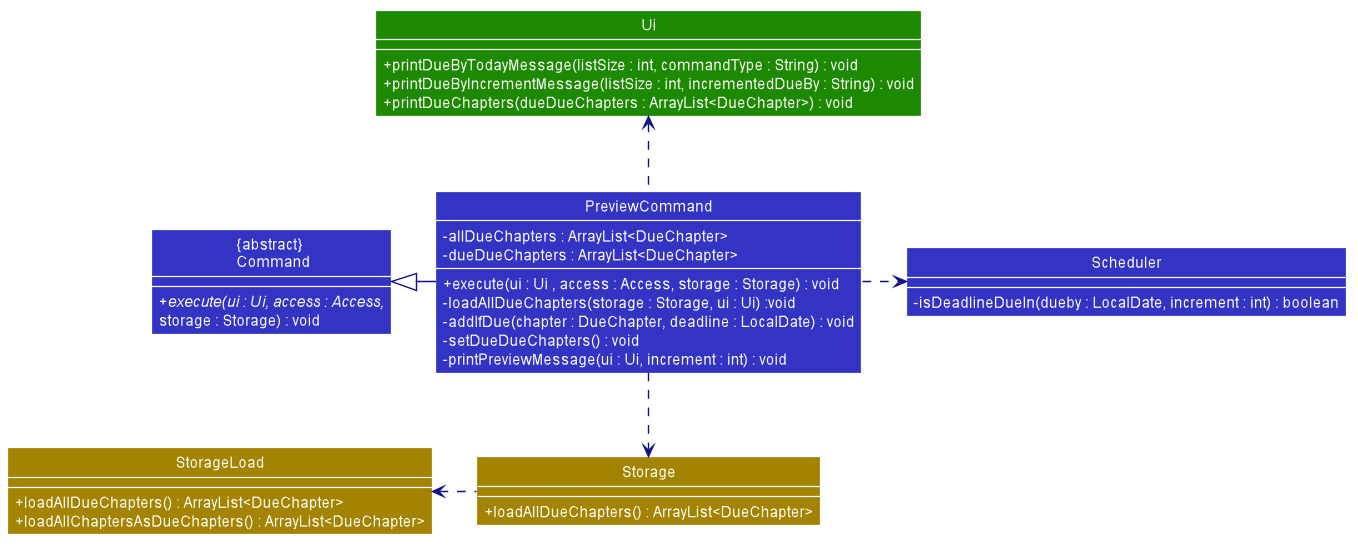
Figure 49. Class diagram of preview
Example
For instance, the user wants to check what Chapters are due on in the upcoming week. A detailed description of what happens is shown below:
Step 1: The user enters preview.
Step 2: The user input is parsed by Parser, and Parser creates a PreviewCommand object.
Step 3: PreviewCommand is executed and calls the method PreviewCommand#loadAllDueChapters(), which will call
Storage#loadAllDueChapters(), which will then call StorageLoad#loadAllChaptersAsDueChapters(). The name of every
Chapter, their deadlines, and the name of the Module that they belong to, will be stored as a DueChapter and be
returned back to PreviewCommand.
Step 4: To check for each day in the upcoming week, PreviewCommand runs a for loop with to carry out the following
steps for increment of value from 0 to 6
Step 5: PreviewCommand will then call PreviewCommand#setDueDueChapters() to parse each DueChapter for those
that are already due on the current date + increment days, and add them to its dueDueChapters attribute.
Step 5: PreviewCommand will then call Ui#printDueByTodayMessage() to print the prompt if the value of increment is 0, and Ui#printDueByIncrementMessage() to print the prompt if the value of increment is from 1 to 6.
Step 6: PreviewCommand will then finally call Ui#printDueChapters(), to print out the contents of dueDueChapters for the current iteration.
Step 7: Increment the value of increment by 1, and go back to Step 4 if the value of increment is smaller than 7.
The following sequence Diagrams illustrates how the Preview Upcoming Dues Process is executed:
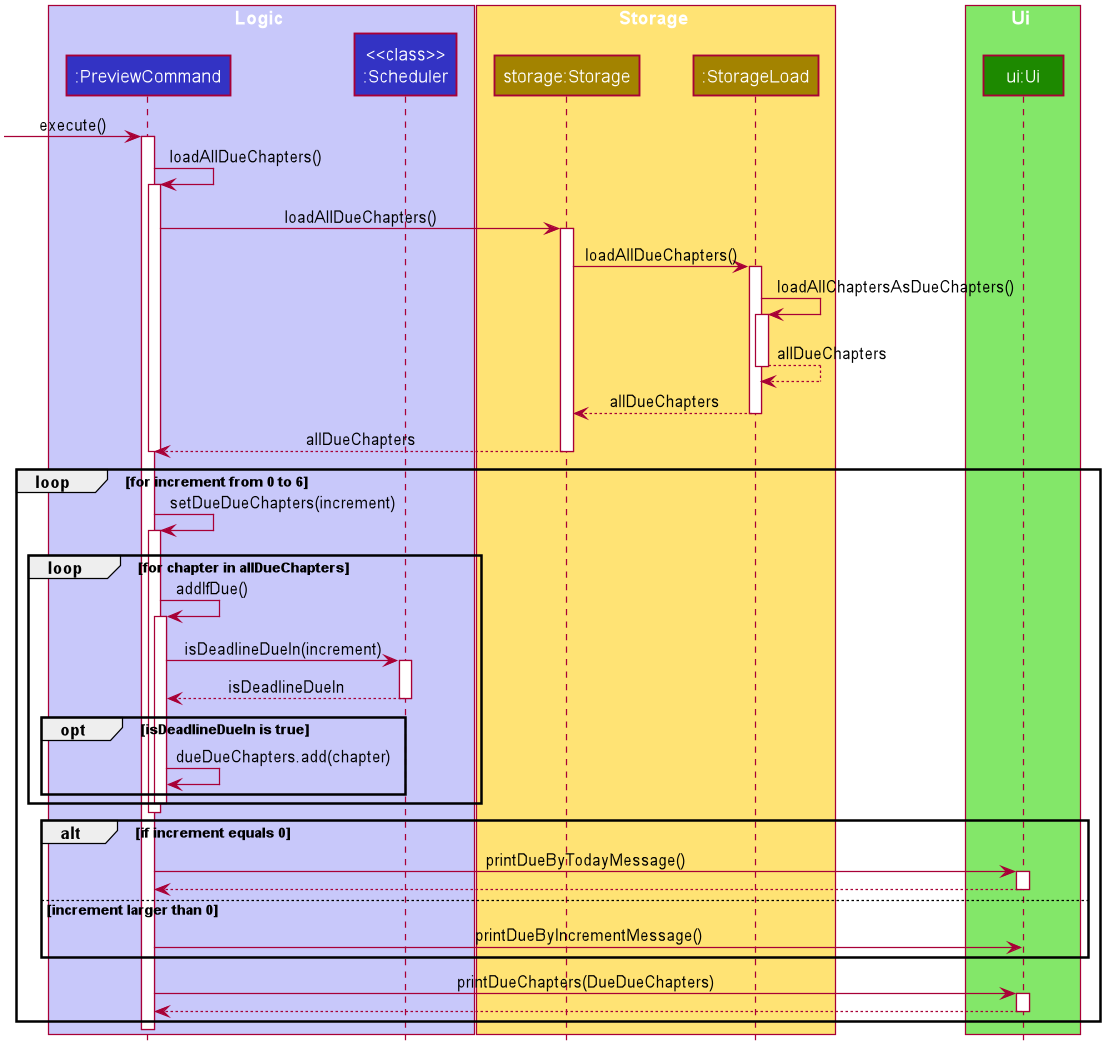
Figure 50. Sequence diagram of the preview upcoming dues feature
4.5.3. Exclusion Feature
Implementation
KAJI allows users to customise which Chapters are to be excluded from their scheduling by maintaining an Exclusion List: a list of Chapters that KAJI will ignore as it parses for Chapters that are due in the due and preview commands.
This is to allow users to exclude and include Chapters from and to their schedules without having to remove and add the Chapters from their database, which can be tedious.
To support this feature, the following commands were added to KAJI:
-
exclude- A command that addsChapters to the Exclusion List. -
include- A command that removesChapters from the Exclusion List. Two corresponding ClassesExecuteCommandandIncludeCommandwere also created to carry out the functions related to the commands.
To load and store the Exclusion List, a Exclusion File is created and maintained using these two methods from the Storage Class:
-
Storage#loadExclusionFile()- Reads the contents of the Exclusion File, parses it into the Exclusion List, stored as aArrayList<String>, and returns it. -
Storage#updateExclusionFile()- Writes theArrayList<String>Exclusion List into the Exclusion File.
4.5.3.1 Excluding Chapters from the Schedule Feature
The exclude command can be called with either exclude chapter or exclude module, which adds a Chapter or every Chapter from a Module to the Exclusion List respectively.
To determine if a single chapter or an entire module is to be added to the Exclusion List, excludecommand implements the operation excludecommand#attemptToExclude().
-
excludecommand#attemptToExclude()- responds to various forms ofexcludecommand input as follows:- calls
excludecommand#addChapterToExclusion()ifexclude chapteris entered - calls
excludecommand#addModuleToExclusion()ifexclude moduleis entered - or throws an exception if the specified command argument is invalid.
- calls
Items are added into the ArrayList<String> Exclusion List using two pairs of commands in both ExcludeCommand and
Storage:
- Excluding a Chapter from Scheduling
-
ExcludeCommand#addChapterToExclusion()- gets the name of theChapterto be excluded and the name of theModuleit belongs to, and callsStorage#appendChapterToExclusionFile() -
Storage#appendChapterToExclusionFile()- appends the targetChapterto the Exclusion File if the targetChapterexists and is not already in the Exclusion File
-
- Excluding a Module from Scheduling
-
ExcludeCommand#addModuleToExclusion()- gets the name of theModuleto be excluded, and callsStorage#appendModuleToExclusionFile() -
Storage#appendModuleToExclusionFile()- appends everyChapterof the targetModulenot already in the Exclusion File to it if the targetModuleexists
-
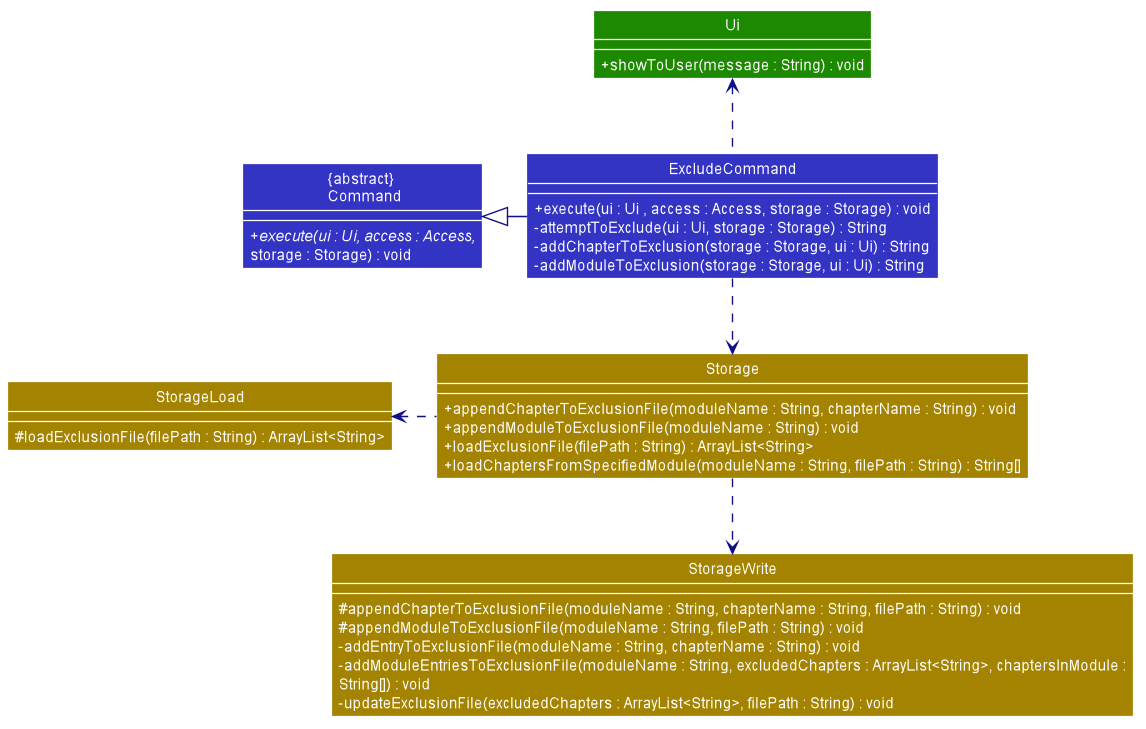
Figure 51. Class diagram of exclude
Example
For instance, the user wants to exclude the Module CS2113T from his schedule. A detailed description of what happens is shown below:
Step 1: The user enters exclude module
Step 2: The user input is parsed by Parser, and Parser creates a ExcludeCommand object.
Step 3: ExcludeCommand is executed and calls the method ExcludeCommand#attemptToExclude().
Step 4: ExcludeCommand#attemptToExclude() checks the command argument, module for the exclude command and calls
ExcludeCommand#addModuleToExclusion()
Step 5: ExcludeCommand calls Ui#getExcludedModuleName() to obtain the name of the module that is to be excluded from the scheduling process, so the user will enter CS2113T here
Step 6: ExcludeCommand will then call Storage#appendModuleToExclusionFile(), which will in turn call
StorageWrite#appendModuleToExclusionFile() to begin the process of Updating the Exclusion File.
Step 7: StorageWrite will load the contents of the Exclusion File into excludedChapters using StorageLoad#loadExclusionFile() and
load the Chapters of the CS2113T by calling StorageLoad#loadChaptersFromSpecifiedModule().
Step 8: StorageWrite will then check through the contents of the Exclusion file for each of the Chapters in CS2113T, and
add them into excludedChapters if it is not already in it.
Step 9: After the inclusion of every Chapter in the CS2113T into excludedChapters, the contents of it are
written back by StorageWrite into the Exclusion File by calling StorageWrite#updateExclusionFile().
The following sequence Diagrams illustrates how the “exclude” command is executed:
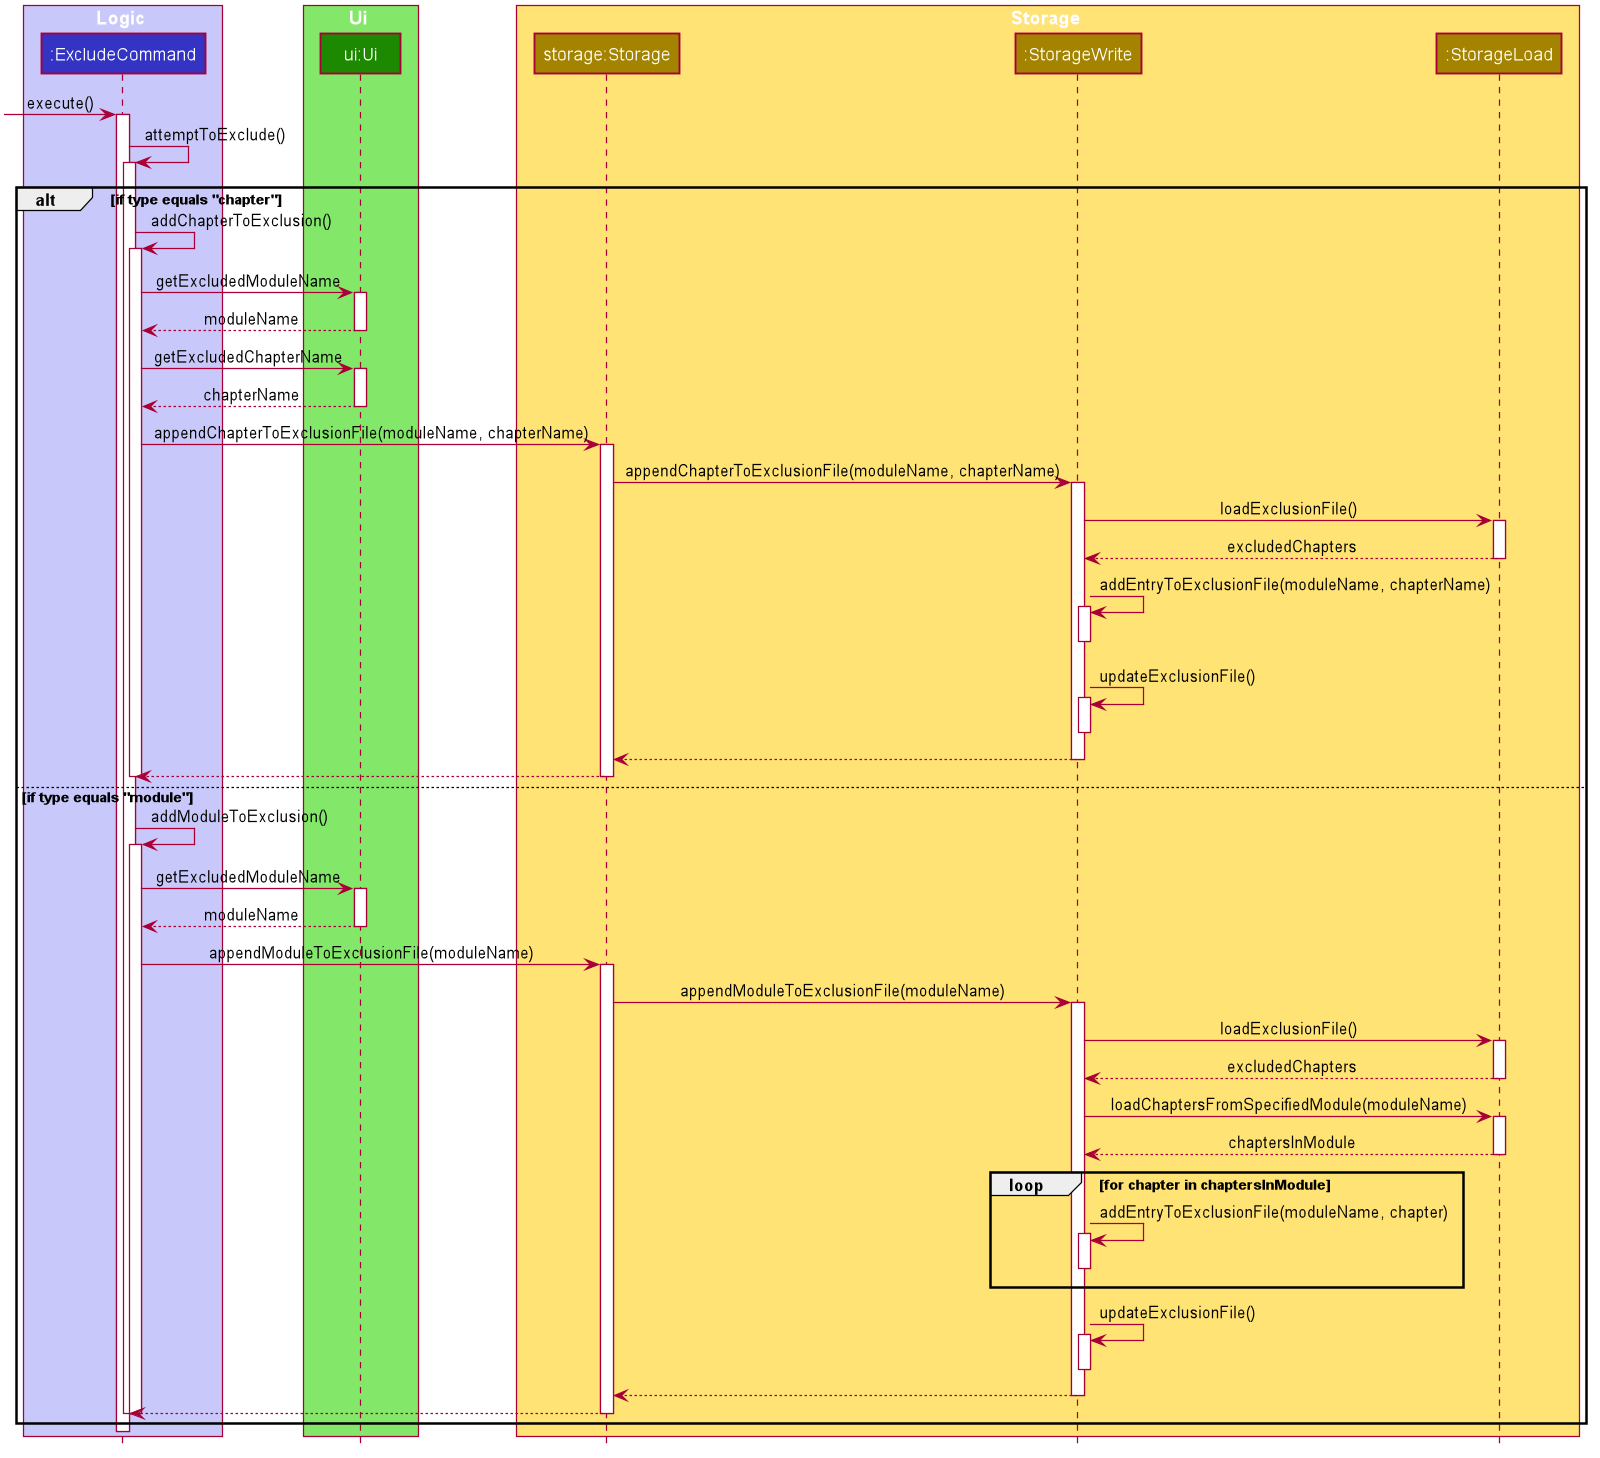
Figure 52. Sequence diagram using the exclusion feature to exclude content from the schedule
4.5.3.2 Including Chapters back into the Schedule Feature
On the other hand, the include command can be called with include chapter or include module which removes a Chapter or every Chapter from a Module from the Exclusion List.
Similarly, to determine if a single chapter or an entire module is to be removed from the Exclusion List, includecommand implements the operation includecommand#attemptToInclude().
-
includecommand#attemptToInclude(). - responds to various forms ofexcludecommand input as follows:- calls
includecommand#addChapterToExclusion()ifexclude chapteris entered - calls
includecommand#addModuleToExclusion()ifexclude moduleis entered - or throws an exception if the specified command argument is invalid.
- calls
Items are removed from the ArrayList<String> Exclusion List using two pairs of commands in both IncludeCommand
and Storage:
- Including a Chapter from Scheduling
-
IncludeCommand#removeChapterFromExclusion()- gets the name of theChapterto be included and the name of theModuleit belongs to, and callsStorage#removeChapterFromExclusionFile() -
Storage#removeChapterFromExclusionFile()- removes the targetChapterfrom the Exclusion File if the targetChapteris in the Exclusion File
-
- Including a Module from Scheduling
-
IncludeCommand#removeModuleFromExclusion()- gets the name of theModuleto be included, and callsStorage#removeModuleFromExclusionFile() -
Storage#removeModuleFromExclusionFile()- removes everyChapterof the targetModulethat is in the Exclusion File
-
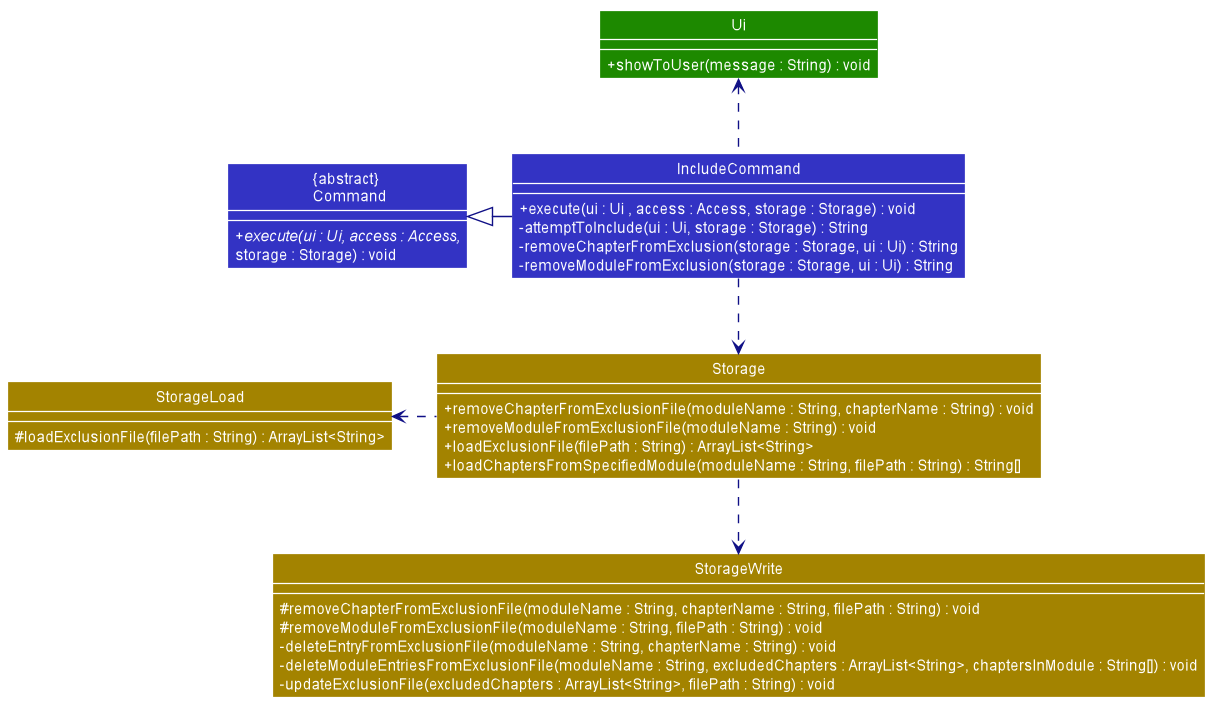
Figure 53. Class diagram of include
Example
For instance, the user wants to include the Module CS2113T back into his schedule. A detailed description of what happens is shown below:
Step 1: The user enters include module
Step 2: The user input is parsed by Parser, and Parser creates a IncludeCommand object.
Step 3: IncludeCommand is executed and calls the method IncludeCommand#attemptToInclude().
Step 4: IncludeCommand#attemptToInclude() checks the command argument, module for the include command and calls
IncludeCommand#removeModuleFromExclusion()
Step 5: IncludeCommand calls Ui#getIncludedModuleName() to obtain the name of the module that is to be included back into the scheduling process, so the user will enter CS2113T here
Step 6: IncludeCommand will then call Storage#removeModuleFromExclusionFile(), which will in turn call
StorageWrite#removeModuleFromExclusionFile() to begin the process of Updating the Exclusion File.
Step 7: StorageWrite will load the contents of the Exclusion File into excludedChapters using StorageLoad#loadExclusionFile() and
load the Chapters of the CS2113T by calling StorageLoad#loadChaptersFromSpecifiedModule().
Step 8: StorageWrite will then check through the contents of the Exclusion file for each of the Chapters in CS2113T, and
remove them from excludedChapters if found.
Step 9: After the removal of every Chapter in the CS2113T from excludedChapters, the contents of it are
written back by StorageWrite into the Exclusion File by calling StorageWrite#updateExclusionFile().
The following sequence Diagrams illustrates how the “include” command is executed:
Figure 54. Sequence diagram using the exclusion feature to include content into the schedule
4.5.4. Reschedule Chapter Feature
Implementation
The reschedule chapter feature allows the user to reschedule the due date of any existing chapter.
The user can reschedule the due date of an existing chapter with the reschedule command, which follows the following format: reschedule CHAPTER_INDEX DATE(yyyy-MM-dd).
The reschedule chapter feature is facilitated by ChapterList and Chapter. The list of user’s chapters are stored internally as ChapterList.
In addition, it implements the following operations:
-
ChapterList#getChapter()- Gets a chapter based on the specified index from the list of chapters. -
Chapter#setDueBy()— Sets the due date of the chapter.
The following diagram shows the class diagram of the reschedule chapter feature:
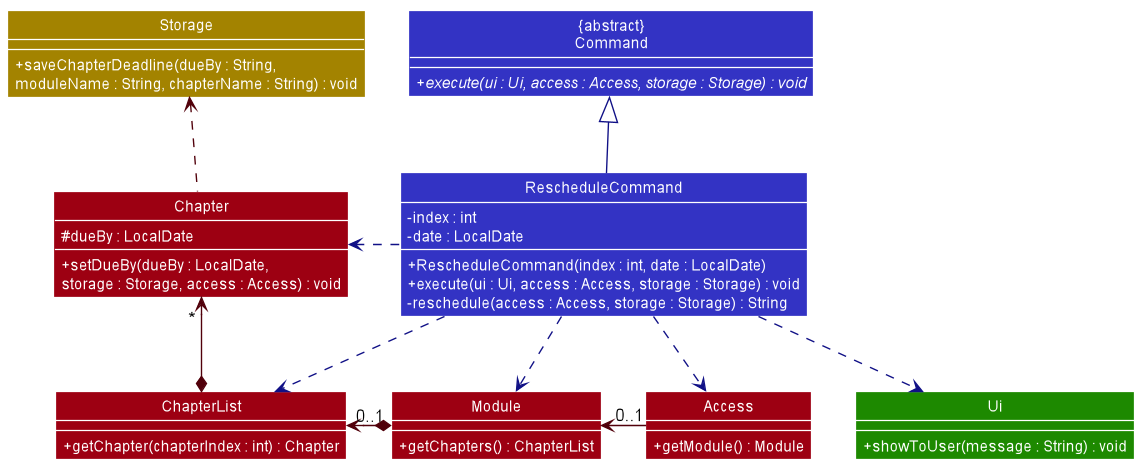
Figure 55. Class diagram of reschedule chapter feature
For instance, the user wants to reschedule the due date 2020-12-12 of the chapter Chapter 1 from the module CS2113T, a detailed description of what happens is shown below:
-
Step 1: The user is currently in
CS2113Tat the module level. -
Step 2: The user enters
reschedule 1 2020-12-20command to reschedule the first chapter in the list of chapters — which in this case isChapter 1. -
Step 3: The user input is parsed by
Parser, which results in a newRescheduleCommandobject. -
Step 4:
RescheduleCommandis executed and calls the methodRescheduleCommand#reschedule(). -
Step 5:
RescheduleCommand#reschedule()gets the chapter based on the index provided by the methodChapterList#getChapter(). -
Step 6: The due date of the chapter is rescheduled to
2020-12-20by the methodChapter#setDueBy(). -
Step 7: The result message from
RescheduleCommand#reschedule()is returned toRescheduleCommand#execute()and shown to the user by callingUi#showToUser().
The following sequence diagram shows how the reschedule chapter feature works:
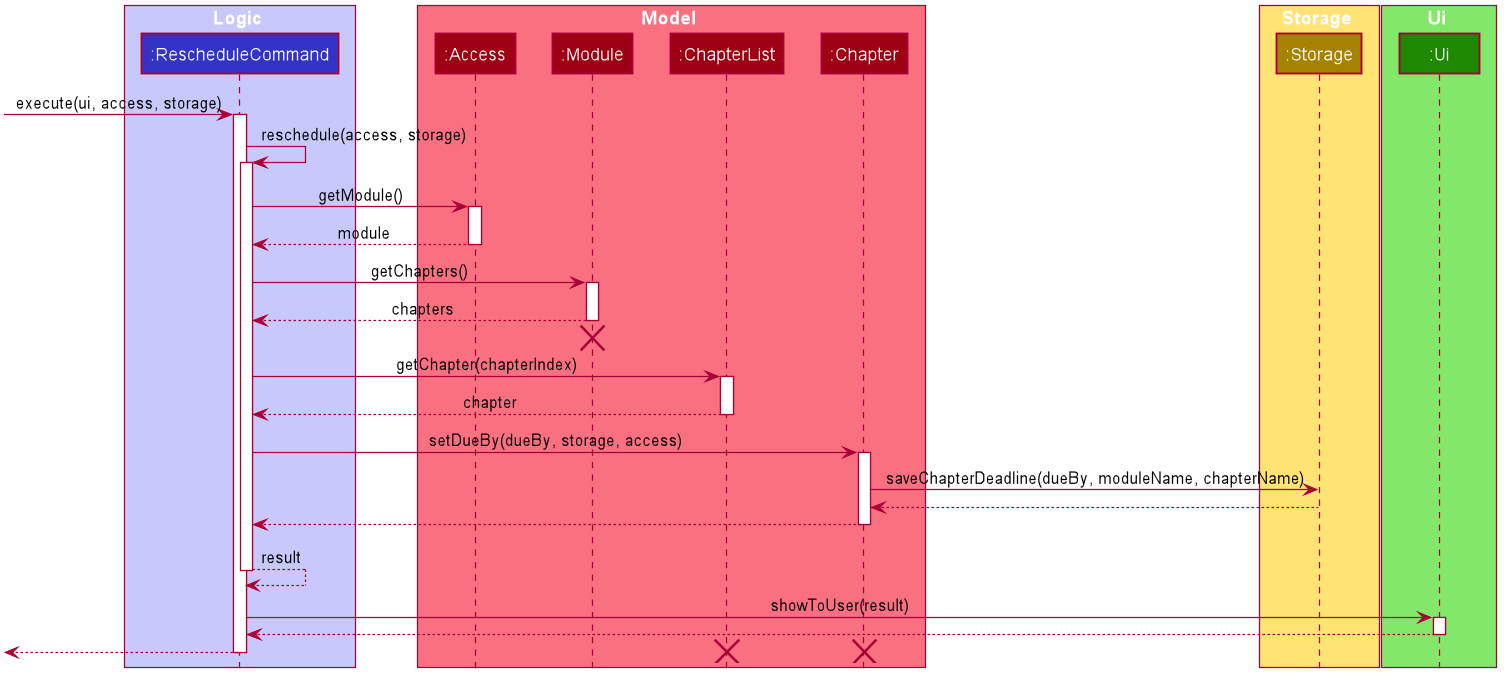
Figure 56. Sequence diagram of reschedule chapter feature
Moduleshould end at the destroy marker (X) but due to a limitation of PlantUML, the lifeline reaches the end of diagram.
4.5.5. View Revision History Feature
Implementation
The view revision history feature allows the user to list the revision completed in the session/in a day. In case the user enters history follow by a date(example: 2020-10-10), Kaji will list the revision completed in October 10, 2020. Otherwise, Kaji will list the revision completed in the day the user uses HelpCommand. This feature can be accessed at any level.
The history mechanism is facilitated by HistoryCommand. It extends from the abstract class Command.
In addition, it implements the following operations:
-
HistoryCommand#execute()— calls the list method to list the history. -
HistoryCommand#listHistory()— lists the revision completed in the session/in a day.
The following diagram shows the class diagram of the list revision history feature:
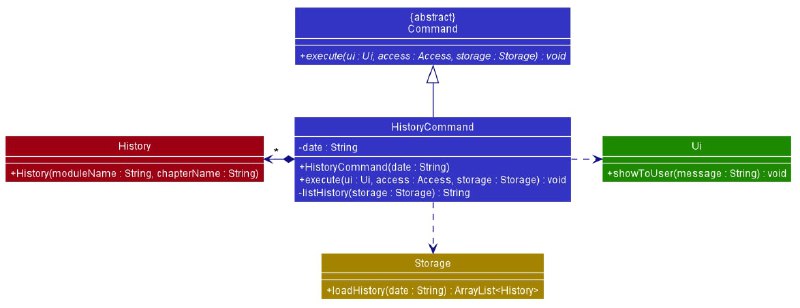
Figure 57. Class diagram of list revision history feature
Given below is an example usage scenario and how the history mechanism behaves at each step:
Step 1: The user launches the application and is currently in the admin level.
Step 2: The user executes history command to load and list the revision completed in current day.
Step 3: The user can also execute history 2020-11-09 command to load and list the revision completed in 2020-11-09.
The following sequence diagram shows how the list revision history feature works:
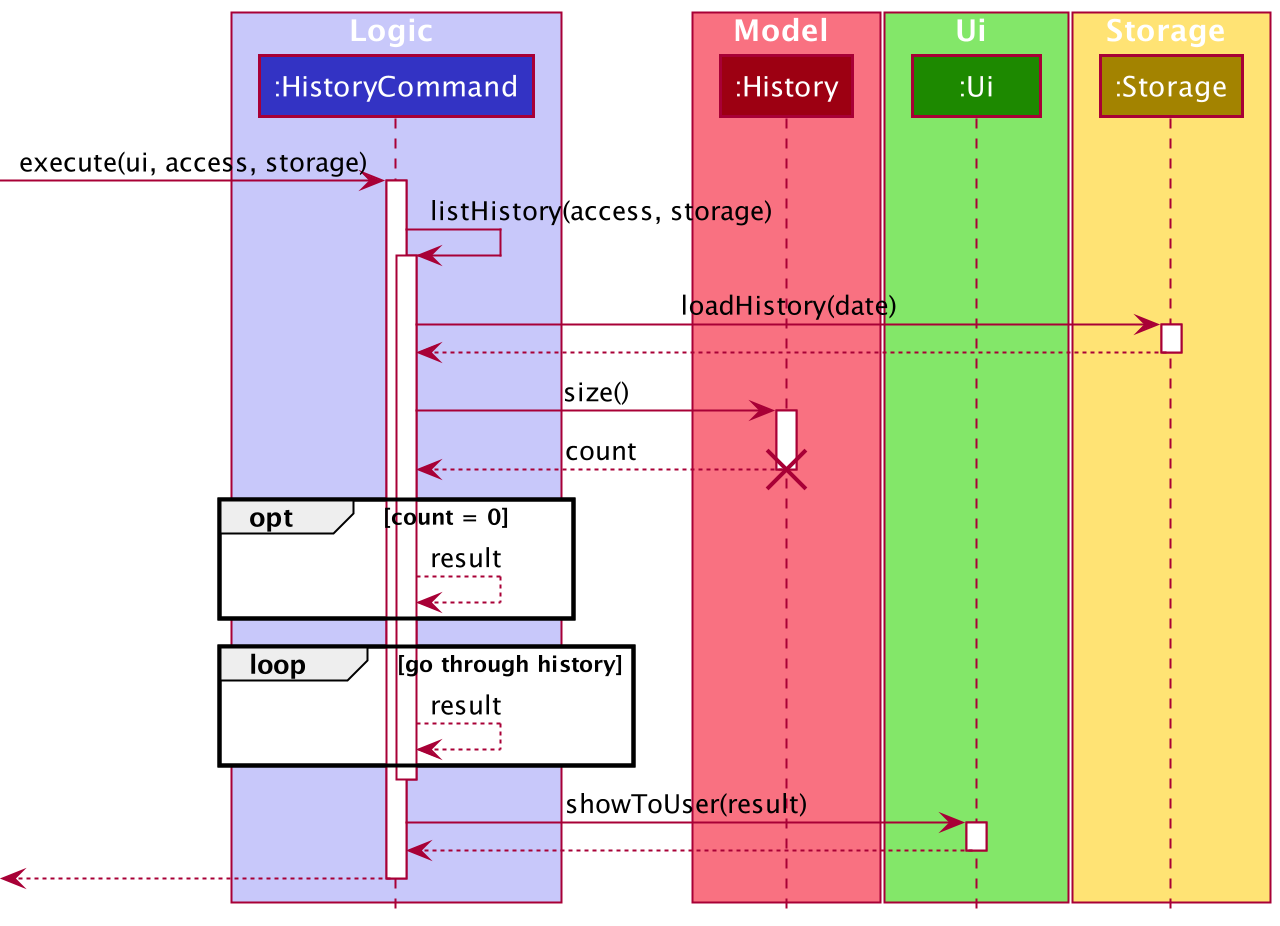
Figure 58. Sequence Diagram of List Revision History
Back to Top ^
5. Appendices
5.1. Appendix A: Product Scope
5.1.1 Target User Profile
- Students who use a computer often, and are reasonably comfortable with the command line interface
- Needs to have an effective study schedule
- Willing to keep track of the content they need to study
- Prefers typing to mouse interactions
5.1.2. Value Proposition
The application aims to provide students with an effective studying technique. In order to make studying easier for students, the application implements a technique known as spaced repetition, which help with memory retention. Content are scheduled automatically, and information is organised in the form of flashcards which makes it convenient to revise.
Back to Top ^
5.2. Appendix B: User Stories
| Version | As a … | I want to … | So that I can … |
|---|---|---|---|
| v1.0 | student | add modules | study based on modules |
| v1.0 | student | add chapters for each module | study based on chapters for a certain module |
| v1.0 | student | add flashcards inside each chapter for the content of each chapter | study the content of each chapter |
| v1.0 | student | list my modules | have an overview of what modules I have |
| v1.0 | student | list my chapters in each module | have an overview of what chapters I have for a module |
| v1.0 | student | list my flashcards in each chapter | have an overview of the content I have for a chapter |
| v1.0 | student | modify the module name | correct the module name if it is incorrect |
| v1.0 | student | modify the chapter name | correct the chapter name if it is incorrect |
| v1.0 | student | modify the content of the flashcards | correct the content if it is incorrect |
| v1.0 | student | remove modules/chapters/flashcard | remove modules/chapters/flashcards that I no longer need |
| v1.0 | student | access my module | revise based on module |
| v1.0 | student | access my chapters for a module | revise based on chapter for a certain module |
| v1.0 | student | revise the flashcards by chapter | do my revision |
| v1.0 | student | set a rating for a newly created chapter | rate a chapter without going through a revision session |
| v1.0 | student | state whether a flashcard is easy, medium or hard | revise the flashcards based of the difficulty of it |
| v1.0 | student | check the scheduled tasks daily | plan my schedule accordingly |
| v1.0 | student | rely entirely on the application to implement spaced repetition for me | enjoy the benefits of spaced repetition without having to implement it myself |
| v1.0 | student | have a help command | have an overview of how the application works |
| v1.0 | student | terminate the program | exit the application when I am done using it |
| v2.0 | student | see a forecast of the my revision schedule | plan ahead and make time to accommodate the revision of the corresponding number of chapters |
| v2.0 | student | reschedule a chapter | change the schedule according to my situation |
| v2.0 | student | view the module and chapters I have completed in a session/in a day | track my progress |
| v2.0 | student | get a sense of how well I have mastered each chapter | have an idea of how well I am doing for a module |
| v2.0 | student | include or exclude certain modules/chapters from the scheduler | revise only the modules/chapters that I need to |
Back to Top ^
5.3. Appendix C: Use Cases
This section will describe the use cases of KAJI.
(For all use cases below, the System is the KAJI application and the Actor is the user, unless specified otherwise.)
Use Case: add a new module
MSS
- User requests to add a new
module. -
KAJI creates and saves the new
modulewith themodulename specified by the user.Use case ends.
Use Case: list all current modules
MSS
- User requests to list all current
modules. -
KAJI shows a list of
modules available.Use case ends.
Use Case: edit a module
MSS
- User requests to edit a
module. -
KAJI makes the changes and saves the
modulewith the newmodulename specified by the user.Use case ends.
Use Case: remove a module from the current list of modules
MSS
- User requests to remove an existing
module. -
KAJI deletes the
modulefrom the list ofmodules.Use case ends.
Use Case: access a module level
MSS
- User requests to access a
modulelevel. -
KAJI changes the current
adminlevel of the user to themodulelevel specified by the user.Use case ends.
Use Case: revise a chapter from the current list of chapters in a particular module
MSS
- User requests to revise a
chapterfrom the current list ofchapters in a particularmodule. -
KAJI starts a revision session for the user.
Use case ends.
Extensions
User will be prompted to acknowledge that he wants to start a revision session for a chapter that is not due.
There will be no revision for an empty chapter.
Use Case: view a list of chapters which are due
MSS
- User requests to view a list of
chapters which aredue. -
KAJI shows a list of
chapters that aredueto the user.Use case ends.
Use Case: preview a list of chapters that are due in the week
MSS
- User requests to
previewa list ofchapters that areduein the week. -
KAJI shows a list of
chapters that areduein the week to the user.Use case ends.
Use Case: exclude an existing module or chapter
MSS
- User requests to
excludeamoduleorchapter. -
KAJI
excludes themoduleorchapterspecified by the user so that it will no longer be scheduled for revision.Use case ends.
Use Case: include an existing module or chapter
MSS
- User requests to
includeamoduleorchapter. -
KAJI
includes themoduleorchapterspecified by the user so that it will be scheduled for revision once again.Use case ends.
Use Case: reschedule the due date of an existing chapter
MSS
- User requests to
reschedulethe due date of an existingchapter. -
KAJI
reschedules the due date of thechapterspecified by the user.Use case ends.
Use Case: view the history of revision completed in a day
MSS
- User requests to view the
historyof revision completed in a day. -
KAJI shows the
historyof revision completed by the user in a day.Use case ends.
Use Case: check overall performance for an existing chapter using showrate
MSS
- User requests to check overall performance for an existing chapter using
showrate. -
KAJI shows the list of number of cards that were rated easy/medium/hard in the chapter to the user.
Use case ends.
Extensions
There will only be changes to the rating after a revision session.
Use Case: view the list of commands available using help
MSS
- User requests to view the list of commands available using
help. -
KAJI shows the list of commands available to the user.
Use case ends.
Back to Top ^
5.4. Appendix D: Non-Functional Requirements
- Should work on any mainstream OS as long as it has Java 11 installed.
- Should be able to hold up to 1000 flashcards without a noticeable sluggishness in performance for typical usage.
- A user with above average typing speed for regular English text (i.e. not code, not system admin commands) should be able to accomplish most of the tasks faster using commands than using the mouse.
- Data saved in a session should be persistent and carry forward to the next session of use.
- The file containing the saved data should be portable so that the user can transfer to the other machine with any mainstream OS and continuing using the app without any additional configuration.
- Application should not crash, application should always recover from error gracefully with an error message.
- Should work mostly without the need for the Internet.
- Should be designed for a single user.
- Should work on both 32-bit and 64-bit environments.
Back to Top ^
5.5. Appendix E: Glossary
- Mainstream OS: Windows, Linux, Unix, OS-X
- CLI: Command Line Interface
Back to Top ^
5.6. Appendix F: Instructions for Manual Testing
5.6.1. Launch and Shutdown
- Initial launch
- Download the jar file from the release page and copy into an empty folder.
- Launch a terminal and navigate to the folder containing the jar file.
- Run the jar file by entering command
java -jar kaji.jarand press enter (replace kaji.jar by the actual file name you downloaded from the release page). Expected output: Welcome message of Kaji is displayed.
- Shutdown of application
- Test case:
exit
Expected output: KAJI program terminates.
- Test case:
5.6.2. Showing a list of commands
- Prerequisites: Launch
KAJIsuccessfully. - Test case:
help
Expected output: A message listing how to use each command will be shown. - Other incorrect commands to try:
help abcd(where there are extra arguments)
Expected output: An error message stating that there should not be any arguments will be shown.
5.6.3. Adding a module/chapter/flashcard
- Adding a module
- Prerequisites: Ensure that you are at the admin level.
- Test case:
add CS2113T
Expected output: A success message stating that there is a new module added will be shown. - Test case:
add cs2113tafter running theaddcommand as stated above
Expected output: An error message stating that the module already exist will be shown. - Other incorrect commands to try:
add ../CS2113T(where non-alphanumeric characters are present)
Expected output: An error message stating that only alphanumeric characters and spaces will be shown.
- Adding a chapter
- Prerequisites: At least one module in the module list. Ensure that you are at the module level.
- Test case:
add Chapter 1
Expected output: A success message stating that there is a new chapter added will be shown. - Test case:
add chapter 1after running theaddcommand as stated above
Expected output: An error message stating that the chapter already exist will be shown. - Other incorrect commands to try:
add ../Chapter 1(where non-alphanumeric characters are present)
Expected output: An error message stating that only alphanumeric characters and spaces will be shown.
- Adding a flashcard
- Prerequisites: At least one module and chapter in the module and chapter list respectively. Ensure that you are at the chapter level.
- Test case:
add q:1+1 | a:2
Expected output: A success message stating that there is a new flashcard added will be shown. - Test case:
add q:1+1 | a:2after running theaddcommand as stated above
Expected output: An error message stating that the flashcard already exist will be shown. - Other incorrect commands to try:
add q:1+1 | a:(where parameter is missing)
Expected output: An error message stating that the question or answer is missing will be shown.
5.6.4. Listing modules/chapters/flashcards
- Listing all modules
- Prerequisites: At least one module in the list. No chapters in the module list. Ensure that you are at the module level.
- Test case:
list
Expected output: A message stating that there are no chapters will be shown. - Prerequisites: At least one module in the list. Chapter list contains some chapters. Ensure that you are at the module level.
- Test case:
list
Expected output: A message listing all the chapters will be shown. - Other incorrect commands to try:
list abcd(where there are extra arguments)
Expected output: An error message stating that there should not be any arguments will be shown.
- Listing all chapters
- Prerequisites: No modules in the module list. Ensure that you are at the admin level.
- Test case:
list
Expected output: A message stating that there are no modules will be shown. - Prerequisites: Module list contains some modules. Ensure that you are at the admin level.
- Test case:
list
Expected output: A message listing all the modules will be shown. - Other incorrect commands to try:
list abcd(where there are extra arguments)
Expected output: An error message stating that there should not be any arguments will be shown.
- Listing all flashcards
- Prerequisites: At least one module and chapter in the module and chapter list respectively. No flashcards in the flashcard list. Ensure that you are at the chapter level.
- Test case:
list
Expected output: A message stating that there are no flashcards will be shown. - Prerequisites: At least one module and chapter in the module and chapter list respectively. Flashcard list contains some flashcards. Ensure that you are at the chapter level.
- Test case:
list
Expected output: A message listing all the flashcards will be shown. - Other incorrect commands to try:
list abcd(where there are extra arguments)
Expected output: An error message stating that there should not be any arguments will be shown.
5.6.5. Editing a module/chapter/flashcard
- Editing a module
- Prerequisites: At least one module in the module list. Ensure that you are at the admin level.
- Test case:
edit 1 CS2113
Expected output: A message stating the module name before and after the edit will be shown. - Test case:
edit 0 CS2113
Expected output: No module is edited. An error message will be shown. - Other incorrect commands to try:
edit,edit x CS2113(where x is larger than the list size)
Expected output: Similar to previous or a message stating how to use the command will be shown.
- Editing a chapter
- Prerequisites: At least one module and chapter in the module and chapter list respectively. Ensure that you are at the module level.
- Test case:
edit 1 Chapter 2
Expected output: A message stating the chapter name before and after the edit will be shown. - Test case:
edit 0 Chapter 2
Expected output: No chapter is edited. An error message will be shown. - Other incorrect commands to try:
edit,edit x Chapter 2(where x is larger than the list size)
Expected output: Similar to previous or a message stating how to use the command will be shown.
- Editing a flashcard
- Prerequisites: At least one module, chapter and flashcard in the module, chapter and flashcard list respectively. Ensure that you are at the chapter level.
- Test case:
edit 1 q:1+1 | a:
Expected output: A message stating the flashcard content before and after the edit will be shown. - Test case:
edit 0 q:1+1 | a:
Expected output: No flashcard is edited. An error message will be shown. - Other incorrect commands to try:
edit,edit x q:1+1 | a:(where x is larger than the list size)
Expected output: Similar to previous or a message stating how to use the command will be shown.
5.6.6. Removing a module/chapter/flashcard
- Removing a module
- Prerequisites: At least one module in the module list. Ensure that you are at the admin level. List all modules using the
listcommand. - Test case:
remove 1
Expected output: First module is removed from the module list. A message stating the details of the removed module will be shown. - Test case:
remove 0
Expected output: No module is removed. An error message will be shown. - Other incorrect commands to try:
remove,remove x(where x is larger than the list size)
Expected output: Similar to previous or a message stating how to use the command will be shown.
- Prerequisites: At least one module in the module list. Ensure that you are at the admin level. List all modules using the
- Removing a chapter
- Prerequisites: At least one module and chapter in the module and chapter list respectively.
Ensure that you are at the module level. List all modules using the
listcommand. - Test case:
remove 1
Expected output: First chapter is removed from the chapter list. A message stating the details of the removed chapter will be shown. - Test case:
remove 0
Expected output: No chapter is removed. An error message will be shown. - Other incorrect commands to try:
remove,remove x(where x is larger than the list size)
Expected output: Similar to previous or a message stating how to use the command will be shown.
- Prerequisites: At least one module and chapter in the module and chapter list respectively.
Ensure that you are at the module level. List all modules using the
- Removing a flashcard
- Prerequisites: At least one module, chapter and flashcard in the module, chapter and flashcard list respectively.
Ensure that you are at the chapter level. List all flashcards using the
listcommand. - Test case:
remove 1
Expected output: First flashcard is removed from the chapter list. A message stating the details of the removed flashcard will be shown. - Test case:
remove 0
Expected output: No flashcard is removed. An error message will be shown. - Other incorrect commands to try:
remove,remove x(where x is larger than the list size)
Expected output: Similar to previous or a message stating how to use the command will be shown.
- Prerequisites: At least one module, chapter and flashcard in the module, chapter and flashcard list respectively.
Ensure that you are at the chapter level. List all flashcards using the
5.6.7. Accessing the next level
- Accessing module level
- Prerequisites: At least one module in the module list. Ensure that you are at the admin level.
- Test case:
go 1
Expected output: Accessed the first module in the module list. Access level message will be changed. - Test case:
go 0
Expected output: Still at admin level. An error message will be shown. - Other incorrect commands to try:
go,go x(where x is larger than the list size)
Expected output: Similar to previous or a message stating how to use the command will be shown.
- Accessing chapter level
- Prerequisites: At least one module and chapter in the module and chapter list respectively. Ensure that you are at the module level.
- Test case:
go 1
Expected output: Accessed the first chapter in the chapter list. Access level message will be changed. - Test case:
go 0
Expected output: Still at module level. An error message will be shown. - Other incorrect commands to try:
go,go x(where x is larger than the list size)
Expected output: Similar to previous or a message stating how to use the command will be shown.
5.6.8. Going back to the previous level
- Going back to admin level
- Prerequisites: Ensure that you are at module level.
- Test case:
back
Expected output: Back to admin level. Access level message will be changed. - Other incorrect commands to try:
back abcd(where there are extra arguments)
Expected output: An error message stating that there should not be any arguments will be shown.
- Going back to module level
- Prerequisites: Ensure that you are at chapter level.
- Test case:
back
Expected output: Back to module level. Access level message will be changed. - Other incorrect commands to try:
back abcd(where there are extra arguments)
Expected output: An error message stating that there should not be any arguments will be shown.
5.6.9. Rescheduling a chapter
- Prerequisites: At least one module and chapter in the module and chapter list respectively. Ensure that you are at the module level.
- Test case: Substitute DATE with the current date
reschedule 1 DATE
Expected output: A message stating the due date of the chapter before and after the rescheduling will be shown. - Test case: Substitute DATE with the date before the current date
reschedule 1 DATE
Expected output: Chapter will not be rescheduled. A message stating that the due date cannot be before the current date will be shown. - Test case: Substitute DATE with the current date
reschedule 0 DATE
Expected output: No chapter will be rescheduled. An error message will be shown. - Other incorrect commands to try:
reschedule,reschedule x DATE(where x is larger than the list size)
Expected output: Similar to previous or a message stating how to use the command will be shown.
5.6.10. Starting a revision session
- Prerequisites: At least one flashcard is in the chapter to be revised. Ensure that you are at the module level.
- Test case:
revise 1
Expected output: A revision session will start on the first chapter in the module. - Other incorrect commands to try:
revise Chapter 1(where chapter name instead of its index integer is provided)
Expected output: An error message stating to specify chapter index in integer will be shown.
5.6.11. Checking percentage of rating for the cards in a chapter
- Prerequisites: At least one flashcard is in the chapter. Ensure that you are at the chapter level.
- Test case:
showrate
Expected output: A list of the percentage for easy/medium/hard based on the number of cards will be shown. - Other incorrect commands to try:
showrate blah(where extra arguments are added)
Expected output: An error message stating that there should be no extra arguments will be shown.
5.6.12. Listing all chapters that are due on current date
- Prerequisites: Launch
KAJIsuccessfully. - Test case:
due
Expected output: A list of chapters that are due on the current date will be shown. If no chapters are due, a message stating that no chapters are due for the day will be shown. - Other incorrect commands to try:
due blah(where extra arguments are added)
Expected output: An error message stating that there should be no extra arguments will be shown.
5.6.13. Previewing list of chapters due in a week
- Prerequisites: Launch
KAJIsuccessfully. - Test case:
preview
Expected output: A list of chapters that are due in a week will be shown. If no chapters are due, every date will be accompanied by a message that no chapters are due. - Other incorrect commands to try:
preview blah(where extra arguments are added)
Expected output: An error message stating that there should be no extra arguments will be shown.
5.6.14. Viewing history of revision completed in a day
- Prerequisites: Launch
KAJIsuccessfully. - Test case:
history
Expected output: Lists the module and chapter which you have completed revision for. If no revision was done on the day, a message stating that no revision for that session will be shown. - Test case:
history 2020-11-09Expected output: List the module and chapter which you have completed revision for on 2020-11-09. If no revision was done on the day, a message stating that no revision for that session will be shown. - Other incorrect commands to try:
history blah(where the argument is not in the correct date format)
Expected output: An error message stating that the date should be inyyyy-MM-ddformat will be shown.
5.6.15. Excluding a module/chapter
- Excluding a module
- Prerequisites: Launch
KAJIsuccessfully. The module you want to exclude should exist. - Test case:
exclude module
Expected output: A prompt for which module to be excluded will be shown and you can enter an existing module which you want to exclude. - Other incorrect commands to try:
exclude blah(where the argument is not module/chapter) Expected output: An error message stating that only module/chapter should be specified will be shown.
- Prerequisites: Launch
- Excluding a chapter
- Prerequisites: Launch
KAJIsuccessfully. The chapter you want to exclude should exist. - Test case:
exclude chapter
Expected output: A prompt for which chapter to be excluded will be shown and you can enter an existing chapter which you want to exclude. - Other incorrect commands to try:
exclude blah(where the argument is not module/chapter) Expected output: An error message stating that only module/chapter should be specified will be shown.
- Prerequisites: Launch
5.6.16. Including a module/chapter
- Including a module
- Prerequisites: Launch
KAJIsuccessfully. The module you want to include should exist. - Test case:
include module
Expected output: A prompt for which module to be included will be shown and you can enter an existing module which you want to include. - Other incorrect commands to try:
include blah(where the argument is not module/chapter) Expected output: An error message stating that only module/chapter should be specified will be shown.
- Prerequisites: Launch
- Including a chapter
- Prerequisites: Launch
KAJIsuccessfully. The chapter you want to include should exist. - Test case:
include chapter
Expected output: A prompt for which chapter to be included will be shown and you can enter an existing chapter which you want to include. - Other incorrect commands to try:
include blah(where the argument is not module/chapter) Expected output: An error message stating that only module/chapter should be specified will be shown.
- Prerequisites: Launch