KAJI - User Guide
By: Team CS2113T-F11-3 Since: August 2020
Table of Contents
-
Overview
1.1. About KAJI
1.2. About this User Guide
1.3. Understanding the Command Line Interface (CLI)
1.4. Understanding KAJI
1.4.1. Content Management
1.4.2. Schedule Management
-
Quick Start
-
Features
3.1. Admin Level
3.1.1. Adding a module:add
3.1.2. Listing modules available:list
3.1.3. Editing a module name:edit
3.1.4. Removing a module:remove
3.1.5. Accessing the module level:go
3.2. Module Level
3.2.1. Adding a chapter:add
3.2.2. Listing chapters available:list
3.2.3. Editing a chapter name:edit
3.2.4. Removing a chapter:remove
3.2.5. Accessing the chapter level:go
3.2.6. Returning to admin level:back
3.2.7. Starting a revision session:revise
3.2.8. Rescheduling a chapter:reschedule
3.3. Chapter Level
3.3.1. Adding a flashcard:add
3.3.2. Listing flashcards available:list
3.3.3. Editing a flashcard content:edit
3.3.4. Removing a flashcard:remove
3.3.5. Returning to module level:back
3.3.6. Checking overall performance for a chapter:showrate
3.4. Scheduling in KAJI
3.4.1. Listing the chapters due for today:due
3.4.2. Listing the chapters that are due in the upcoming week:preview
3.4.3. Adding chapters to your list of excluded modules:exclude
3.4.4. Removing chapters from the list of excluded modules:include
3.5. General
3.5.1. Showing a list of commands available:help
3.5.2. Viewing the revision history:history
3.5.3. Exiting the program:exit
-
Command Summary
4.1. Admin Level
4.2. Module Level
4.3. Chapter Level
4.4. Scheduling in Kaji
4.5. General
1. Overview
This section gives an overview about KAJI and the purpose of this user guide.
1.1. About KAJI
In your past learning experience, have you encountered these problems? A large number of lecture notes and materials have made your computer desktop messy, and there is no way to find the materials you want. When the exam is approaching, you don’t know which subject to review first, or suddenly find that you have forgotten everything you learned before. No one wants to forget what they have dedicated time to learn.
Don’t worry! KAJI will help you solve all these problems!
Kaji is a schedule manager that implements Spaced Repetition, optimised for use via a Command Line Interface (CLI).
1.2. About this User Guide
This User Guide explains how to use KAJI. It provides an understanding of the features and commands, as well as some common use cases of this application.
In this guide, we cover:
- How to use the Command Line Interface (CLI)
- Syntax of the commands available in different levels in KAJI
- Common use cases for each command
- Summary of all the commands
1.3. Understanding the Command Line Interface (CLI)
To use KAJI, you have to first know the Command Line Interface, the platform that KAJI runs on. However, as we have simplified the interface for you, here is a simplified introduction that will cover everything you need to know about the CLI to use KAJI.
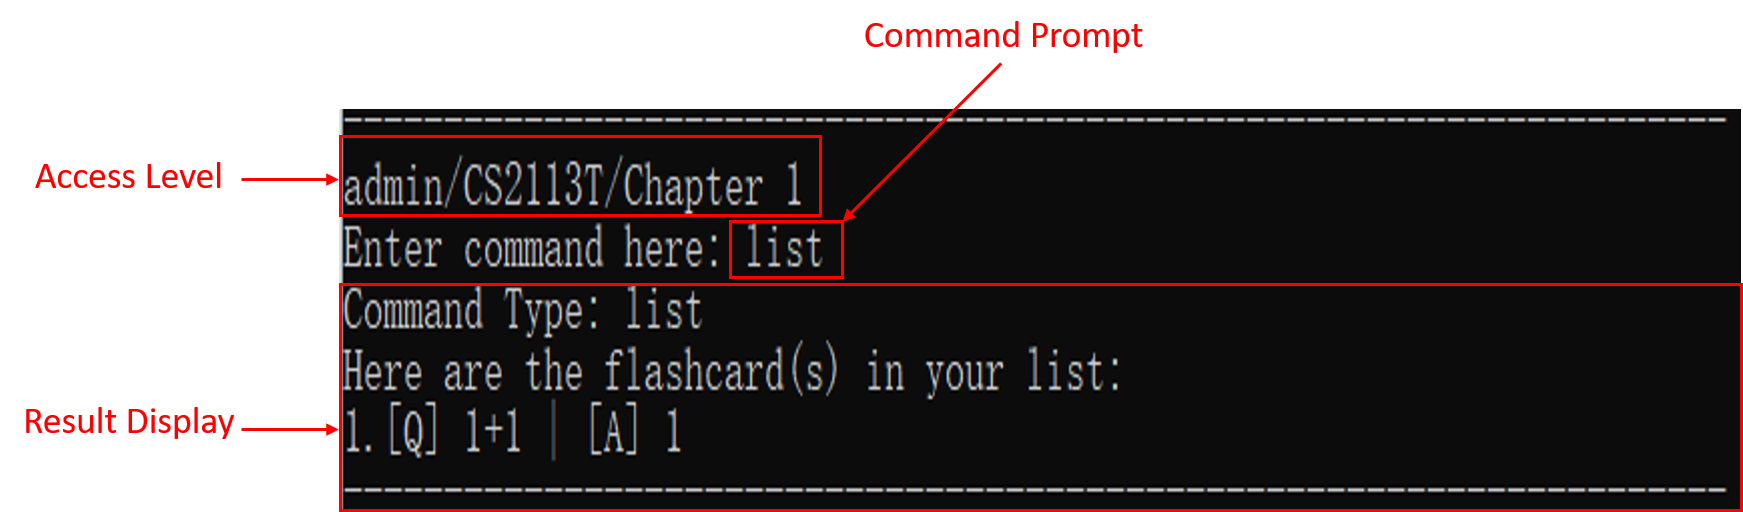
Figure 1. KAJI CLI Layout
- Command Prompt: This is where you enter your commands
- Access Level: This displays the access level that you are currently at
- Result Display: This displays feedback and other useful information about your commands that you have just entered
1.4. Understanding KAJI
1.4.1. Content Management
KAJI’s content management system is similar to a physical folder which you may use to organize your lecture handouts.
KAJI manages content in four different levels, they are the Admin Level, the Module Level, the Chapter Level and the Flashcard Level:
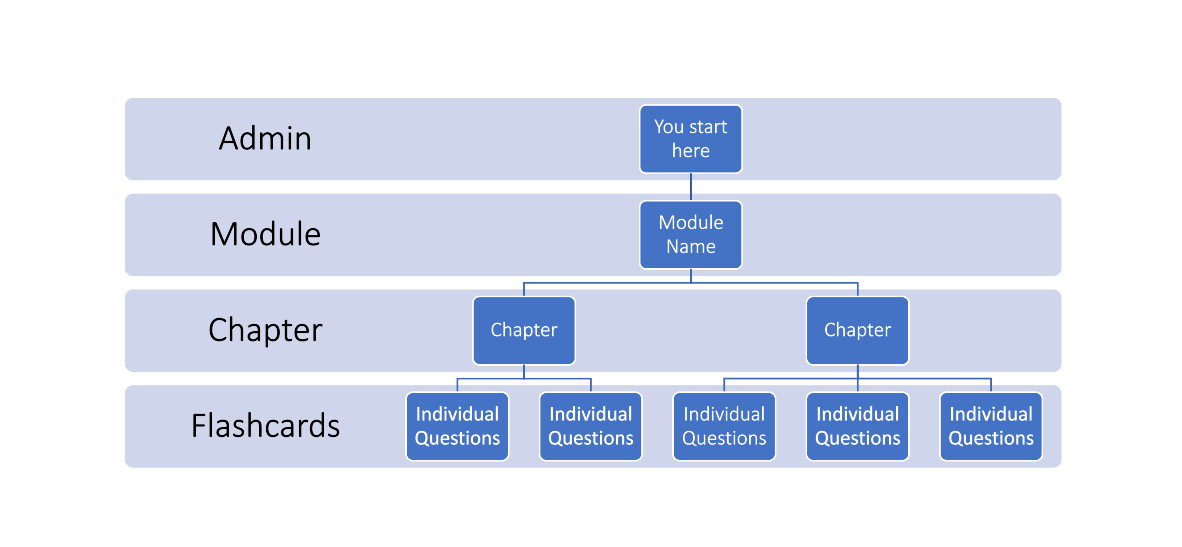
Figure 2. Content Management Diagram
- Admin Level is like your bookshelf to keep all the separated module folder in place.
- Module Level is like a folder to keep all your lecture notes and materials by different module codes.
- Chapter level is like an index sticker which organizes different pieces of information into its relevant chapters.
- Flashcard level is all the primary notes and material which you have collected for your modules. With KAJI’s assistant, you can easily categorise your messy notes into organized structure.
When you start our program, you begin on the Admin Level, indicated by the prompt “admin” as shown here.
To add/modify/remove elements of a certain level, you have to be on the level above it.
- E.g. to create a new Module in the Module Level, you have to be on the Admin Level
- E.g. to create a new Flashcard in the Flashcards Level, you have to be on the Chapter Level
Refer to Features below for details of each command.
1.4.2. Schedule Management
Your biggest reason to use KAJI lies in KAJI’s ability to provide you with the full benefits of “Spaced Repetition” without you having to do the tedious manual work involved. To accomplish this, KAJI comes with an automated Schedule Management feature that will facilitate the “Spaced Repetition” scheduling process for you.
To find out more about how you can utilise the feature and even customise it to your liking, find out more below.
2. Quick Start
To get started on this application, please perform the following steps:
- Ensure that you have Java 11 or above installed.
- Download the latest version of
KAJIfrom here. - Copy the file to an empty folder you want to use as the home folder for your KAJI.
- Open a command window in the folder you saved KAJI and run the command
java -jar kaji.jar. You should get the output as shown below:

- Type the command in the command window and press Enter to execute it.
e.g. typing
helpand pressing Enter will show the list of commands available.
Some example commands you can try:-
help: Lists all commands available. -
exit: Exits the app.
-
- Refer to Features below for details of each command.
3. Features
This section introduces the syntax and usages of the commands for the features available in KAJI. In explaining the syntax, do take note of the following command format which applies to all KAJI commands:
- Words in
UPPER_CASEare the parameters that you need to provide.-
Example: In
add MODULE_NAME,MODULE_NAMEis a parameter which can be used asadd CS2113.
-
Example: In
- Parameters cannot be given in any order.
-
Example: In
edit MODULE_INDEX MODULE_NAME, enteringedit CS2113 1will result in an error as theMODULE_INDEXandMODULE_NAMEparameters are in the wrong order.
-
Example: In
- The
INDEXthat is used for various commands is a number used to identify a module/chapter/flashcard within the list. TheINDEXof a module/chapter/flashcard is shown one the left of each module/chapter/flashcard whenever alistcommand is used.- Example of index:

- Example of index:
3.1. Admin Level
This section introduces the syntax and usages of the commands for the features that are available at the Admin Level.
Ensure that you are at the Admin Level before trying the commands in the next few sections:

3.1.1. Adding a module: add
Welcome to the first feature of KAJI! In order to use this program, you first will need to create a module deck. Creating a new module deck in KAJI is like getting a new folder to store all the handouts for one module. This is important because it helps you to organize your messy notes.
Format: add MODULE_NAME
MODULE_NAME is the name of the new module that you would like to create, such as CS2113, Module 1 or Biology.
Here are some key pointers:
- KAJI does not allow duplicate of module names, therefore, if the existing module has the same name as the new module, you will get an error message.
- KAJI is not case-sensitive, therefore, a new module named
modulewill be treated equally to a module namedMODULE. - KAJI only allows creation of one module with the
addcommand. If you enter commandadd CS2113T CS2101will creates a module namedCS2113T CS2101, instead of two separated modules namedCS2113TandCS2101respectively.
Example:
In this example, you are going to add a new module called CS2113T.
Below are steps of using this add command:
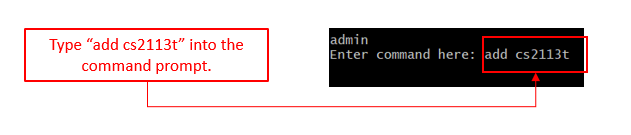
- Step 1: Enters the command
add CS2113Tinto the command prompt. Your new module name comes after the key wordadd.

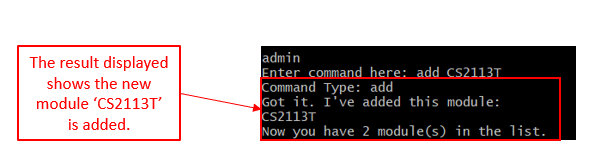
- Step 2: As shown below, a new module named
CS2113Thas just been created! You are free to edit, delete and access this module!
This is an additional example to show you the unique property of KAJI’s add feature.
As you may aware from Key Pointers section above, KAJI is case-insensitive. This example belows shows you what will happen if you try to add a new module called cs2113t after completing the previous example.
Below are the breakdown of this example:
- Step 1: Types
add cs2113tto add a new module namedcs2113tafter adding a module namedCS2113Twhich essentially have a same name as our new module but in capital letters.
- Step 2: Opps, Kaji refuses to add the module
cs2113tbecause a module with the same name is already existed!

This is another additional example to show you the unique property of Kaji’s add feature.
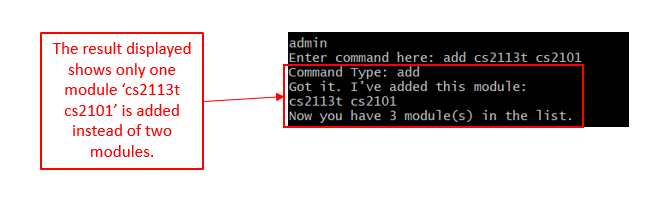
As you may aware from Key Pointers section above, Kaji only allows addition of one new module each time. Let’s see what will happen if you try to add two modules cs2113 cs2101 at same time.
Below are the breakdown of this example:
- Step 1: Types
add cs2113t cs2101and attempts to add a new module namedcs2113tand another new modulecs2101.

- Step 2: Opps, Kaji has interpreted it as one single module with the name of
cs2113t cs2101, instead of two seperate modules.
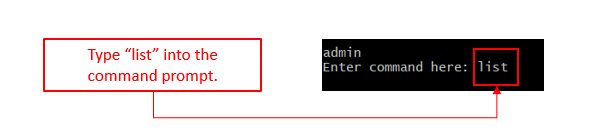
3.1.2. Listing modules available: list
After adding modules to the admin, you can view the list of modules that you have for the admin by using the list command.
Format: list
Here are some key pointers:
- Do not need to add parameter
adminafterlist. - All list commands have the same command word
list.
Example:
- Step 1: Type
listinto the command prompt and pressEnterto execute it.

- Step 2: The result for the list of modules will be displayed as shown.

- After listing all modules, you can try all commands available in Admin Level.
3.1.3. Editing a module name: edit
You can edit the name of an existing module from the list of modules by using the edit command, followed by the edited name of the module.
Format: edit MODULE_INDEX MODULE_NAME
Here are some key pointers:
- You can only edit content on the level below the one you are on.
- The
MODULE_INDEXrefers to the index number shown in the displayed content list. - The
MODULE_INDEXmust be a positive integer 1, 2, 3, … - The
MODULE_NAMEis the edited name of your module.
Example:
Let’s say you want to edit the module name to CS2113T for the module cs2113.
- Step 1: Type
listinto the command prompt and pressEnterto execute it.

- Step 2: From the list of modules displayed, you can see that the module
MODULE_INDEXis 1.

- Step 3: Next, you can type
edit 1 CS2113Tinto the command prompt and pressEnterto execute it.

- Step 4: After the module name has been successfully edited, the result will be displayed as shown.

- After editing the module name, you can try all commands available in Admin Level.
3.1.4. Removing a module: remove
Removes a module from KAJI.
Format: remove MODULE_INDEX
Here are some key pointers:
- Removes the module based on the index provided.
-
MODULE_INDEXrefers to the index number shown in the current module list. - Index provided must be a positive integer 1, 2, 3, …
Example:
For instance, you are currently at the admin level and want to remove the module CS2113T, the steps to do so are shown below:
- Step 1: Enter the command
remove 1to remove the first module in the list which in this case isCS2113T:

- Step 2: The module as well as the chapters and flashcards in it are removed, and the output message below will be shown:

3.1.5. Accessing the module level: go
Now you have learnt how to create, edit and delete the module deck, let’s move to the next page. You can now access the module deck you have created by using the command go MODULE_INDEX.
Format: go MODULE_INDEX
Here are some key pointers:
- Kaji only allow access to the existing modules that are shown in the list, therefore, module that is deleted or has never been created will result in an error message.
-
MODULE_INDEXmust be a positive integer 1, 2, 3, …, and must be a valid index number for a module as displayed from the list of module.
Example:
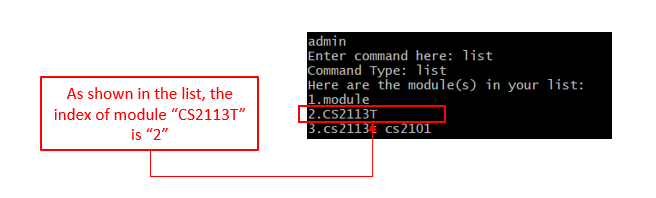
In this example, you are going to access the module CS2113T that you have created in the previous sections.
Below are steps of using this go command:
- Step 1: Uses
listcommand to check the index of the module that you would like to access.
- Step 2: In this example, the module you would like to access is
CS2113Tand its index is2as shown as the diagram below.
- Step 3: You can type
go 2to access this module.
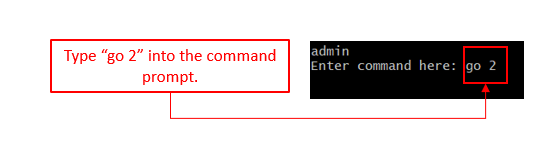
- Step 4: As shown below, you are now at a module level named CS2113T
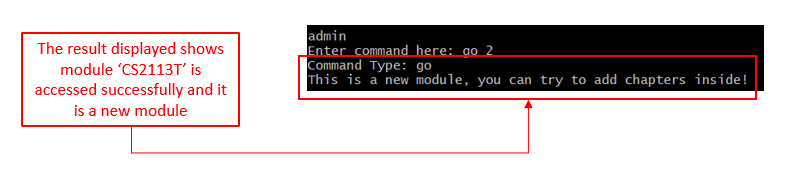
- Step 5: You may double check your access using the command prompt directory displayed on top of
Enter command here:. As shown as the diagram, your current access directory is underAdmin/CS2113T.

3.2. Module level
This section introduces the syntax and usages of the commands for the features that are available at the Module Level.
Ensure that you are at the Module Level before trying the commands in the next few sections:

3.2.1. Adding a chapter: add
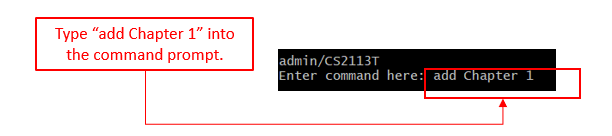
You are now at the module level! This command allows you to create a new chapter inside your current module deck. It belongs to the module level you are currently in. It is like preparing an empty paper to write notes for a lecture. Let’s create a new chapter inside the module!
Format: add CHAPTER_NAME
CHAPTER_NAME is the name of the new chapter that you would like to create, such as Topic 1, Chapter 1 or Newton's laws of motion.
Here are some key pointers:
- Similar to module, KAJI does not allow duplicate of chapter names, therefore, if the existing chapter has the same name as the new chapter, you will get an error message
- KAJI is not case-sensitive, therefore, a new chapter named
chapterwill be treated equally to a module namedCHAPTER.
Example:
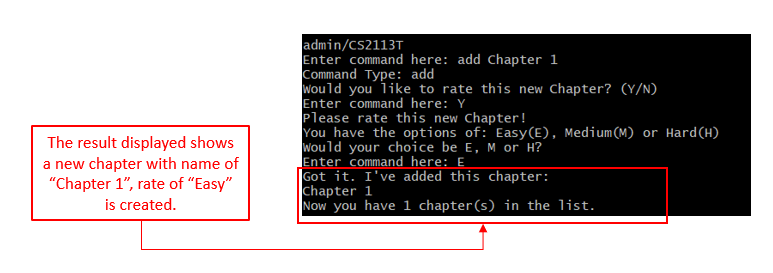
In this example, you are going to add a new chapter called Chapter 1.
Below are steps of using this add command:
- Step 1: Enters the command
add Chapter 1into the command prompt which your new chapter name comes after the key wordadd.
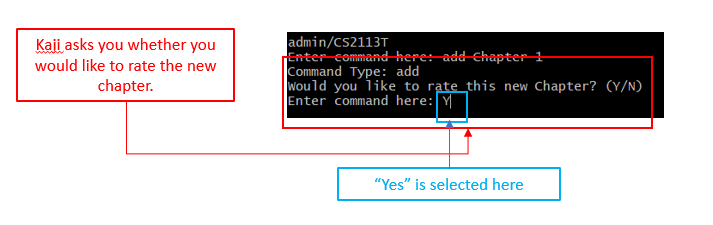
- Step 2: In Kaji, you can give new chapters a rate to pre-set its revision schedules. If you would like to keep it as fault state, you can simply enter
N. To demonstrate this feature fully, you may enterYto rate the new chapter and check out how will Kaji responses!
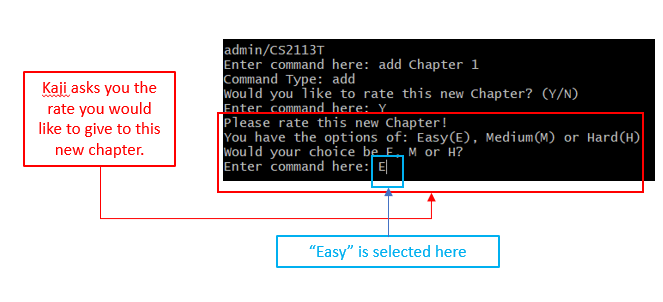
- Step 3: You choose to rate the new chapter from the previous step, therefore, you can rate your chapter as
Easy,MediumorHardby enteringE,MandHas shown as the instruction given by Kaji.
- Step 4: You have just created a new chapter! Good Job!
3.2.2. Listing chapters available: list
After adding chapters to the module, you can view the list of chapters that you have for the module by using the list command.
Format: list
Here are some key pointers:
- Do not need to add parameter
module_nameafterlist. - All list commands have the same command word
list.
Example:
- Step 1: Type
listinto the command prompt and pressEnterto execute it.

- Step 2: The result for the list of chapters will be displayed as shown.
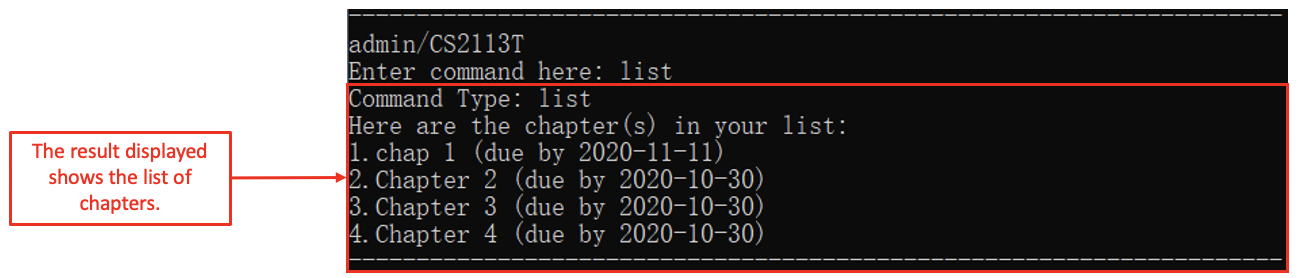
- After listing all chapters, you can try all commands available in Module Level.
3.2.3. Editing a chapter name: edit
You can edit the name of an existing chapter from the list of chapters.
You can do so by using the edit command, followed by the edited name of the chapter.
Format: edit CHAPTER_INDEX CHAPTER_NAME
Here are some key pointers:
-
CHAPTER_INDEXmust be a positive integer 1, 2, 3, …, and must be a valid index number for a chapter as displayed from the list of chapters. -
CHAPTER_NAMEis the edited name of your chapter.
Example:
Let’s say you want to edit the chapter name to Chapter 1 for the chapter chap 1.
- Step 1: Type
listinto the command prompt and pressEnterto execute it.

- Step 2: From the list of chapters displayed, you can see that the chapter
CHAPTER_INDEXis 1.

- Step 3: Next, you can type
edit 1 Chapter 1into the command prompt and pressEnterto execute it.

- Step 4: After the chapter name has been successfully edited, the result will be displayed as shown.

3.2.4. Removing a chapter: remove
Removes a chapter from KAJI.
Format: remove CHAPTER_INDEX
Here are some key pointers:
- Removes the chapter based on the index provided.
-
CHAPTER_INDEXrefers to the index number shown in the current chapter list. - Index provided must be a positive integer 1, 2, 3, …
Example:
For instance, you are currently at the module level CS2113T and want to remove the chapter Chapter 1, the steps to do so are shown below:
- Step 1: Enter the command
remove 1to remove the first chapter in the list which in this case isChapter 1:

- Step 2: The chapter and the flashcards in it are removed, and the output message below will be shown:

3.2.5. Accessing the chapter level: go
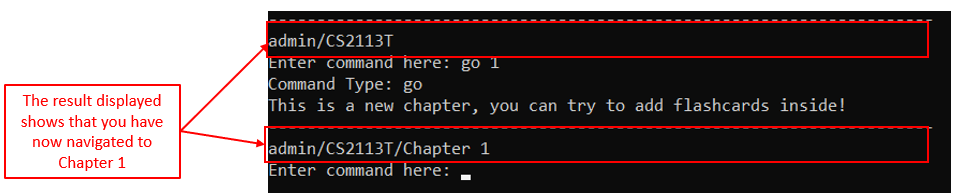
Proceeds to the Chapter Level with reference to one of the Chapters within the module.
Format: go CHAPTER_INDEX
Example:
For instance, you are currently in Module level CS2113T and want to head to Chapter level Chapter 1 , the steps to do so are shown below:
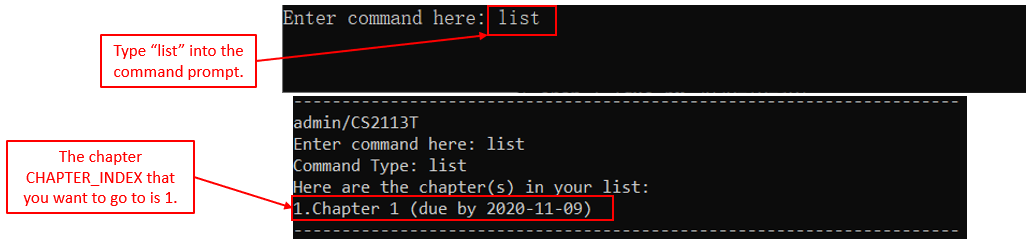
- Step 1: Enter the command
go 1and press [Enter] to head down to the Chapter level below:

-
Upon completion: This is what you will see:
- You should return to the Admin level as shown below:
- You should return to the Admin level as shown below:
3.2.6. Returning to admin level: back
Returns to the Admin level.
Format: back
Example:
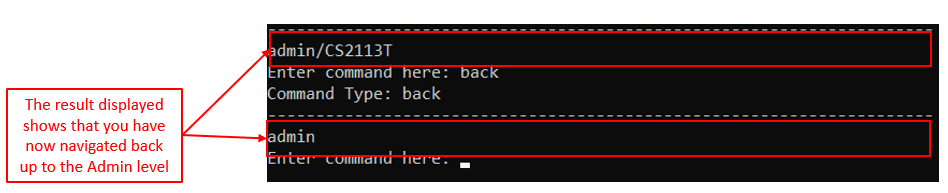
For instance, you are currently in Module level CS2113T and want to return to the Admin level, the steps to do so are shown below:
- Step 1: Enter the command
backand press [Enter] to return to the previous level which is the Admin level:

-
Upon completion: This is what you will see:
- You should return to the Admin level as shown below:
- You should return to the Admin level as shown below:
3.2.7. Starting a revision session: revise
Starts a revision session for a chapter.
Format: revise CHAPTER_INDEX
Here are some key pointers:
- Revision can only be done at module level.
- Starts a revision based on the index provided.
- The index refers to the index number shown in the chapter list for the module level you are currently in.
- Index provided must be a positive integer 1, 2, 3, …
Example:
For instance, you are currently in the module level CS2113T and want to start a revision for Chapter 1, the steps to do so are shown below:
- Step 1: Enter the command
revise 1to start a revision on the first chapter in the list which in this case isChapter 1:

- Step 2: If the chapter is not due for revision yet, you will be shown the below message:

- Step 3: Enter
Yto start the revision.

- Step 4: The message below will be shown at the start of the revision:

- Step 5: The question of the flashcard will be shown as well:

- Step 6: Enter
sto see the answer for the flashcard:

- Step 7: Based on the difficulty of the flashcard, you may enter either
e/m/h/cto rate the flashcard as shown below:

- Step 8: If you entered
c, the same flashcard will be shown again after your last flashcard, and the process will repeat until you entere/m/hfor the particular flashcard you could not answer for.
- Step 9: Once all the flashcards have been revised, the output message below will be shown:

3.2.8. Rescheduling a chapter: reschedule
You can reschedule the due date of an existing chapter from the list of chapters.
Rescheduling a chapter allows you to reschedule a chapter to an earlier or later date than the specified due date.
You can do so by using the reschedule command, followed by the due date that you want to reschedule the chapter to.
Format: reschedule CHAPTER_INDEX DATE
Here are some key pointers:
-
CHAPTER_INDEXmust be a positive integer 1, 2, 3, …, and must be a valid index number for a chapter as displayed from the list of chapters. -
DATEis the rescheduled due date of your chapter. -
DATEshould be in the formatyyyy-MM-dd.
Example:
Let’s say you want to reschedule the due date to 2020-12-20 for the chapter Chapter 1.
- Step 1: Type
listinto the command prompt and pressEnterto execute it.

- Step 2: From the list of chapters displayed, you can see that the chapter
CHAPTER_INDEXis 1.

- Step 3: Next, you can type
reschedule 1 2020-12-20into the command prompt and pressEnterto execute it.

- Step 4: After the due date of the chapter has been successfully rescheduled, the result will be displayed as shown.

3.3. Chapter Level
This section introduces the syntax and usages of the commands for the features that are available at the Chapter Level.
Ensure that you are at the Chapter Level before trying the commands in the next few sections:

3.3.1. Adding a flashcard: add
After adding a new chapter, the first thing you might want to do is to add a flashcard to the chapter.
You can do so by using the add command, followed by the details of the flashcard.
Format: add q:QUESTION | a:ANSWER
Here are some key pointers:
-
QUESTIONis the question of your flashcard. -
ANSWERis the answer of your flashcard. - You need to type
q:before theQUESTIONparameter. - You need to type
a:before theANSWERparameter. - Having
|betweenq:QUESTIONanda:ANSWERis required.
Example:
Let’s say you want to add a new flashcard with 1+1 as the QUESTION and 2 as the ANSWER:
- Step 1: Type
add q:1+1 | a:2into the command prompt and pressEnterto execute it.

- Step 2: After the flashcard has been successfully added to the chapter, the result will be displayed as shown.

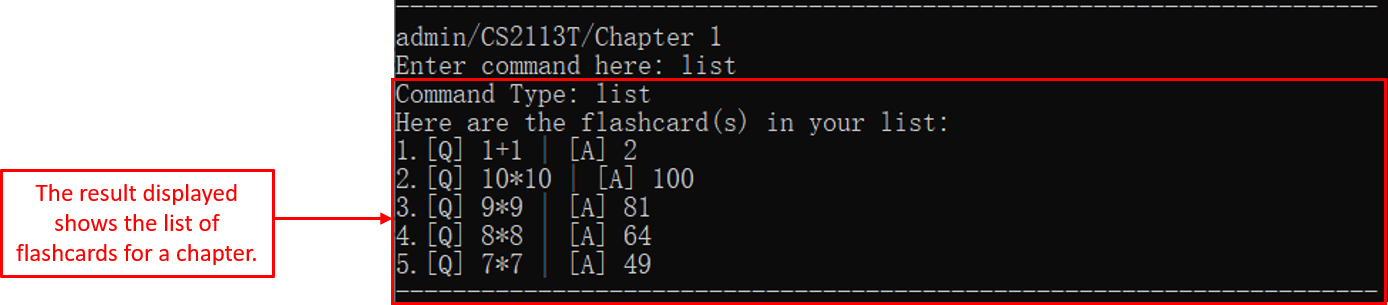
3.3.2. Listing flashcards available: list
After adding flashcards to the chapter, you can view the list of flashcards that you have for the chapter.
You can do so by using the list command.
Format: list
Here are some key pointers:
- You cannot type in any parameters after the
listcommand.
Example:
Let’s say you want to view all the flashcards for a chapter:
- Step 1: Type
listinto the command prompt and pressEnterto execute it.

- Step 2: The result for the list of flashcards will be displayed as shown.
3.3.3. Editing a flashcard content: edit
You can edit the question and/or answer of an existing flashcard from the list of flashcards.
You can do so by using the edit command, followed by the details of the flashcard.
Format:
- Editing question and answer:
edit FLASHCARD_INDEX q:QUESTION | a:ANSWER
- Editing question only:
edit FLASHCARD_INDEX q:QUESTION | a:
- Editing answer only:
edit FLASHCARD_INDEX q: | a:ANSWER
Here are some key pointers:
-
FLASHCARD_INDEXmust be a positive integer 1, 2, 3, …, and must be a valid index number for a flashcard as displayed from the list of flashcards. -
QUESTIONis the edited question of your flashcard. -
ANSWERis the edited answer of your flashcard. - You need to type
q:before theQUESTIONparameter. - You need to type
a:before theANSWERparameter. - Having
|betweenq:QUESTIONanda:ANSWERis required. - If the question or answer of your flashcard does not need to be edited,
you do not need to type any content for the parameter
QUESTIONorANSWER.
Example:
Let’s say you want to edit the question to 2*1 for the flashcard that has 1+1 as the question and 2 as the answer.
- Step 1: Type
listinto the command prompt and pressEnterto execute it.

- Step 2: From the list of flashcards displayed, you can see that the flashcard
FLASHCARD_INDEXis 1.
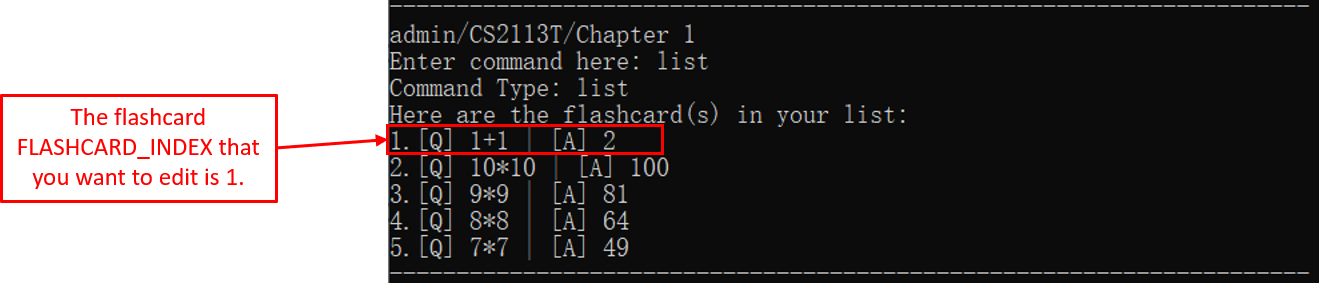
- Step 3: Next, you can type
edit 1 q:2*1 | a:into the command prompt and pressEnterto execute it.

- Step 4: After the flashcard has been successfully edited, the result will be displayed as shown.

3.3.4. Removing a flashcard: remove
Removes a flashcard from KAJI.
Format: remove FLASHCARD_INDEX
Here are some key pointers:
- Removes the flashcard based on the index provided.
-
FLASHCARD_INDEXrefers to the index number shown in the current flashcard list. - Index provided must be a positive integer 1, 2, 3, …
Example:
For instance, you are currently at the chapter level Chapter 1 and want to remove the flashcard [Q] 1+1 | [A] 2, the steps to do so are shown below:
- Step 1: Enter the command
remove 1to remove the first flashcard in the list which in this case is[Q] 1+1 | [A] 2:

- Step 2: The flashcard is removed, and the output message below will be shown:

3.3.5. Returning to module level: back
Returns to the module level.
Format: back
Example:
For instance, you are currently in chapter level Chapter 1 and want to return to the module level CS2113T, the steps to do so are shown below:
- Step 1: Enter the command
backto return to the previous level which is the module level:

- Step 2: You should return to the module level as shown below:

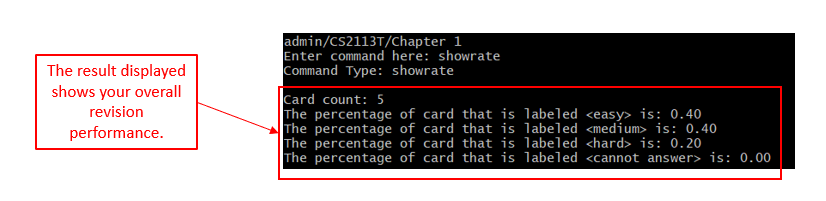
3.3.6. Checking overall performance for a chapter: showrate
Congratulations! You have learnt how to add flashcards and revise your flash cards, and now is the time to check your overall performance for a chapter.
It is very simple, all you have to do is to enter the command showrate in prompt.
Format: showrate
Here are some key pointers:
- This command is only accessible in the chapter level. You will get an error message if you are in the wrong access level.
- Only overall performance of your current chapter level will be computed.
- Cards that has yet be answered will be label as
, therefore, if you find a `1.0` for `the percentage of cards that is labeled `, don't panic, it will be updated as soon as you finish your first revision session of this particular chapter.  Note: As you now know, it is the level which you can add/edit/delete cards.
Example:
For instance, you would like to check your overall performance after completing several rounds of revision.
Below are steps of using this showrate command:
- Step 1: Type “showrate” into the command prompt while you are in a chapter level.

- Step 2: Kaji calculates the percentage of card in different master level (i.e.
easy,medium,hardandcannot answer).
3.4 Scheduling in KAJI
Now that you know how to make KAJI manage your Database of revision content for you, what about scheduling? For your benefit, the scheduling in KAJI is mostly automated!
You don’t have to do a thing to enjoy the benefits of Spaced Repetition. Everything is scheduled for you, so all you have to do is to use the commands due and preview to view what chapters are due and complete the revision for them accordingly.
Despite that, this does not mean that you cannot customise the scheduling process. KAJI allows you to reschedule, include and exclude Chapters manually if you wish to do so, but more on that later. First, let us get into the specific introduction of each command.
3.4.1. Listing the chapters due for today: due
As you now know, each Chapter will be scheduled to be due on a date. However, it will be tedious for you to go through each chapter one by one to find their deadlines. Our solution to that, is the due command.
The due command simplifies the process for by showing you the Chapters that you have scheduled on that day and the Modules they belong to.
Format: due
Here are some key pointers:
- There are no parameters for this command.
- This command can be called from any Level
Example:
At any point, if you want to see what Chapters are due, all you have to do is enter the due command. Below is an example of an execution of the due command.
-
Step 1: Key the
duecommand into the prompt as shown below and press [Enter]

- Upon completion: This is what you will see:

3.4.2. Listing the chapters that are due in the upcoming week: preview
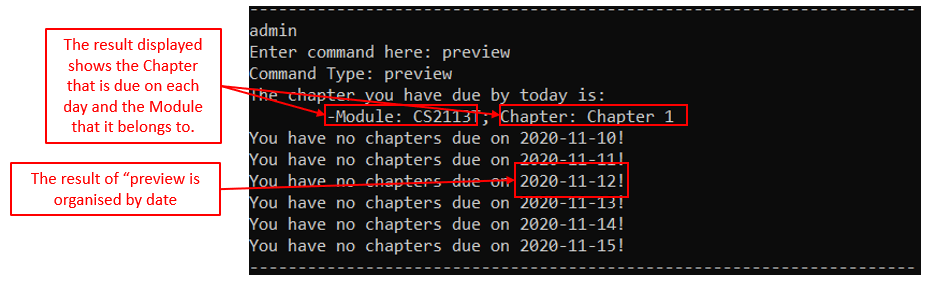
Beyond simply being able to view the Chapters that are due on the day itself, what if you would like to view your upcoming revision schedule so that you can plan ahead? For that specific purpose, we have the preview command.
The preview command shows you the Chapters that you have scheduled for each day of the upcoming week and the Modules that they belong to.
Format: preview
Here are some key pointers:
- There are no parameters for this command.
- This command can be called from any Level
Example:
At any point, if you want to see a preview of which Chapters are going to be due within the upcoming week, all you have to do is enter the preview command. Below is an example of an execution of the preview command.
-
Step 1: Key the
previewcommand into the prompt as shown below and press [Enter]

- Upon completion: This is what you will see:
3.4.3. Adding chapters to your list of excluded modules: exclude
Apart from viewing your schedule, what if the Semester has ended and you would like to take a Module or Chapter out of your schedule? If you were to remove the files from your database completely, it would be really tedious to add the content back Card by Card. Therefore, we created the exclude command.
The exclude command allows you to add a single Chapter or every Chapter from a Module to your Exclusion list so that you can remove these items from your schedule.
Format: exclude MODULE_OR_CHAPTER
The exclude command has two options for MODULE_OR_CHAPTER:
-
module: This option allows you to use
excludeto add all the Chapters from a Module into the Exclusion List. -
chapter: This option allows you to use
excludeto add a Chpater into the Exclusion List.
Here are some key pointers:
- This command can be called from any Level
- This command checks if the Chapter/Module you are adding into the Exclusion List exists, so the List will not be filled with non-existing exclusions.
- Do note that the name of the Chapter/Module you provide has to be in the correct case as our check is case-sensitive.
Example:
At any point, if you would like to add to your Exclusion List, all you have to do is enter the exclude command with the choice of “module” or “chapter” in the format specified above. Below are examples of the execution of the exclude command using both options.
Example of exclude module
-
Step 1: Key the
exclude modulecommand into the prompt as shown below and press [Enter]

- Step 2: Key the Module name that you wish to exclude from your schedule into the prompt as shown below and press [Enter]

- Upon completion: This is what you will see:

Example of exclude chapter
-
Step 1: Key the
exclude chaptercommand into the prompt as shown below and press [Enter]

- Step 2: Key the Module name of the Module that contains Chapter that you wish to exclude from your schedule into the prompt as shown below and press [Enter]

- Step 3: Key the Chapter name that you wish to exclude from your schedule into the prompt as shown below and press [Enter]

- Upon completion: This is what you will see:

3.4.4. Removing chapters from the list of excluded modules: include
However, what should be done if you had excluded the Chapters of a Module from your schedule, only to find that it is a prerequisite for another module the next semester. To prepare for the upcoming semester, you would like to revise the excluded content again. This is why we created the include command.
The include command allows you to remove a single Chapter or every Chapter from a Module from your Exclusion list so that you can add these items back into your schedule.
Format: include MODULE_OR_CHAPTER
The include command has two options for MODULE_OR_CHAPTER:
-
module: This option allows you to use
includeto remove all the Chapters from a Module from the Exclusion List. -
chapter: This option allows you to use
includeto remove a Chpater from the Exclusion List.
Here are some key pointers:
- This command can be called from any Level
- Do note that the name of the Chapter/Module you provide has to be in the correct case as our check is case-sensitive.
Example:
At any point, if you wish to remove from your Exclusion List, you can either enter the include command with the choice of either “chapter” or “module” in the format specified above. Below are examples of the command’s execution using both options.
Example of include module
-
Step 1: Key the
include modulecommand into the prompt as shown below and press [Enter]

- Step 2: Key the Module name that you wish to include back into your schedule into the prompt as shown below and press [Enter]

- Upon completion: This is what you will see:

Example of include chapter
-
Step 1: Key the
include chaptercommand into the prompt as shown below and press [Enter]

- Step 2: Key the Module name of the Module that contains the Chapter that you wish to include back into your schedule into the prompt as shown below and press [Enter]

- Step 3: Key the Chapter name that you wish to include back into your schedule into the prompt as shown below and press [Enter]

- Upon completion: This is what you will see:

3.5. General
This section introduces the syntax and usages of the commands for the features that are available at All Levels.
You can use the commands in the next few sections at Admin, Module and Chapter Level.
3.5.1. Showing a list of commands available: help
If you forget the format of some commands, you can find a list of commands available by using help command.
Format: help
Here is a key point:
- This command can be called from any Level.
Example:
- Step 1: Type
helpinto the command prompt and pressEnterto execute it.

- Step 2: Part the result for the list of commands will be displayed as shown.
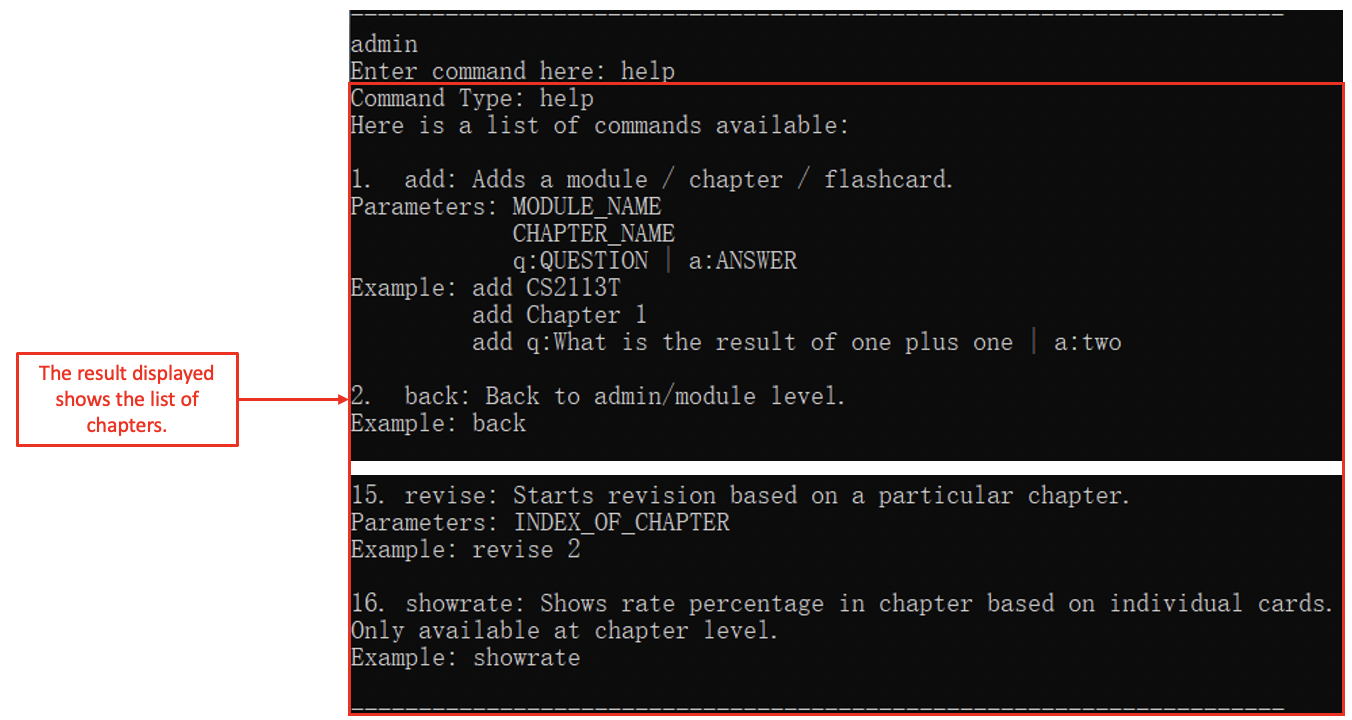
- After knowing what are the commands, you can try any commands on the correct level.
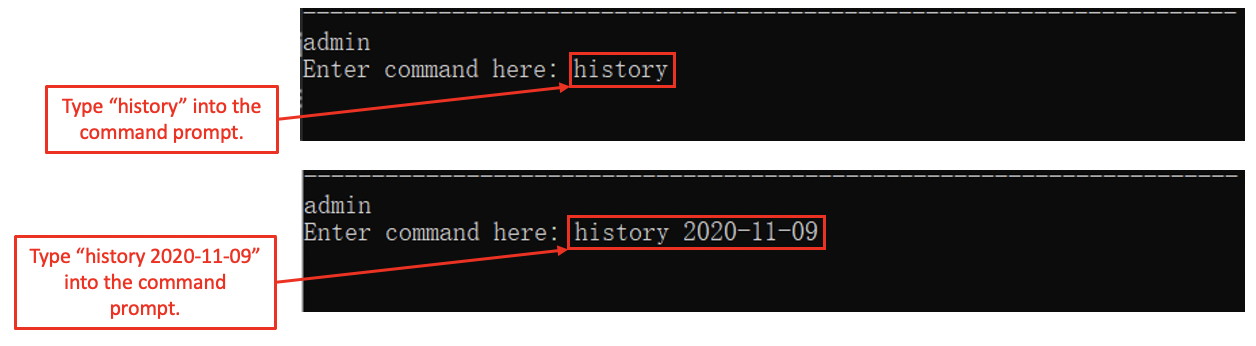
3.5.2. Viewing the revision history: history
You can view the revision completed in the session/in a day by using history command.
Format:
history
history DATE
Here are some key pointers:
- This command can be called from any Level.
- If you enter
history, Kaji will show the revision completed today (the day you enterhistory). - If you enter
history DATE, theDATEneed to be in the format of yyyy-mm-dd, then Kaji will show the revision completed on the given date.
Example:
Let’s say today is 2020-11-09 and you want to view the revision history today:
- Step 1: Type
historyorhistory 2020-11-09into the command prompt and pressEnterto execute it.
- Step 2: The result for the list of history will be displayed as shown.

- If you have not revised on 2020-11-09 this result will be displayed.

- After knowing the revision you have completed, you can try any commands on the correct level.
3.5.3. Exiting the program: exit
You can exit Kaji by using this command.
Format: exit
Example:
- Step 1: Type
exitinto the command prompt and pressEnterto execute it.

- Step 2: The result for the exit will be displayed as shown.

4. Command Summary
4.1. Admin Level
| Action | Format, Examples |
|---|---|
| Add Module |
add MODULE_NAME e.g. add CS2113T
|
| List Modules | list |
| Edit Module Name |
edit MODULE_INDEX MODULE_NAME e.g. edit 1 CS2113
|
| Remove Module |
remove MODULE_INDEX e.g. remove 1
|
| Access Module Level |
go MODULE_NAME e.g. go CS2113
|
4.2. Module Level
| Action | Format, Examples |
|---|---|
| Add Chapter |
add CHAPTER_NAME e.g. add Chapter 1
|
| List Chapters | list |
| Edit Chapter Name |
edit INDEX CHAPTER_NAME e.g. edit 1 Chapter 1
|
| Remove Chapter |
remove CHAPTER_INDEX e.g. remove 1
|
| Access Chapter Level |
go CHAPTER_NAME e.g. go Chapter 1
|
| Return Admin Level | back |
| Revise |
revise CHAPTER_INDEX e.g. revise Chapter 1
|
| Reschedule |
reschedule CHAPTER_INDEX DATE e.g. reschedule 1 2020-11-03
|
4.3. Chapter Level
| Action | Format, Examples |
|---|---|
| Add Flashcard |
add q:QUESTION | a:ANSWER e.g. add q:1+1 | a:2
|
| List Flashcards | list |
| Edit Flashcard |
edit FLASHCARD_INDEX q:QUESTION | a:ANSWER e.g. edit 1 q:2*1 | a:2
|
| Remove Flashcard |
remove FLASHCARD_INDEX e.g. remove 1
|
| Return Module Level | back |
| Show Rate | showrate |
4.4. Scheduling in KAJI
| Action | Format, Examples |
|---|---|
| List Due Chapters | due |
| Preview | preview |
| Exclude |
exclude MODULE_OR_CHAPTER e.g. exclude module or exclude chapter
|
| Include |
include MODULE_OR_CHAPTER e.g. include module or include chapter
|
4.5. General
| Action | Format, Examples |
|---|---|
| Help | help |
| Show Revision History |
history or history DATE e.g. history 2020-11-03
|
| Exit | exit |